Monday, May 03, 2021

Polly's Wanna Be of 'The Best Taiwanese KASUTELA / Castella" Cake


There are so many different postings in the YouTube about baking CASTELLA / KASUTELA.  And sometimes, all it takes is a good pic to motivate you to bake or cook.
And, I tried one found under "The Best Taiwanese Castella Cake" (by Molala cook),.  One big mistake I made was that I missed the instruction section about mixing the flour with heated cooking oil.  I was in a hurry, and according to a couple of other YouTubers that steps are important part of this Bain Marie Castella resulting with no big bubbles in the cake.  
Recipe:
8 inch square mold  - my U.S. brownie mold is 9" - line it up with Parchment paper to make 10 cm wall
8 Large Eggs - Separated - 8 Egg Yolks for the flour mixture
Cake Flour 105g 
Corn Starch 15g 
Corn Oil 95g  - I used my Avocado Oil and this is supposed to be microwaved! which I missed.
Milk 90g 
Salt 2g 
Lemon Juice 4g <<< I added it to my flour batter rather into meringue  But I will try next time to add it to the egg white the next time.
 
For Meringue:
Egg White 8 
Sugar 95g 
 
1. Sift cake flour, corn flour. 

2. Microwave corn oil for 1 minute and 45 seconds or (194'F) approx 88 - 90'C pour it into the flour immediately, and mix   << This is what I missed.  I thought it is a easy Chiffon Cake baked in bain marie, but I was wrong.  The texture of the flour mixed with oil would look like this.
3. Add milk and stir, then add egg yolk and stir 
 
4. Add salt and lemon juice to the egg white, add sugar in three portions, beat until firm peak forms
 
Preheat up to 165 C Degree - 325'F
*Normally, everyone wants the oven preheated at the beginning of the prep work, but I don't like hot kitchen, so I time it to turn it on  10-15 minutes befor I use it.
 
5.  Add 1/3 of the meringue into the batter.  Use "Fold" in method to mix in meringue.  Add the 2nd 1/3, then, transfer the batter into meringue bowl, and complete the fold in.  
Transfer the batter into prepared cake mold line with parchment paper.
 
6.  Heat enough water to 70'C to cover the large cake pan half way for Bain Marie  Place the cake mold.  Fill more water to bring up the water half way of the cake mold.
 
7.   Bake for about 65 minutes at 155 C degrees and 165 C degrees - 325'F.
*Do not open the oven door until well into 55 minutes at least and top is browned.
 
8.   The cake should have a nice brown top and would not dent it when touched.   Tester comes out dry.
9.   Remove from the oven.  Lift up at the parchment mold onto a cutting board while still hot. 
10.  Remove the parchment paper all around while the cake is still hot..  
11.  Slice the cake while hot.  
 
 
 I think this Meringue is overbeaten.  I was busy mixing egg yolk and ignored my timer beep and let it beat 2 more minutes and resulted in dry meringue.  
Beat egg white into firm peak, but not dry clump like this.  It should be smooth, shiny firm peak. 

I didn't have a large single sheet parchment paper to form into a mold wall about 10cm high.  I used 4 sheets overlaying each other instead.

Bain Marie.

After 70 min.
Looks great!.  Take out right away and remove the parchment paper gently while the cake is still hot.
Trim away the sides (and gobble them up) to make into a beautiful sides.   You can see that I didn't.  It's only for me.  No need to waste.
Slice it in sawing motion.


Different lighting make the cake look whiter or yellowish, but actually, the bottom pic in yellow color is the right ones.
 A day in refrigerator is also a good idea in a closed lid container lined with parchment paper.  The cake is moist and soft.


Polly's Dragonfruit Plant Dillema

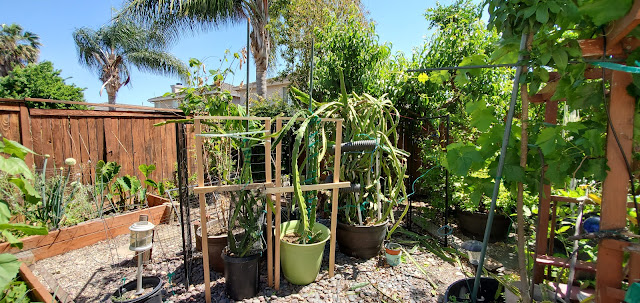
 After five? years, (can't remember how long since I raised it from seeds) my Dragonfruit plant survived the Sacramento sun and had fruited 2 - two beautiful Dragonfruits last year in the fall.   Because I was not sure of its survivability in my backyard - full sun from morning till sunset, I let it grow as much as possible.  It basically grew wild.  Out of its forms.  I let new shoots grow as much as it wanted to make sure if one dies, there are new shoots to take over.  It's has been a lot of work to keep them alive.  As soon as night temp drops to 35'F, these plants are insulated.  I use a  dog cage (my make shift green house idea) with clear shower curtains and Holiday Light to insulate them over the winter, but understanding not to water them during the winter and treat them like cactus definitely helping.  The medium size Dragonfruit plant in the green planter is a offshoot from the original.  It seems to have acclimated itself also and is doing well.  I built it a frame to lean its long arms over it.  Because they are not planted into the ground, the frame has to be free standing, I thought. I will need to recage the dog house, cover it again with clear cover and with holiday light for the winter again, so the frame needs to be mobile.


2020 Fall.  Dragonfruit plant blossom.
Time to trim and shape.  5/2/21, Sunday.  What a mess!
Yesterday, I decided it's time to trim it up.  I don't think the planter is able to handle anymore for the size it has become. The other two smaller dragonfruits - RED dragon fruit which I was very lucky to have found at the local nursery being sold is doing well, but it too grew wild, too.  It's only one year old, but unlike mine that grew from the seeds, it seems to be handling Sacramento weather well. 


Time to trim off.

Decided to use anything available - flexible, round ... underground water drain hose I found in the storage would do.   I wrapped the red dragonfruit plant with flexible fence mesh first to stand all the limbs up, then placed a stake in the middle.  I noticed it has grown a few very long arms that really need propping up.  Bought some stakes to make frames.
Hmm... My saw is not seeing the same spot everytime time I turn it to cut the other side.  LOL.
It looks healthier I think.  They probably got a few tears, but I hope they will heal itself.

These are all the cuttings on the ground which can be replanted to grow more dragonfruit plants, but ... I think three is enough.  Their blossoms are awesomely beautiful under a moonlit night.  Can't wait to see them soon.

This vine is growing really strong this year.

I think I got the main vines under control.  I didn't want to trim off too much.   Maybe in fall, do one more trim.
This one is the youngest Red Dragonfruit plant.  I hope this one will survive the hot Sacramento sun.


My Lotus 2021

 Can't wait to see if the Lotus will bloom this year.
I think this one is supposed to be CHAWANBASU.  A smaller lotus than the Pink Lips
And this is supposed to be Pink Lips.  Gold fish and mosquito fishes are happy in there.  So hopefully the louts will bloom.

I tried to germinate one of the seed, but it looks like it might have damaged from water being too warm from the sun.  It's been since 4/13 and only a tiny green is showing.  Basically, after sanding off the hard shell.  The Lotus will germinate within a  week and start to shoot out real quick. 
These are the seeds I purchased from Amazon, and I am not sure if they would germinate to grow out.  Hadn't had any luck with any of the flower seeds shipped from China.  I think they zap them at some entry point and likely killed the seeds.
Oh, well.  Hopefully the Pink Lips replacement plant I purchased from https://tenmilecreeknursery.com/search?type=product&q=pink+lip Texas Water Lilies https://texaswaterlilies.com/ last year will bloom so I can save the seeds.  I know they will grow for sure from the seeds.  These are the new seeds from a bag of varieties.  So if the germination is a success, it will be surprise to see what they turn out.
Place the seeds in the jar for a couple of days to soften the shell.  Use a medium grade Sand paper to open an end.  Then, peel away.   Place them back in the jar filled with water.  Wait for germination.


Hmm... Not sure..
Update on the seed germination - No luck.  
After sprouting 1 inch it got no where.  They all died.
 
I am testing with three other seeds right now.  They seem to be doing well.   Here they are.


I remembered not to drown them this time.  Leaving leaflets afloat above the water.
Strong root system started to form.  These groups of seeds are doing great!


Time to plant them outside.
Right now, the update on the two new Lotus that arrived.  The roots look very healthy.  They seem to be thriving in the new planter.  I planted the large ones in this pot following the direction sent with the root shipment.   I planted the smaller ones in the grey pot next to it.


These are the new leaflets.
They seem to love the hot sun back in June.


This is last year's plant.  It was struggling at it's location.  I moved it to a bit shadier spot and lowered the water level.  It's happier and begin to grow more leaflets.
Added more water as it got used to the new pot.
This one had a poor start.  The top soil I purchased had some compost mixed in it even though I tried my best to buy one without it.  I had to dig into my garden to find Clay soil.  It was a poor idea because I know some spots in my garden had been sprayed with weed killer back in March.  But it it surviving.
July 18, 2021 Status:
Both two planters in the foreground are filled with the new lotus and they seem to be doing well.  The new germinated plants are thriving.  It may be too crowded though.  In anticipation that one or two would die from the hot Sacramento heat, I planted three different lotus in one small pot.   I just hope the roots would not bust open the planter, which one of the giant lotus pink lips have done a couple of years back.  It was a disaster and a sad ending that summer was.  A garden mesh fence is placed in front of the Lotus to keep the goldfish from "cooked".  Sunshading from hot 100+F temp to keep water cool for goldfish.  Sometime when the weather is above 100+F, I further place a piece of ground cloth cover over the temporary plastic mesh.
This large ones are one year old, but no Lotus buds in sight.
This one is the latest one with newly germinated lotus seeds and the new lotus purchased.
This one was infested with mosquito larvae a month ago.  Now it is all fixed with a pool of mosquito fish planted by CA Agriculture (for free).  It is quite happy.  This contains the germinated lotus and a small lotus roots I split off from the one I purchased this year (right next to the one in the above picture.)  I am very surprised that it is doing so well.   I will be waiting with anticipation to see what  lotus those rock hard "seed varieties surprise bag" I purchased will grow into. 
A Surprise!  I have never had a single lotus to form a bud in the first year of planting. 


I wonder what Lotus it is going to be.


Thesefeeder goldfish was only a inch long last year.  Sadly they dies a week ago. 
Farewell Goldfish.