Monday, October 19, 2009

Japanese Cotton Soft Cream Cheesecake


About a month ago, I came across this Japanese Cream Cheesecake. It is cotton soft and delicious. It is fluffy and light.
The recipe can be found at its original site:
http://www.recipezaar.com/Japanese-Cheesecake-90032
By: Maeva Recipe #90032 | 1 hour | 5 min prep

This is how mine turned out. 

Please check this blog for the new testing of Japanese Cotton Soft Cream Cheesecake 2010 Aug that I made.  The texture turned out quite differently when the mixing method is changed.  I like the new one much better.  http://rockdavinci.blogspot.com/2010/08/japanese-cream-cheesecake.html

Friday, October 16, 2009

Thai Premium Tea vs Thai Tea

More information on the Thai Tea fan.
There is Thai Tea without food color.
Obviously there are community of Thai tea loving citizens discussing how to make the best Thai Tea at home and concern with the food color in some of the Thai tea brand.
Sribhud Thai iced tea at http://www.patsongroup.com/premiumtea.htm
and at Wirun - the website is still under construction. http://www.thaiteasuwirun.com/
Both vendors claim to sale "Premium Thai Tea" without color added.
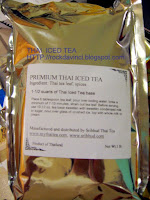
Update:  So, I finally got this Premium Thai Iced Tea, 1lb/pack from www.mythaitea.com or www.sribhud.com.
The taste is wonderful.  When you perk/brew it for 7-10 minutes, the aroma of the Black Tea is quite strong, so is the taste.  When the condensed milk and milk are added, mixed, and poured over the glass of ice - the taste is wonderful.  & the best -part - no food color.


Thursday, October 15, 2009

Polly's Pep Oatmeal Cookies

I thought I should type some recipes tonight, so here is one that I invented.  This is a cookie recipe I came up last year.  It is an excellent addition to your gorp to take along to the hiking trip.  It will give your taste bud an awakening experience and tired body a zing! from the surprise chili pepper in this Oatmeal cookies or bars?  The consistency of this cookie is close to a bar cookie rather than the soft chewy oatmeal cookies.

Yield:  24
Preheat Ovent to 350'F          Bake at 350'F 7 to 10 min.
Tools:  Measuring spoons, measuring cups, spatula, medium size microwavable glass mixing bowl, Cookie Sheet, Silipat (if you have one), or parchment paper (silicone base), cooling rack, oven mittens. Anything else you can think of.  :-)

Ingredients:
1 C Old Fashion Oatmeals
1 Stick Butter
1/2 C Pure Cane Sugar
1/2 tsp Soda
1/2 tsp Baking Powder
3/4 C AP Flour
1/8 tsp Kosher Salt
Chili Pepper Flakes

Procedures:
Mixing:
In a medium size glass bowl, Mix and Microwave - 1 Minutes -  1 Cup Oats and 1 Stick Butter first.
Stir to make sure that Oatmeal is somewhat cooked in the melted butter.
Take out and stir--becareful, it is hot.  Stir to COOL--about 2 minutes.
*Remember, you will be adding baking soda and powder, so the mixture should be cool.
Shift Flour, Baking Soda, and Baking Powder, Kosher Salt toghther.
Add them to the Oatmeal mixture.  Sprinkle in Chili Pepper Flakes - give a three shakes.
*Depending on the size of the holes of the chili pepper shaker or the amount you and your family or the loved ones can handle, sprinkle with care.
Use your hand to mush them together into a coarse meal.

Panning:
Prepare the cookie sheet with parchment paper or line it with Silipat.
Use a Tablespoon and scoop a tablespoon size dough onto the baking sheeting.
If you prefer a super large size cookies.   Go ahead.  Do it.
The dough will feel dry and crumbly.  So, form into the best shape that will hold together.  Round? Square? be creative.

Baking:
Bake for 7 to 10 minutes, depending on your oven's personality.
Take it out.

Cooling:
Do not transfer cookies off the cookie sheet.
Cool the sheet on top of the cooling rack -- so you won't burn your kitchen counter.

Serving:
Wrap them in foil or pack them in a sandwich bag to take along to your favorite hiking trip.
Enjoy!   oh, and don't forget to warn your friends about the surprise in it, the chili pepper flakes or don't forget to ask them if they are allergic to chili pepper, etc.

Fresh Homemade Salsa - for Chips and Dips and for Linguini


Here is a nice homemade salsa that works for two.  One for the chips and dips or serve with linguini.

Yield: Qty - 2 Cups
Tools:  Blender or food processor; measuring cups, cutting board, sharp chef knife; teaspoon, 1 Pint Size Mason Jar, Medium size Glass Bowl, small glass bowl (for lemon and lime juice); option - juicer.  Strainer for pasta, large cooking pot, 10" frying pan, salad spinner, wooden spatula or stir-fry spatula.  Pasta serving plate.

Ingredients:
1 large Ripe Tomato
2 Romano Tomatoes
Lime Juice from 3 Large Limes
Lemon Juice from 1 Large Lemon from home tree
1/2 of Medium Onion - Chopped finely
1/3 C Cilantro leaves
Dash of Kosher Salt
1/2 C Vinegar

Procedures:
Cut and deseed tomatoes.  Chop tomatoes into small chunks.
Chop up Onions as small as you can, but not minced.
Wash Cilantro well and if you have salad spinner, spin to remove excess water.
Tear off all the leaves.
Juice Limes and Lemons into a glass bowl.  --Cut lemons and limes into halves.  Hold the halved lemon in the palm of one hand and Insert a teaspoon to the center.  Wiggle the teaspoon back and forth to squeeze the juice out.  But, if you have a juicer or any other means to get juice out, that will work, too.
Put all in the Blender.  Process for 5 to 6 seconds at Pulse Speed.
Transfer to the Clean, very clean Mason Jar.
Serve or Keep in refrigerator.

Lemon Lime Shrimp and Mushroom Pesto Sauce over Linguini
Ingredients:
1 pkg Linguini - Boiled and strained
1 pkg Mushroom - washed, strained/dried, sliced or chopped
1 lb Precooked frozen shrimp or raw is okay, too.
1/4 Cup Pesto Sauce
3 TBsp Butter
Kosher Salt
Lemon juice - from 3 Lemons
Lime juice - from 2 Limes      *squeeze both juice into the same glass bowl
Dash of Red Chili Peppers

Procedures:

Boil Linguini to the softness your family like.  If you are carb conscience, buy the pasta with "protein" in it, which maybe better than the regular pasta for your diet.  & you can use Linguini or any other pasta of your choice for this dish. 

WASH, STRAIN/DRY, OR CUT:
I like to wash Mushrooms.  Wash them quickly and remove all the dirt and rinse thoroughly and quickly dry them.  If you have a salad spinner, spin dry them.
Slice them or Chop them up into small pieces.

If you have raw shrimps, wash them in salt water and rinse them well or use precooked shrimps - whichever, wash them with salt water and then with clear water.

STIR-FRY:
Stir fry - medium heat - mushrooms first in 10" frying pan with 3 TBsp of Butter.
Stir fry until you start to hear sizzling sound and juice from the mushrooms are drying up - approx. 10 minutes.
Add 1/4 CUP of Pesto Sauce.  Stir quickly and Add shrimps.
Stir fry - medium heat - until raw shrimps turn white and orangish - approx 3 min. Or if stir-frying precooked shrimps, then cook till they are heated through.
Add Lemon and Lime juice.
Add a dash of Red Chili Pepper, if you like to give a bit of kick.
Turn heat to high to sizzle everything.
Remove from heat.

SERVE:
Serve the sauce over the prepared pasta.


Serving Idea:  Serve Lemon Lime Salsa on top of Linquini, or the Lemon Lime Shrimp and Mushroom Pesto sauce over the Linguini.
Enjoy!

Wednesday, October 14, 2009

Palmiers and Pinwheels

 So the rest of the Puff Pastry dough was baked into Palmiers and Pinwheels.
4 - Five Folding of the Puff Pastry, benching 20 minutes between each roll definitely helped with relaxing the dough and keeping the butter block in the dough.  And see the wonderful result of layers and layers of lamination.
Some people like the Palmiers baked till the sugar is caramelized completely, and also to extend the shelf life.  My Palmiers and Pinwheels are baked till Golden Brown and retained sugar crystals.
More pictures can be viewed at http://picasaweb.google.com/pastrydavinci


Stir-Fried Shanghai Noodles with Shrimps


We love to order "Chow Mien" at our favorite seafood restaurant in Fremont - especially my grand-kids.  They love "noodles".  Three dishes for $18?  Not baaad.  We can feed the entire family and still got enough to take doggy bag home.  After a while though, it's time to try your own.  We found this new 99 Ranch Market in Mountain View (CA).  It's loaded with variety of Oriental noodles.  Anything from dry, instant, to fresh noodles from Japan to Taiwan to China, they got few of each.  Our goal is to find the right fresh noodles for the stir-fry to make the "Chow Mien".  As you might already know "Chow Mien" is Chinese fried noodles usually prepared with some vegetables, meat, and sauce, and it is expressed in "Cantonese" dialect.  In Mandarin, it would be pronounced more like "Tsao Mien".  Regardless, I found this Stir-Fry Shanghai Noodles.   You can practically add any kind of vegetables and meat to stir fry with it.  Since this is fresh noodles, not egg noodles, the noodles will be soft vs. "pan fried noodles" that is usually prepared with "egg" based thin noodles.  I am sure you know a lot more about the noodles than I do, but I used the following ingredients:


2 TBsp dark soy sauce
1-1/2 TBsp light soy sauce... I just used Low Sodium soy sauce we bought for both
1TBsp OYSTER sauce
1/2 tsp sugar
1/8 tsp ground white pepper or black pepper
1/2 tsp of pre-chopped garlic in the jar  - if fresh, three cloves, chopped
1 tsp of minced ginger  (I keep them frozen, so I can use it anytime)
1/2 lb of raw shrimps - Rinsed in salt water and strained or you can use Chicken pieces
1 bunch of green onions, washed and chopped
1/4 head small Cabbage, finely Julienned or cut thinly
2 cups of fresh bean sprouts, washed and strained
3 Dry Shiitake Mushrooms, rehydrated in Hot Boiling water. Sliced.  Save the Stock.
Any other veges you want to put in.

MIX soy sauce, oyster sauce, salt, and pepper together.  Set aside

Pour 3 TBsp of cooking oil in the hot wok.
Add garlic and ginger.  Stir to bring out aroma, then add green onion.  3 min.
Add Raw Shrimps (or Chicken)
Stir fried until cooked. (Not translucent anymore)
I also add a bit of chili flakes, but you can do it for your own bowl later.
WITHOUT TAKING OUT THE OIL IN THE WOK, Take out the shrimps.... try to leave as much oil in the Wok as possible.  If not enough oil to fry the vegetables, add 1 TBsp more of cooking oil.

Add Cabbage and stir-fry just until it turns translucent. 
Make sure there is enough cooking oil to coat the cabbages lightly all around.  Do not over cook.    Stir fry for 3-4 min. 
(Raw cabbage seems to develop gas for many people.)
Add Bean sprouts, mushrooms, and any other veges.  Stir fry for 30 seconds.
Remove to large bowl and set aside.

In the same Wok:
Add the fresh Noodles and recommended amount of liquid on the package, e.g. 6 oz water + mushroom stock -- amount of stock from rehydrated Shiitake mushroom.
Cook the noodle until the stock goes down to 1/3 cup or something like that.  

(Some people prefer the noodles with lots of sauce, but just make sure it is not like a soup.  After all, this is Stir-fry noodles.)
Add Vegetables, Sauce Mixtures, Shrimps to combine with noodles.  

Stir Fry until everything is coated with sauce mixture.  3 to 5 minutes.
Done.


Serves 5


Also, there are lot more pictures at http://picasaweb.google.com/pastrydavinci


Tuesday, October 13, 2009

Blueberries on the Cloud Puff Tart


So, here is what I decided to do with the rest of the Puff Pastry dough. 
I wanted to make another Pineapple Tatin, but out of luck.  No more fresh pineapple.
In my effort to find a way to preserve the Puff Pastry's "Puffiness" even after topping it with the goodies, I came up with an idea.  I am sure others have done the same because I have seen puff pastry being used for Pate puff, but in much smaller size, of course.  So, I shaped the dough to fit my 10 " round Tart Pan - Puff Tart Shell is formed, chilled, sprinkled the top with some sugar and egg washed the top, and baked at 425'F.  Beautiful.  It puffed up like an awakening giant stretching upwards.   The sugar and egg wash coating was to help in giving some shine and flavor and not depend entirely on the pastry cream of some sort for the sweetness.  To cut down on the overall usage of sugar, I decided on the beautiful puffy Whip Cream for the topping.  That's it.  Pressed down on the puffed shell with the palm of my hands to make the well in the center (surprisingly, the shell sprang back... no problem.)  Whip cream whipped up with just a tablespoon or so of sugar to taste.  Frozen blueberries are -- I saved a pint of wonderful large fresh blueberries from the summer, frozen -- dipped in the simple syrup flavored with Raspberry Liqueur.

Then, I assembled my Blueberries on the Cloud Puff Tart.   Taste of the fresh puff pastry is just wonderful.   I loved the Puffy pastry coated with sugar.  The combination of lightly sweetened whip cream and raspberry liqueur syrup coated blueberries tasted great. 
So, here are the pictures.


Monday, October 05, 2009

Fresh Pineapple Tatin


 This is the ultimate best Fresh Pineapple Tatin ever.  It was a lucky accident.  I bought a fresh pineapple over the weekend. I was suppose to have gone to a party, but did not make it back on time to take the Fruit basket that I was going to make. So, I am stuck with a fresh pineapple. The weather is very cooperative - cool.  I decided to make the Puff Pastry that I have not touched for a long time since June.  Everything went very smoothly. I followed the regular Tarte Tatin recipe from our culinary class.  Instead of apples I used Fresh Pineapple.  I was very careful not to over caramelized in the saute pan.   Remembering that once it goes in the oven, it will get browned some more.
I am very pleased with the turn out. My puff pastry is PUFFED.  It was well worth the time waiting - benching the dough after each roll. The taste was delicious and loved the crunchy layers of the puff pastry. I wished there is a way to serve this pastry without sacrificing the "puffiness". What I mean is that - once the pastry has completed its baking, it is inverted out to a serving dish. The whole entire 4 inches of PUFFED pastry is then flattened. That's the way it is supposed to be, but I would love to see the puffiness stay puffed up. There are other recipes such as Napoleon, Cream Horns, Patty Shells, etc.  But, I think I know what I want to try with the rest of my Puff Pastry dough waiting for action in the refrigerator. Maybe I can bake a separate layer of puff dough. Then, place it on top of the finished Tatin after it has been inverted -- like a sandwiched tatin. What do you think? Or an individual small 4" Tatin, roll out two puff pastry dough, one with a hole in the middle. Then, after the baking, place the extra baked puff pastry with hole in the center on top of the finished Tatin. Nope, the puff patty shell is the same idea and easier . . . all right, Palmiers, Pinwheels, and Puff Pastry Tart Shell for Blueberries on the Cloud.


Posted by Picasa

Asian Pear Tatin


Weather in Sacramento this week, due to the full moon, has been quite 'welcomingly' cool.  It also means that my kitchen is cool enough at 79'F for me to handle 1 lb of butter block for the Puff Pastry!  Yes! The last time I prepared the Puff Pastry was in the early June.  Practicing what I learned in the class to make the beautiful and wonderful, amazing Puff Pastry - Tarte Tatin, Almond-Apple Diamond, Fruit Strips, and Palmiers.  All so wonderful, but the hot kitchen is not what butter block likes.  Finally, today, I made Fresh Pineapple Tatin as a test and Asian Pear Tatin.  Pineapple Tatin is one pastry that I remember and savour the taste since I was child.  There is only one place in Japan, back then, bakes them - Fujiya Bakery at Tachikawa.  I never saw the pastry made anywhere else that I've been to.  Even in the State, I have never came across once like the ones I had.  But today, I made both Pineapple Tatin and Asian Pear Tatin.  Haven't decided what to do with the rest of the puff pastry dough, yet.
I am very happy to share this photo journal as the butter block cooperated quite well throughout the process.  So, here it is my photo journal of Asian Pear Tatin.