Tuesday, July 21, 2020

Polly's Lactose Free Creamy Flan

I think the last time I made Flan was ... a very long time ago.  I saw our team mates in the KENDO Zoom class reward themselves after the exercises with beautiful creamy flan.  I thought I need to try making that.  After all, I love flan.  But not all Flan.  I had flan at the restaurants.  A few times at a very good restaurants.  After I had it, I regret it.  My lactose intolerance cause an havoc after a good meal.  There is no better way to solve this than to make the Flan yourself at home with Lactose Free Milk.  Problem Solved.
Get 5 3/4 C size Ramekins  or 4 - 1 C size ready

Ingredients for Caramel:
6 Tbsp Sugar and 1/3 C water - heat in sauce pan until caramelized - golden - not brown.
Pouring equally into Ramekins right away.  Coating the bottom of the Ramekins.  Set Aside.

Custard:   Be ready to Bain Marie to bake in oven at 320'F for 40-45 min.
1 large brownie pan or 9x11 cake mould to hold 5 Ramekins and hot water
Enough Boiling water to fill half way up the Ramekins.
In NutriBullet container, add 4 eggs + a pinch of salt + 1/2 C Sugar.
As you know NutriBullet beater container will be upside down with the beater head on the top when you close it.  The sugar you added will be at the bottom.  No worries.  Just close it and shake the closed container back and forth for about 10 times.
Open the beater head.  Add 1-1/2 C of low fat Lactose Free Milk + 1/2 C Heavy Cream.
Close the beater head. 
Process for 4 to 5 sec only.  We do not want to build up with foam.
Preheat Electric countertop convection oven to 325'F. 
Pour the custard mixture equally into Ramekins.
Place the filled Ramekins into 9x11 cake mould pan or large brownie pan that would fit 4 Ramekins. 
Add hot boiling water half way up the Ramekins.
Bake Bain Marie for 40 to 45 min or until the knife inserted comes out clean.
You can also enjoy this without caramelized sugar in the Ramekins.
Because I added Heavy Whip Cream, it foamed a bit even at 4-5 sec processing in the NutriBullet.


The foamy top browned

But the inside is very creamy.  No ugly bubbly holes inside.  This one is without the caramel top.

I almost forgot to give the credit to the recipe idea to https://www.youtube.com/watch?v=tB55iAo3p2Y


Polly's CHA GIO Wrapper Testing - Photo Journal

I was trying to make CHAGIO - Vietnamese fried spring rolls.  We made it so easily when we lived in S Viet-Nam, but it seems so formidable trying to make it now.  The wrappers seem to be different. The first couple of times I tried, the wrapper looked like a burnt plastic.  They looked scary.  I don't think they really used the rice and tapioca flour.  I think they are foreign chemical - plastic.  I gave it a year of rest.  I retried it this time buying the wrapper that says for the fried spring roll.  Yes, you could easily make them with the Chinese spring roll wrappers, but it's just not the same.  Just for the crab Cha Gio served at one of the hole in the wall eatery in Cholon maybe a good reason to visit S Viet-Nam one of these days.

The results - I like the square Banh Trang ChaGio wrapper.  Does it really matter?


pre-soaked rice vermicelli in hot boiling water.
Stir fry them all briefly.  Add potato starch roux to coagulate them.  There should be very little liquid.
All the filling ingredients are pre-cooked.
The round one's texture looks so plastic.
Square ones look more 'home made'?


To keep the seems to split open during frying, it maybe a good idea to use a cornstarch roux, paste to dab all around the edge.  Otherwise, during frying, you will be holding onto the spring roll's seam closed until the outer skin is quite browned.

Let them sit to dry.  It is also important that the wrapper skin is quite dry before frying. to keep them from opening up.
To fry, do not let go of the tongue or the chop stick holding the seam closed until quite browned.

The result - I like the square ChaGio wrapper.  The texture looks more real ingredients than the round wrapper.  It's not a very good reason, but the round wrapper seems so plastic like when fried.  Maybe that's the way tapioca behaves in heat.  I need t do it again.  Air dry the rolls longer. than, fry gently maybe better.  Serve with vinegar, lemon juice, chili flakes or other recipes you find in the Internet with lime juice and nuoc mum - fish sauce and chili, etc.

Saturday, July 11, 2020

Polly's BAO Making Flour Testing

I was troubleshooting the cause of yellowing of my BAO or the steam bun. 
Using Unbleached flour is one of the cause.
My mother also pointed out that maybe I put too much yeast.
To find out, I went to the Asian market and bought 4 different flours and tested them.
The results are quite interesting.
The ingredients I have been trying has been:
250 g flour
60 g sugar
7 g Baking Powder
7 g Yeast
7 g Lard
125 ml Water
The steamed bun turn out yellowish.

After reviewing some YouTube posting, I changed the formula into followings:
250 g flour
20 g sugar
2 g Baking Powder
2 g Yeast
1/4 tsp salt
1 Tbsp avocado oil
125 ml Water
Knead by hand for 10 min, cover and let rise for 20 min.
Roll out the dough, enclose with TSA XIAO meat. Rise over steamer with water at 30'F. For 1 hour.
Steam for 10 min.
Turn off the stove.  Wait 5 minutes before opening.


Viet-Namese BOT BANH flour  - I followed the package's instruction - just add the water, fill with meat and steam.  It opened up at the top just like what we see at Chinese Dim Sum restaurants.  But soon after, the Bun turned yellow as they cooled.

Flour #2 Taiwan Pastry Flour:  I added 20 g sugar, 2 g of yeast, 2 g of baking powder, etc. to the Taiwan manufactured Pastry Flour
Follow the instruction and steam.
The Bun is white and fluffy.
The Taiwan pastry flour is likely a bleached flour.
The original recipe calls for 7 g of yeast and 7 g of Baking Powder.
The top of the bun did not split open, however, even after following the chef's instruction on how to fold the top.

Flour #3 - MIKKO Cake flour - premixed for cake baking.  Added 2 g of yeast, 2 g of baking powder.

The bun is wonderfully aromatic but with great spots all over.  (Discard. Did not attempt to eat.)
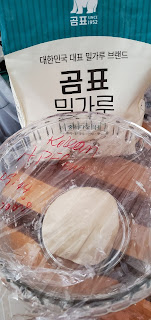
Flour #4 - Korean Unbleached flour - the bun turned out nicely.  White and fluffy.
Repeat Korean Unbleached flour retest:
The bun turned out great, but the top did not split open.
Nice and soft with great bounciness.  The bun turned out white.

Out of the four flours I tried, the Korean unbleached flour turned out the best white bun.... that is if it is truly an unbleached flour.  At the store, the same brand had bleached pink bag and unbleached turquoise bag that I got.  The next test will be to see if using other unbleached flour with only 2 g of yeast and 2 g of baking powder will give the same result.