Monday, February 01, 2021

January Home Crab Feast for One

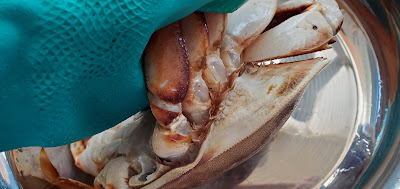
 January is supposed to be a great time for the Dungeoness Crab.  I bought two live crabs to try.  Any other year, before COVID-19, the fish tanks are always filled with fresh fish and crabs, etc.  This time the tank's looked murky, a bit of concern.  But what I didn't notice at the moment, but later is that the bottom tank's crabs looked lean, which means those crabs could have been in there for a long time.  The fish monger picked one crab from the top and one from the bottom.   I should have asked to pick both from the top.  Well, what happens when you open them?  Here is the photo journals.
Live Crabs were placed in a large basin filled with water with addition of salt, then each one is Thank'd and prepared.  Each one is scrubbed clean before Steaming.  I don't like to boil them alive or cook them without cleaning.  Sometimes you see plump white crab legs served, but looked off colored grey and fishy - a sign that they were just dunked into hot water before being cleaned.


After scrubbing clean, tear the top shell off by grabbing all the legs firmly and lifting the shell apart.
Remove all the Gills under running faucet.  Brush clean all around the legs and body shell.  If the family member enjoy tomalley / butter, gently rinse under running water after scrubbing shell and place in the steamer basket.  Peel and slice ginger and place on each crab pieces or in the steamer basket.


The second crab's internal did not look very healthy.  I have never seen one with charcoal dark.  This must have come of the bottom fish tank with murky water.  ZAN'NEN!


Trash.  The second crab's internal did not look healthy.  It's a trash.
Pick all the meat out of one and save to make Crab cake later.


Saturday, January 23, 2021

Homemade Lactose Free Yogurt

This is my first INSTANT POT dish - home yogurt.  I was contemplating over the Christmas to buy a yogurt maker.  I had one many years ago, and it was a simple incubation steamer box.  Since I found a recipe in the INSTANT POT recipe booklet, I thought I will give it a try.  I just so happened to have six of these Oui yogurt cup.  And a half a cup of Oui vanilla yogurt, non-fat Lactose Free Milk.   So I mixed 4 C of the non-fat Lactose Free Milk and yogurt.  I think I only had 1/3 C of the yogurt rather than the 1/2 C the recipe called for.  And added 1 Tbsp of sugar.
I boiled the jars to sanitize, and also boiled the milk in a separate pot.  Cool to room temperature. 
Take a 1/4 C of the milk and mix in the yogurt till dissolved.
Add the mixture to the rest of the milk.
Pour equally into jars.

Follow the Instant Pot's instruction by adding 4 C of water to the inner pot. 
Place the yogurt jars.
Close the lid  - leave the pressure valve in Release position. 
Select Keep Warm for 15 minutes and then unplug.
With Lid on, let the pressure cooker stand for 10 hours.  I let mine stand for 12 hours.
Take them out.  Cover with wrap and chilled overnight.
 Not bad.  Firm top.
Smooth texture.


Sunday, January 10, 2021

Making HOSHI IMO

 I eat sweet potatoes (not Yam) regularly to help control blood pressure.  I cook it in the microwave at a Potato setting.  Then, while watching a Japanese TV show, this woman side-kick was giving everyone a package of "HOSHI IMO", and that gave me the idea.  HOSHI IMO in Japan is steamed and then dried.  I enjoyed it when I was a child. It's a sweet and chewy treat. The commercial ones are loaded with 'whatever' that are not healthy for us.  Since I have been using the dehydrator to make HOSHI KAKI - dried persimmons, I thought why not make the dried sweet potatoes.  I also wanted to test out the InstaPot pressure cooker.  I normally pressure cook potatoes over my gas stove.  It's done in 3 minutes.   And, so did InstaPot in 4 minutes.  Perfect.

 Scrub the sweet potatoes. Remove any blemishes.  Make a single slit.   I've never used InstaPot before, so instead of 1 C of water, I added 1-1/2 C water for 5 potatoes.  Just to make sure for the first time that there is enough water to make steam.  Set the "Steam Release" valve mechanism to "Sealing" position.  Plug in.  Press STEAM button, Press "-" minus button to reduce the timer to 4 minutes.  Press STEAM again to start - that was scary.  Set my kitchen timer to 4 minutes also for the just in case I am doing it wrong.   I walked away really far.
Once it is cooked, I let it sit for 10+ min to cool.  Set the valve to "Release".  Unlock the lid.  There they are.  Beautiful.
Peel and slice.  Dehydrate.  Hope they will turn out as good as the one sold at the store.


Now, it's a waiting time for the result in a few more hours of drying.  Will they keep well in Mason jar?  Good enough to take along for a hike?  How long will it keep...