This is my adventure with Asparagus. The dish turned out quite appetizing to eat GENZIMAI 'brown rice' with. But the rice vinegar flavor is a bit overpowering. Will improve on the sauce the next time. In fact, tonight, I made creamy mushroom sauce with shallots with Provence spice for the Asparagus spears sauted in clarified butter.
It was heat through for 1 minutes and found out that it was 30 sec too much for the beautiful green asparagus. It got overcooked.
To Share, To Enjoy Life Together. Why not make the "Cooking Adventures" as part of family activities to share, explore, and appreciate the differences... Let's Rock together in the Home Kitchen Lab!
Sunday, December 12, 2010
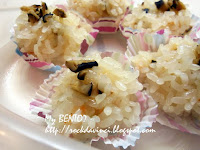
Shrimp Pearl-Balls
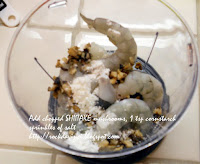
Glutinous sweet rice taste wonderful steamed. Normally, the ground pork is used to make this dish, but I ran out of it, so I tested with shrimps. Taste??? well, it's missing something, I am not sure what. I will have to improve on it. Maybe a dab of fat pork would do?
Form the grounded shrimps into a ball and roll it in glutinous sweet rice. *The sweet rice is wash thoroughly till the water is clear and soaked in water for 30 min, then, strained well before use. (but not dry).
Get the steamer ready. These pearl balls are set in 'steamer' pan on top of the electric rice cooker. I have never used it to steam anything. Since it is not mine, it has been sitting in far corner of the kitchen cabinet for many years. I filled the 'rice' cooking pot section with cold water - half of the pot. Cover with lid and turn the rice cooker on. Steam for an hour. *Never open the lid of the rice cooking pot - well, there is no such thing as 'never'. But I think if you are raised with rice as staple food, you and I have been told many a times - don't open the lid to check until it is ready
After an hour, turn off the rice cooker. Wait 10 min. Then, open the lid carefully not to let the steam rain down on the pearl-balls. Set the lid on the lid rester. The sweet rice should look all translucent. If your rice cooker has a glass lid, then, just check for translucent rice all around. I rather cook it long enough to make sure the rice is cooked and internal meat is cooked through. Uncooked rice is challenging to recook once the heat is turned off; and it usually require additional water, and there is a consequence of rice turning 'mushy'.
The next day, they turned into my BENTO in mini-cupcake cups.
Sunday, December 05, 2010
Challah with Raisins and Cranberries
When I visited Baking Bites' blog site, I noticed this beautiful picture of Challah with Raisins. I love bread, and it seems to be calling me, so I went right to work. For Challah with Raisins recipe that I made mine from, please visit http://bakingbites.com/2010/09/challah-with-raisins. Since, I did not know what Challah meant, I consulted the Internet and found it to be quite in time for this holiday season. http://en.wikipedia.org/wiki/Challah, and I am glad I made it. My Challah is three rope braid. And not knowing the tradition, I added chopped cranberries. It tastes very good with raisins. I would like to try making the sufganiyot, like PONCHIK, the next time.
My Challah has some modification to the recipe I got from the Baking Bites' site. I added Tangzong - Flour ROUX to give extended moisture and softness as a test.
Tangzong - Flour ROUX is not my recipe either. I learned it from some of the Malaysian and Singaporean food bloggers. They reference Yvonne Chen, the bread doctor. For example, you can visit Pei-Lin's blog site. http://dodol-mochi.blogspot.com/2009/10/tangzhong-or-water-roux-method.html.
For Tangzong: Mix 25 g of flour with 125 ml of water in a saucepan. Have a thermometer ready. Mix well and cook over medium heat. While stirring continuously , measure the temperature often to make sure that it does not exceed 65'C (centigrade). Remove from heat to cool before use.
Since my kitchen is either too hot in the summer or too cold in the winter, to make sure all my mixtures for the dough is at desirable proofing temp, I added my Tanzong roux while at 90'F (Farenheit) into the flour mixture.
Bread dough Ingredients:
Dissolve 1 tsp sugar + 1/2 C warm 110'F water + 1 Tbsp active dry yeast for 10 min. until bubbles form on top.
Manual Mixing (since I kind of gave up using my Kitchen Aid dough mixing function):
Total of flour used in my variation: 'approx.' 3-3/4 C + roughly 1/2 C for kneading
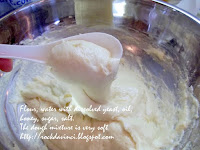
When it's about 8 minutes into the yeast fermentation, start adding 1/2 C oil, 1 Tbsp honey, 1/4 C sugar and 2 C flour and 1/2 C warm 110'F water in a large mixing bowl.
Mix all well together, and add yeast mixture. Add Tangzong. And mix all well together.
In the beginning, I was using a spoon to incorporate everything. You can use spatula or hand, but I know the mixture is very wet, and I was not yet ready to get my hands all occupied, so, you will see the spoon in the photo. Once the dough mixture is well mixed. I let it set for 5 minutes.
Bring two eggs to room temperature under warm water and chop 2/3 C of raisins and cranberries in the mean time.
Add 1 C flour, raisins and cranberries in. Pass two eggs through the mini-strainer to separate Albumen, chalazae, etc. and it's mashed evenly when done in the bowl.
Mix all well again with the spoon or with your hand.
The mixture is really wet. Transfer the mixture out to floured work surface.
Start pulling and pushing down the mixture. Adding handful more of flour up to 1 more Cup.
Repeat pulling and pushing down the mixture, scraping and rolling until the gluten is formed.
After an hour of manually 'kneading' the dough this way, the dough's gluten is well developed for me to round it to form a ball. Ready for the proofing.
Cover with plastic and a cover and place in a warm place to proof until double in size.
*I heated the oven to 350'F and turned it off. Waited 15 min and measured the interior temp. 85--87'F. I placed the bowl inside with lamp on. It took three hours for the dough to rise.
As I removed the plastic cover, the dough deflated on its own. I did not pound down any further because I want to keep as much air bubble as possible.
Transfer the dough to lightly floured work surface. Divided it into three equal parts.
Prepare a baking sheet covered with parchment paper. Set aside.
The dough is soft and pliable. Gently pull and elongate the dough. I rolled the dough into a log shape, then, rolled on the surface gently to form into a long rope. Repeat with the other two.
Braid the ropes and tuck the ends under.
Transfer to the baking sheet pan line with parchment paper.
Beat 1 egg whites with 1 tsp water - egg wash the formed dough.
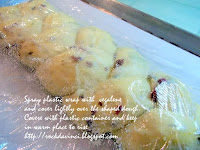
Spray the plastic wrap with vegalene and lightly cover the dough for the 2nd rise.
I covered my dough with the inverted rectangular plastic container. Then, placed the sheet pan
back in the oven with light turned on. Proof until double in size.
Remove from the oven. Preheat the oven to 375'F.
I egg washed it again. Bake until deep golden brown. Interior temperature read 200'F.
Cool completely. **The crust of the bread will become tender as it cools.
You can view video of how I managed to knead the wet dough by visiting YouTube - How to Knead Wet Challah Dough - Step 1 of 4
(click on the photo to view larger image and other details)
I can't wait to make some more this!
FYI - After 8 days, a slice of toasted Challah or microwaved for 5 sec or just as is still tastes very good. & as for the Challah with Raisin, it turned out fantastic.
Subscribe to:
Posts (Atom)


