Friday, November 12, 2010

Bouchon Bistro - my Restaurant Adventure

After test frying a few batches of Buttermilk Fried Chicken recipe by Chef Thomas Keller,  I decided to go to the true source to compare mine with - at Ad Hoc Restaurant (Chef Thomas Keller's) in Yountville, California.  It was a beautiful sunny day, a perfect day to drive out to Napa country.  I made it there in a good time - arrived at 3 pm.  Ad Hoc Restaurant is not open till 5 pm.  Of course, I strolled down the street and reached Bouchon Bakery (Again! yes!).  I was right, they have fresh Croissants and more baguettes and epi baguettes and a few other pastry and breads that were sold out at noon time already when I came the last time.   Well, I couldn't just look.  I bought 4 Croissants, two Chocolate Bouchons, 1 baguette, 1 epi baguette, 1 lemon tart (even though I already had it the last time - it is soooo good - I got to have it!), 1 pistachio macaron, 1 raspberry macaron.  $30.25 worth.
Then, I was really really hungry, as I have nothing to eat since morning for this visit's purpose to dine at the Ad Hoc.  I changed my mind and bravery stepped into Bouchon.  (Why bravery?  because I don't normally step into any restaurant without my friend's or family's recommendation.  I don't like the risk.)  I seated first at the bar, but felt awkward with all the breads and pastries, etc.  So I changed to the table.   I was surprised that I got the table.  According to www.opentable.com, there are nothing available for reservation today.  As far as my eyes can see, there are many open tables at that moment. 


They serve the epi baguette with butter and I think it was wasabi mustard.  Cool.  I love bread.
I ordered Salade de Champignons - Roasted wild mushrooms, pickled radishes, young lettuces, Dungeoness crab glacage. $14.    I don't remember seeing the lettuces in my plate.  I was not quite sure if the creamy egg mixture at the bottom of my plate had crab pieces... glacage.  Not much distinction. Mushrooms tasted fresh.  If you spoon the cream glacage and pickled radishes slices 'together'  and mushrooms at its end, then, voila, the tanginess of pickled radish slices brought out the mushroom flavors.   I never had 'roasted' mushrooms before, but I did not find that "Wow! that's what roasted mushroom taste like" kind of feeling.   I think if they are drizzled with some sort of -- just even a bit of butter with tangy, concentrated lemon / lime 'something' would brought out their natural wild flavor. Or if the glacage had a bit more kick instead of tasting like .... bland scrambled eggs... that was my thought at the first bite.  I didn't seem to have the feeling of "that's what crab glacage taste like" of impression... had to think about it after each bite --where is the Dungeoness crab glacage taste? too bad.  But I ate it all. 


Then, main - Plat Principaux - Steak Frites - 10-oz pan-seared prime flatiron, caramelized shallots, maitre d'hotel butter, French fries.  For some reason, the menu brought me back the memory about the steak I ate at the French athletic club in Saigon, South Viet-Nam.  My friend is one of the 'elite' families and had access to resorts and what not.  For fun, both of us ordered the steak with french fries.  So I ordered Steak Frites - medium well.  It is covered with caramelized shallots and very tasty butter.  The meat is tender, not over salted like ... Sizzler's.  I was contemplating to ask for the steak sauce, but I held back to let my palate just enjoy its natural taste. (I knew I should not had eaten those spicy food two days in a row - it has weakened my taste buds.)  As I cut in, it started to turn pink and pinker - it turned out to be medium.  They were more than happy to cook it again for me.  I was surprised, when they brought it back that it was on a clean plate.  And as for the half eaten steak, it looked like a brand new steak.  French fries were fresh, too. 
Then, I ordered Profiteroles with vanilla ice cream, chocolate sauce to end the dining.  I thought it's one profiterole with ... but it's enough to serve three people.  But, I ate the whole thing.  (Shouldn't have, though, but can't doggy bag ice-cream home.)  The Bouchon Bistro is a relaxing casual place - as named "Bistro" with jazz or music from the 60's or even 40's. I am not good at recognizing music, but I like to listen to music while I eat, so that's a plus.  The guests at the bar are talking to other guests and laughing and exchanging news and day's events.... friendly.  I am glad I stepped in.  After the dinner, on my way back to the car, I stopped by at the Ad Hoc Restaurant to check it out.  It has wood furniture theme.... don't depend on my description. ... I don't know anything about interior design nor can I give good description, but they are dark walnut color furniture.  As you step in, a few feet behind the hostess' podium, there is a long family size table for ..10 on left side.  The bar is to the right with about 10 seats. . . that's where I would have been sitting if I had arrived at 5 pm.  It was a fully booked evening (according to the hostess when I called or www.opentable.com), but I would not have minded sitting at the bar.  There are smaller tables all around the main dining area.  They are playing the similar jazz music as at Bouchon Bistro.  I asked the hostess about the Buttermilk Fried Chicken because I noticed the menu they posted on Monday is what they are serving today on Thursday which means what they post on Monday is the menu for the whole week.  I thought they change it every day, but it's not so (?)  They serve the buttermilk fried chickens every other Mondays and the next one is on November 15th.   I think I will let my body rest a while before I return, however.  My body is just not used to all these 'fine' dining.  Back to YOGA...


Thursday, November 11, 2010

Buttermilk Home Biscuits with Herbs of Provence and Cran-Raisins

So, it's been many months since I started to bake using digital scales to measure ingredients for accuracy.  But yesterday morning, I was really dying in a hurry for my biscuits - "my biscuits" that I used to make just right out of flour bag sometimes... but not so drastically, but just to be able to measure out and mix and bake.  I recalled the a couple of months ago, I did that and it's like I was lost without the digital scale and so did "my biscuits".  That's not a good thing.  My grandson loves biscuits and I was hungry for it.  I brave myself and started with the following ingredients.  Mixed well and baked at 425'F.  YES!  Wonderful.  I didn't forget.  On top of it, this version turned out with Crispy shell and tender crumb inside.  It's a free-form biscuits.  Once the dough kneading is complete, shape it anyway you want and bake it.  Enjoy my buttermilk home biscuits with herbs of Provence and Cran-Raisins.
Yield: 10 - 12 mini biscuits
Tools:  large wide mixing bowl, whisk, measuring cups and spoon; 2 inch biscuit dough cutter
Ingredients: 
1 Cup Flour in a large wide mixing bowl + extra flour on the side for rolling - about 1/2 C
1-1/4 tsp baking powder
2 quick shakes of salt - likely a pinch to 1/8 tsp because my salt shakers have about 20 holes
1/2 stick of cold butter cut into 1/4 cube chunks.
1/3 - 1/2 C buttermilk
1/2 C Raisin and Cranberries
1/2 tsp Herbs of Provence
Preheat electric oven to 425'F  - mine is a counter-top convection electric oven (I don't really think my convection is functioning though)

Whisk flour, baking powder,salt, and herbs of Provence together.
Add butter cubes into the flour mixture. 
Using your fingers, coat the butter with flour and flatten butter cubes into quarter coin size.
Add 1/3 C of buttermilk and mix with hand. 
Don't be in a hurry to do the following mixing.  Just take time to let the dry flour soak the buttermilk as you mix.  Gently toss to mound the dry flour from the bottom to the top of the moist thick batter mixture.  Repeat.
The mixture should feel shaggy but on the wet side.   If not add a bit more buttermilk.
Clean the sticky mixture off the the side of the bowl and lay on top the mound.
Remove as much sticky batter off your hand.
Add Cranberries and Raisins.  Chop them up or whole - any way you like.  I like to chop up my raisin and especially dried cranberries because they are large.
Then, flour your hand (or hands) and knead the dough - turn the flour mixture from the bottom to the top, then push down with your palm of your hand.  (Flour your hand and top of the dough as often as necessary.)  Then, gather the dough from the right side and turn to the top and push down . Repeat... about 10 times. 
Dip your hand into the flour as necessary to keep the dough from sticking onto the bowl.
Let the dough rest for a minute.  
You can turn the dough out to the work surface or just do it in the bowl - using the palm of your hand, press the dough into disc shape - 1" high or your desirable height.
Cut out with dough cutter.  I used the smallest 2 inch dough cutter.
Place on top of a small baking pan - place each right next to each other for soft side crust, but leave about 1/4" space between each for expansion.
You can also place it on top of parchment paper or silpat. 
Bake in electric toaster oven at 425'F for 20 - 25 min.


Wednesday, November 10, 2010

The Kitchen Restaurant - my Restaurant Adventure

Here is my photo journal of my wonderful evening dinning experience at The Kitchen Restaurant, (Chef Randall Selland's, Sacramento, California.)  The six and half course menu for the month of November is wonderfully prepared and satisfied my food adventure curiosity.  As my visit was on the first opening night for the November menu, Chefs were as excited as guests were about the evening.  And ladies - the restaurant has thoughtfully installed a purse hook under the counter table.  That's a plus point.  Guests are all welcomed at the door by the Chef and the hostess. Soon after arrival of all guests, the Act I of VII begins.
From the time I was welcomed at the door to the seating, I felt that I am in for a special treat.  The assembly of the each dish is prepared right before my eyes.  This is a real treat.   Each dish satisfied all my basic enjoyment of celebration of food with my eyes, smell, touch, and taste... and audio.  Guests were engaged with the Chefs in food preparations and entertained at the same time.
This experience gave me another dimension to the definition of fine dining.   I was a bit skeptic about "course" meal outside of Asian style formal banquette that I am accustomed to in Asia, but after this one, I don't mind start venturing to try others.  I like The Kitchen's November menu because it is something that I would not want to prepare at home.  Service staff are courteous and attentive.  Amusingly I find this folded napkin on my setting each time I return to my seat -- whether I ventured off  to the kitchen to see what Sous Chef is doing or while I step away to ask Chef de Cuisine questions - I thought I dropped my napkin or forgot my manner, then, I saw service staff carefully and quietly and quickly doing just that to give that touch of care and fresh look and class for the fine dining.  I like that.  Many  visitors to my blog sites, as well as my friends have already experienced this type of fine dining and knew all about all these details.  But how about that, I am talking about it now and want to share that experience because I think it's worth sharing about a great restaurant that you can count on fresh ingredients, wonderful and interesting menu, and with great service.  And, I won't forget that 'fresh' herb tea service.  That was 'fantastic'.  I hope you will have a chance to visit The Kitchen and treat yourself, too.  Or try ELLA is what Chef Selland recommends.
(double click on the image to view better details.)
- November 2010 Dinner Menu at The Kitchen -
Presented by Chefs Nancy Zimmer, Randall Selland,and Chef de Cuisine Noah Zonca
______
First Course:
The Kitchen’s Pumpkin-Squash Bisque with
a Smoked Ham Soufflé, Crispy Lardo
and Toasted Chili Sabayon

~~~
Second Course:
A Salad of Maine Lobster, Fall Beans, Prosciutto, Walnuts, Pomegranate, Celery, Vanilla and an Oyster-Fresh Ricotta Crema

~~~
Sushi ~ Sashimi ~ Crudo


~~~
Third Course:
Thai Snapper and Foie Gras with Potato, Braised Fennel, Spinach, Thyme, Mushroom Emulsion and Crayfish Jus


~~~
Fourth Course:
Classic ‘Steak Frites’ with True Wagyu Ribeye, Sauce Bordelaise and Black Truffle


~~~
Fifth Course:
Key Lime Pie, Chocolate Tart and Selland’s Dream Bar


 And I can't wait to visit others.

Sunday, November 07, 2010

Jamie Oliver's Bread

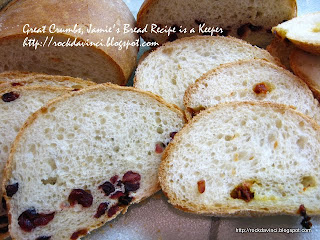
This bread recipe is from one of Jamie Oliver's video show that we watched while he was demonstrating to group of future chef how to make bread.  I am not 100% sure of the ingredient quantity as he was talking quite quickly, my bread turned out very tasty.  His direction was to make Focaccia and some other savory bread, I made mine filled with cranberries.  One of the steps are new to me - such as slit the top of the dough before the 1st proofing.

Ingredients:
1 Kg Strong Flour - I assumed Bread Flour
1 pt tepid water
3 sachet yeast (30 grams)
2 Tb sugar
1 Tb salt

On work surface, place flour and make a well in the center.
Add yeast, sugar, and salt to the center; then add the tepied water.
Starting at the middle, incorporate all ingredients with liquid with spoon at the beginning, then, by hand.
Knead the dough.  Kneading should be in 1, 2, 3 motion, using the palm of the hands resting at the work surface and fingers to grab the dough back as you push the dough forward; move quickly, then roll it back, turn.  Repeat until the dough becomes elastic and smooth.
Rub at the top of the dough and circle it on the surface.
Round down the dough to form into a ball.  Place in a bowl.
Break with knife at the top (make a 'cross' slits)
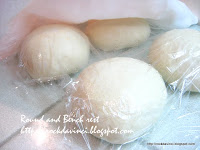
Cover with plastic firmly all around to proof until double in size.
Divide, and form into bread shapes.  Varieties include:  focaccia; sweet raisin; stuffed cheeses and sages; grape pine nuts.
 I also found Jamie's "The Perfect Bread Recipe" at http://www.foodnetwork.com/recipes/jamie-oliver/rosemary-and-raisin-bread-recipe/index.html    Please follow the details there.
My breads turned out wonderfully and tasty.   I baked my bread based on the latest baguettes baking that have been successful and producing consistent results.  I preheated oven with Baking Stone at 500'F.  Baked with home devised steaming - spray bottle and pan of hot water at the bottom and baked for 10 minutes; then, removed steam and dropped the temperature to 425'F. Baked for 15 more minutes or till internal temp reached 200'F for my Boules.


Filled with Cranberries or rehydrated sun dried tomatoes.  Will try to roll it a bit better so the fillings would be in the center rather than just at the bottom.
I made them into Mini-Boules.  The crust is crispy and crumb is chewy, the breads were just perfect for the chili filled Boules. 

Monday, November 01, 2010

Buttermilk Fried Chicken Testing

This Buttermilk Fried Chicken recipe is shared by the famous Chef Thomas Keller.
As I am doing some research on Chef Keller, I thought it will be interesting to also test make his favorite.  After frying 4 batches, I remembered why I have not fried chicken for over 20 years.  Irregardless, Chef Keller's tips he provides in his cookbook - Ad Hoc at Home helped making this fry chicken experience fun.  On top of it, it is ... "not like mine"... embarrassingly - my family knows I like dry chicken, so if I prepare any chicken or turkey, they are normally dry.  This is mostly because I don't like the word of "juicy" chicken or "tender" chicken, especially the chicken raised here in the State or today anywhere are not the same as the ones I've tasted in Asia - Japan, S. Viet-Nam, or Taiwan.  But this fried chicken recipe's Brine has convinced me that when the chicken is prepared correctly as described in the recipe, it is "delicious"!  and here, I don't mind describing these fried chicken as tender and moist because I know exactly what is in it from start to the end.
While I do have a copy of the Buttermilk Fried Chickens from the Ad Hoc at Home cookbook, I also found a complimentary copy posted at Amazon.com
Here it is:  http://www.amazon.com/Ad-Hoc-Home-Thomas-Keller/dp/1579653774
This photo is Chef Keller's picture - I wished mine turned out like that color.  

From Ad Hoc at Home: Buttermilk Fried Chicken

If there's a better fried chicken, I haven't tasted it. First, and critically, the chicken is brined for 12 hours in a herb-lemon brine, which seasons the meat and helps it stay juicy. The flour is seasoned with garlic and onion powders, paprika, cayenne, salt, and pepper. The chicken is dredged in the seasoned flour, dipped in buttermilk, and then dredged again in the flour. The crust becomes almost feathered and is very crisp. Fried chicken is a great American tradition that’s fallen out of favor. A taste of this, and you will want it back in your weekly routine. --Thomas Keller
Ingredients
(Serves 4-6)
  • Two 2 1/2- to 3-pound chickens (see Note on Chicken Size)
  • Chicken Brine (recipe follows), cold
  • For Dredging and Frying
  • Peanut or canola oil for deep-frying
  • 1 quart buttermilk
  • Kosher salt and freshly ground black pepper
  • Coating
  • 6 cups all-purpose flour
  • 1/4 cup garlic powder
  • 1/4 cup onion powder
  • 1 tablespoon plus 1 teaspoon paprika
  • 1 tablespoon plus 1 teaspoon cayenne
  • 1 tablespoon plus 1 teaspoon kosher salt
  • 1 teaspoon freshly ground black pepper
  • Ground fleur de sel or fine sea salt
  • Rosemary and thyme sprigs for garnish
Directions
Cut each chicken into 10 pieces: 2 legs, 2 thighs, 4 breast quarters, and 2 wings. Pour the brine into a container large enough to hold the chicken pieces, add in the chicken, and refrigerate for 12 hours (no longer, or the chicken may become too salty).
Remove the chicken from the brine (discard the brine) and rinse under cold water, removing any herbs or spices sticking to the skin.
Pat dry with paper towels, or let air-dry. Let rest at room temperature for 1-1/2 hours, or until it comes to room temperature.
If you have two large pots (about 6 inches deep) and a lot of oil, you can cook the dark and white meat at the same time; if not, cook the dark meat first, then turn up the heat and cook the white meat.
No matter what size pot you have, the oil should not come more than one-third of the way up the sides of the pot.
Fill the pot with at least 2 inches of peanut oil and heat to 320°F.
Set a cooling rack over a baking sheet. Line a second baking sheet with parchment paper.
Meanwhile, combine all the coating ingredients in a large bowl.
Transfer half the coating to a second large bowl.
Pour the buttermilk into a third bowl and season with salt and pepper.
Set up a dipping station: the chicken pieces, one bowl of coating, the bowl of buttermilk, the second bowl of coating, and the parchment-lined baking sheet.
Just before frying, dip the chicken thighs into the first bowl of coating, turning to coat and patting off the excess; dip them into the buttermilk, allowing the excess to run back into the bowl; then dip them into the second bowl of coating.
Transfer to the parchment-lined pan.
Carefully lower the thighs into the hot oil.
Adjust the heat as necessary to return the oil to the proper temperature.
Fry (thighs) for 2 minutes, then carefully move the chicken pieces around in the oil and continue to fry, monitoring the oil temperature and turning the pieces as necessary for even cooking, for 11 to 12 minutes, until the chicken is a deep golden brown, cooked through, and very crisp.
Meanwhile, coat the chicken drumsticks and transfer to the parchment-lined baking sheet.
Transfer the cooked thighs to the cooling rack skin-side-up and let rest while you fry the remaining chicken. (Putting the pieces skin-side-up will allow excess fat to drain, whereas leaving them skin-side-down could trap some of the fat.) 
Make sure that the oil is at the correct temperature, and cook the chicken drumsticks.
When the drumsticks are done, lean them meat-side-up against the thighs to drain, then sprinkle the chicken with fine sea salt.
Turn up the heat and heat the oil to 340°F. 
Meanwhile, coat the chicken breasts and wings.
Carefully lower the chicken breasts into the hot oil and fry for 7 minutes, or until golden brown, cooked through, and crisp.
Transfer to the rack, sprinkle with salt, and turn skin side up.
Cook the wings for 6 minutes, or until golden brown and cooked through.
Transfer the wings to the rack and turn off the heat.
Arrange the chicken on a serving platter.
Add the herb sprigs to the oil (which will still be hot) and let them cook and crisp for a few seconds, then arrange them over the chicken.
Note on Chicken Size: You may need to go to a farmers' market to get these small chickens. Grocery store chickens often run 3 to 4 pounds. They can, of course, be used in this recipe but if chickens in the 2-1/2- to 3-pound range are available to you, they're worth seeking out. They’re a little easier to cook properly at the temperatures we recommend here and, most important, pieces this size result in the optimal meat-to-crust proportion, which is such an important part of the pleasure of fried chicken.
Note: We let the chicken rest for 7 to 10 minutes after it comes out of the fryer so that it has a chance to cool down. If the chicken has rested for longer than 10 minutes, put the tray of chicken in a 400°F oven for a minute or two to ensure that the crust is crisp and the chicken is hot.
Chicken Brine
Makes 2 gallons
  • 5 lemons, halved
  • 24 bay leaves
  • 1 bunch (4 ounces) flat-leaf parsley
  • 1 bunch (1 ounce) thyme
  • 1/2 cup clover honey
  • 1 head garlic, halved through the equator
  • 3/4 cup black peppercorns
  • 2 cups (10 ounces) kosher salt, preferably Diamond Crystal
  • 2 gallons water
The key ingredient here is the lemon, which goes wonderfully with chicken, as do the herbs: bay leaf, parsley, and thyme. This amount of brine will be enough for 10 pounds.
Combine all the ingredients in a large pot, cover, and bring to a boil.
Boil for 1 minute, stirring to dissolve the salt.
Remove from the heat and cool completely, then chill before using.
The brine can be refrigerated for up to 3 days.

The followings are my photo journals of how mine turned out:


See my drumstick?  it looks almost burnt or petrified from volcano eruption, but it is not.
My fried chickens turned out with three different colors - likely my oil temperatures have fluctuated, and I didn't catch it.  Then, also the flour sediment build up at the bottom of the pot did not allow the heat to come through and also added color to the crust.  The peanut oil I used is fresh, but once those flour comes off the chicken as you dip it into the hot oil, it will burn at the bottom of the pot while your chicken is fried.
If the chicken piece is much heavier than the suggested weight, and if your chicken piece touches the bottom of the hot oil pot, then, that particular spot will brown much faster than the rest of the body.  So - Be mindful of the suggestion Chef Keller he points out - find the chicken within the weight that he noted or cut into smaller pieces; deep 6 inch pot, if you have one would be better - I learned.
Watching the timing and temperatures are truly skills that I need some polishing on.  Also using the right type of equipment.  My stainless steel pot is not as heavy gauge as my son's and even though I am using peanut oil and using thermometer to monitor the temperature, the chickens turned out differently, even my iron skillet did not turn out the fried chicken the way I wanted (my first time frying chicken in this skillet - so I don't really know my skillet - my fault) ... also, watch for flour sediments collected at the bottom of the pot. If you have a skimmer, it is a great idea to skim out as much flour sediments from the bottom as possible.   Or filter the oil into another clean pot, so the heat would come through strongly for the next batch...things like that.
So, will I make this fried chicken, again?  Yes! the recipe is great - very tasty.  If my son says, "Wow! it is great'.  "Can you make Honey Lime chicken, too?" Then, it got to be good, and I would make it again,... but I think I will rather venture out and go eat it at the Ad Hoc restaurant in Yountville or at our school's Oak Cafe for this fried chicken.  It's well worth the money spent and the enjoyable time without the clean-up to deal with.  The oil splatter clean-up I believe is one of the second reasons why I have not fried chicken for the last twenty years.  But this one is well worth the time it took to learn to cut the chickens, make the brine, wait 12 hours, test fry a couple - impressed with it myself, then, take the whole thing down to San Jose and  prepared it for my family.  And now I can enjoy and appreciate the prepared Buttermilk Fried Chickens I will be ordering once I get to the Ad Hoc restaurant.
Buttermilk Fried Chicken with Lime Honey Chili Dip: