Thursday, January 17, 2013

Tartine Croissants 1

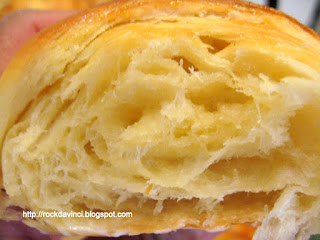
 Something is soooo mysterious about Croissants.   I never get tired of making it, and never tired or taking pictures of it.     I can do it over and over, and take pictures of every angle, and still amazed with it each time after I bake them.  This is the recipe from the Tartine baking book.  Pastry chef Elisabeth Prueitt and master baker Chad Robertson must have a satisfying day every day after baking them.   Viva la Croissants!
  I learned to use my tile counter to my advantage - each square is 7", so I can roll out the dough without much use of a ruler.
 I am getting better and better at lengthening the dough - streeeeetch! and I have many folds when I wrap it up.
Curved croissants are the originals that my grand-son loves.

 Straight shape croissants with goody fillings that my grand-daughter enjoys.


Holiday Biscotti 2013

This one is one of the must have recipe for the holiday.   It tastes so good and enjoyed by family members... especially good with coffee and hot chocolate.

This is the same recipes used in 2010 Holiday Biscotti and original recipe came from the Foodnetwork - Giada De Laurentis'
 I double the recipe for mine.

 Cool for 30 min., then cut with serrated knife in sawing motion.
 Ready to rebake to brown the sides.
Ingredients

  • 2 cups AP Flour 
  • 1 1/2 teaspoons baking powder
  • 3/4 cup sugar
  • 1/2 cup (1 stick) unsalted butter, room temperature
  • 1 teaspoon grated lemon zest
  • 1/4 teaspoon salt
  • 2 large eggs 
  • 3/4 cup pistachios, coarsely chopped--shell it yourself
  • 2/3 cup dried cranberries and cherries; drained and dried overnight Maraschino cherries, chopped
  • 12 ounces good-quality semi-sweet chocolate, chopped
  • Almond slivers   and sprinkles that you might like

Directions

Preheat the oven to 350 degrees F.
 
Line a half sheet baking pan (18x13") with silipad or parchment paper.   Shift the flour and baking powder in a medium bowl.   Beat sugar butter and lemon zest, salt, in mixer with paddle attachment until the butter is fluffy and pale in color;  Add 1 egg at a time and after well mixing in the first ones.  Stop and mix in pistachios and other goodies of your choice.  Use the spatula to incorporate them well.
 
Form the dough into a 13-inch long, 3-inch wide log on the prepared baking sheet. Bake until light golden - *depending on your oven-- about 40 minutes.  Cool for 30 minutes.
                   ** You are not done, yet.
Place the log on the cutting board. Using a sharp serrated knife, cut the log on a diagonal into 1/2 to 3/4-inch-thick slices. Arrange the biscotti, cut side down, on the baking sheet. Bake the biscotti until they are pale golden, about 15 minutes. Transfer the biscotti to a rack and cool completely.
  
Stir the chocolate in a bowl set over a saucepan of simmering water (bain marie) until the chocolate melts. (Or microwave it in a plastic or stainless bowl for 1 minute at a time - when you see the sign of "softness", take out and stir it crazy.  It is ready for use.)
Keep it warm over the bain marie, if your kitchen is very cold.  **I normally make the chocolate glacage rather then melting the chocolate chip straight.   The chocolate chip you purchased at the store is already tempered, so, it is possible to use it right after melting.  But I use chocolate pistoles, so I mix in a bit of heavy corn syrup and butter to make chocolate glacage for my biscotti.  It's the same glacage I use to cover some of my cakes.

Dip half of the biscotti into the melted chocolate. Gently shake off the excess chocolate. Place the biscotti on the cooling rack set over a parchment or wax paper to catch the excess chocolate for the chocolate to set  (you can reuse the chocolate after it becomes solid again). Roll in almond sliver before the chocolate solidifies or sprinkle with sprinkles or sugar crystals. Let it set until the chocolate is firm, about 35 minutes.

Wrap them up individually or in a holiday-ish container and share with friends and family.
 An excellent ways to recycle the leftover Christmas Seals I accumulated over the years.

Wednesday, December 26, 2012

Christmas Tamales

Making Tamales has been one of the goal in my list of goodies to make for the Holidays, and here it is.  Pork Tamales and my testing with blueberries and cheddar cheese.     I am so glad my grand-children and family enjoyed them well.
Most of the recipes were following the direction on the MASA (corn meal) package.
 Tamales sauce was pre-made many months ago, and kept frozen in mason jar in the freezer.  Defrost it and add to the slow cooker.   Quarter 2lb pork tenderloins lengthwise and sear them all around.  Transfer to the crocker pot with tamale sauce.   Slow cook it over night.    Turn off and cool as quickly as possible.    Shred the pork apart.     Refrigerate in a container overnight or until ready to roll.


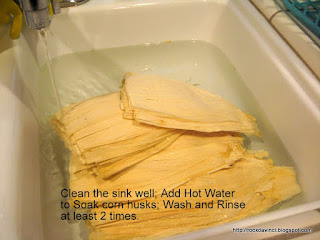
 Wash and sanitize the sink.    Add hot water and soak and wash and rinse the corn husks, at least 2 times.  Discard any corn husks with sign of mold as well as other pieces on top or bottom of the molded piece.

 Follow the instruction on the MASA mix to make masa mixture.
 Add more liquid - water or stock to make sticky mush rather than 'dough'.

 The picture here shows the masa spreaded on the husk, but i found out that spreading the masa 3/4 way to the top would be better than what I did, so that when I fold the pointing side to the wider side, the masa spreaded on the pointy side of the husk would cover/enclose the goodies in the middle of the masa.  Otherwise, I ended up tediously having to add extra masa mixture on the top to enclose the goodies.
 For my grand-daughter - blueberries. 
 Test steaming two first for the taste.


 Test steaming the best way -
 The steamed masa slided toward the bottom when steamed vertically.  So, the best way is to steam flat in my steamer - overlapping each other.


 Made Shrimp Tamales with lime juice, too.

 After a few hours, 57 tamales to share with everyone.
Next time, I am hoping to do this again with the family together.  It will get done much faster.