Saturday, April 08, 2023

HOME FRIED POTATO CHIPS - Nothing New

 I always enjoy watching a new kitchen tools of this and that doing its work for what it is made for and the story of Thomas Edison who invent tools, gadgets, and machines, etc. with the intention to help his mother - to alleviate her from labor intensive chores, etc.   Maybe that's why they say, ".... is a "Mother" of Success..."  maybe that's not the true sense, but regardless it brought back the memory of the day when I watch in wonder what is going on when a group of my mother's friend came to our house for what seems to compare to today's tupperware party.  It was back in the 60's.  Everyone sat in a circle and was presented this plastic containers with lids.  All the women's eyes lit up with joy.  I was not sure what the big deal was, but I guess it was.  Because they all took purse out and bought one to take home.  I also noticed the joy and the same 'eyes lit up' when my father brought home an electric rice cooker - National brand, then, the washing machine.  I think the washing machine was just amazing.  Our family's dearest housekeeper... naaa, she was more like our nurse mother, a family member.... was very delighted to see the washing machine.  All she had to do after it finishes washing is to hang up all the clothes on the bamboo poles and hung them out to soak up the sun.  Really Cool.  In the kitchen, beside the plastic container with a lid that became a star, I think the kitchen knives of all sizes are the boss even to this day.  There are vegetable slicers and peelers, too. I like them all.  But, my mother can skillfully slice the cabbage into thin hair threads effortlessly with her Chinese cleaver knife.  The thinly sliced cabbage threads melt in mouth served next to the hamburger steak meal with TONKATSU sauce and rice.  I remember it was a big deal when the potato chips showed up at our local candy stores.  It was sold by weight.  50 YEN (Japanese YEN) back then, woul buy you 5 slices of potato chips.  I recall when we lived in S. Viet-Nam, my oldest sister came home one day from her French cooking class and made us the fried potato chips.  The potatoes were thinly sliced and fried.  We really loved the snack.  I thought that was amazing.  Well, here in U.S., we get a small bag of potatoe chips for 95 cents and family size for $4.99.  We don't have to slave over washing the potatoes, peeling, then slicing them, then, to decide to follow icing them or not or fry them twice or not.  Just go to the store and buy a bag.  Unfortunately I need to control the amount of salt consumption, so I tried to make the potato chips myself.  I only remember that my sister told me that they need to be sliced very thin.  Then, it will puff up during frying.  Well.  I tried.  Of the 20 slices, maybe 5 will puff up.  The rest seems to be limpy.  I don't want to know how or what they put in the manufactured potatoe chips to keep the potatoes 'dry' in the bag, but I am happy to have the 5 slices of crisy chips.  
I wanted to buy the Mandoline slicer for many many years.  But unlike in Japan, the price of mandoline slicer have been very high until just recently I was able to buy one within a reasonable $30 for a mandoline slicer that can even do a crosscut potatoes.  Not that I need the crosscut slicer, but it was a good optional feature to encourage me to buy it.  So, with my mandoline slicer, I made my own potatoe chips.  Wow, one potatoe, two potatoes... you lost count after frying them into tasty potato chips.  3 potatoes are easily consumed in no time when it turned into potato chips.  I checked the Internet on the history of Mandoline slicer, and it associated itself to the French Guillotine inventor Dr. Joseph-Ignace Guillotin.. https://kitchenproject.com/history/Tools/Mandoline/index.htm  C'est intéressant; ЭТО ИНТЕРЕСНО; HONMA??  Regardless, I even watched at the famous "The Kitchen" restaurant in Sacramento, I watched one of the chefs use the Mandoline to produce even and consistent slices of ingredients. Cool, I thought.  So, why not for my kitchen.  I love it.
Be very careful and never run your fingers across the blade to test its sharpness.  It is extremely sharp like SHINKEN.


OISHII DESU!! Delicious!


LEMON TART - MY WAY

 I have been buying a bag of Lemons and wanted to make Lemon Tarts.  But I know how sweet the little tart square can be and all that calories... hmmm....  So I came up to limit the size of each tart.  It could have been baked in a baking sheet, then, fairly and squarely cut into nice litte cubes or into size that I wish.  But I've done that and I thought why not use a small tart pan, but I cannot find the pan!! After searching for it high and low, I decided to use the madeleine pan.  The side curves and could hold the filling.   And here is the result.


So far so good.
As they cool, the filling sink down.  The bottom looks good, too.
The taste?  Tangy, lemony, and sweet tart.  Just right.

GRAPEFRUIT PIE - REALLY?


 So this is my adventure in testing a Grapefruit Pie recipe I came across in Sunset Magazine, Holiday Issue 2022.   I thought it is unusual, and I just so happened to have some Grapefruits and Oranges and Beets Powder.  So, here is my adventure result.
Recipe from Sunset magazine Holiday Issue 2022 says - for FILLING:
1.  14 oz. condensed milk  - I used 14 oz Eagle Brand Fat Free Sweetened Condensed Milk 
2.  5 large Egg Yolks 
3.  3/4 C fresh grapefruit juice, strained.  I only had 1/2 C, so I squeezed 2 Oranges
4.   1/4 C fresh lemon juice, strained
5.   2 tsp. grapefruit zest

CRUST is interesting that you make into a large sheet of cookies and crumble them up to make the crust.  I can use the same idea for other pies, too, then, I thought.
1.  2 C AP Flour
2.   1 C Powder Sugar 
3.   3/4 tsp. Kosher Salt
4.  6 tsp Beet Powder - I bought it from Walmart.  Walmart carries a lot of interesting items.
5.   1 C Butter, unsalted.  Cut into 1/2-in cubes and at Room Temp.
6.   3 Tbsp melted butter.
 
Filling
Mix in a bowl, 1 &2 well by hand with spatula or large spoon.  Then, 1/4 cup at a time, add liquid #3 and 4.  Mix well.  Do NOT use a mixer.  Blend gently everything, avoid creatting bubbles..  Add #5 zest.  Cover and Set aside.
Crust -
Food Porcessor:  In a bowl, mix ingredients 1 though 4 with spatula or whisk, if you prefer to do this by hand. Or use Food Process and process for 10 seconds.  Then, Add butter pieces and process - depending yon your processor - do in Long Pulse or ON for 30 to 60 seonds until the mixture should come together to form a dough.  
Transfer to a work surface or on top of a parchment paper. Gather the dough gently together.  
Preheat oven to 325'F.   
Spread the dough down and roll into 1/2 inch thick.  Or, roll the dough into 1/2 inch thick on top of  a 1/2 sheet parchment paper, then, transfer onto a baking sheet.
Bake 12-14 min untill 'cookie'ness, but not browned.
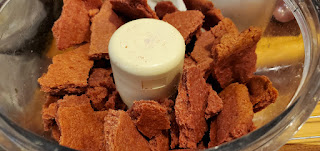
Remove and transfer the cookie to a cooling rack.   Once cooled, break into large pieces.  Transfer to Processor and Pulse into sandy crumbs.  Add the melted butter and pulse until combined.
Get your favorite 9" pie pan - glass or tin.  Press the cookies to form the shell.  
Chill pie shell for 20 min - make sure you don't have any smelly items in the refrige. ( The pie shell will act like an air filter.)
5 minutes before 20 min is up, Preheat overn to 325'F - Bake for 5 min the empty CRUST out of refrigerator. 
Remove from oven.
Cool it to room temperature.
Pour in the filling.
Bake for 15 min.
The filling will be loose when you insert tester or jiggle a bit, but that's okay.
Chill at least for 2 hours before serving.
Serves 6

So the taste?  I really like the tanginess and smooth texture.  As a tester, I think it turned out really good.   I think there can be some modification in the future to lower the "carb" and cholestrol somehow.  But I think it is what it is.  And just share the love and serve a very thin sliver of slices to enjoy with 12 people instead of 6.  ha, ha.... 


Add the crust ingredients into Processor and process.
Tranfer to the lightly floured work surface and form into a mass of dough.  Preheat oven to 325'F.  Roll out over the parchment paper or in baking sheet lined with parchment and roll out to 1/2 inch thick.  Bake into large sheet of cookie but not browned, then cool entirely.
Break the cooled cookie into pieces to fit into Processor bowl.  Process until sandy crumb.
Press into 9" pie pan.  Follow the instruction to bake for 5 min, then cool to room temp. Then, Fill.
Fill and bake for 15 min.  The golden yellow filling should turn pale.

The baked pie is still loose, but that's okay... it said.... so I trusted it.  Chill for 2 hours.
Enjoy the creamy refreshing slices of pie.
This pie is so tasty.  Slicing the quarter slice into three and server 1/3 of it is just delightfully satisfying I think.  Try it.  You will like it.