So, it is already 2 am, Friday morning. Just finished baking Pandan Chiffon Cake and mini-Pandan Chiffon Cake (recipe that came from this 6" paper baking tube pan, manufactured in Japan, $1.50); and MOCHI MOONCAKE with Taro Filling; I might as well wake up to the aroma of fresh baked bread, I thought. It has been a couple of years since I last baked with my bread machine. I needed bread, and I resisted buying the ready made ones from the grocery store, so, here I go. I chose HOKKAIDO MILKY LOAF. The challenge is to get my bread machine to "knead" long enough to form the needed gluten. I decided to let it run through the 'Start' cycle's kneading process twice. After the first kneading cycle, I knew I had to scrape the bowl well. And, I am glad I did. I turned it off. Then, I reset to start the new cycle again. And set the timer on to bake in 3 hours. I woke up to the beautiful fragrance of baked bread.
Texture? I think, if I had let it go through the cycle 4 times, then, it would have reached the lovely beautiful stranded texture known to Asian style bread. But this suffice my need for now. The next time, what I will do is pre-knead it by hand and then set in the bread machine to bake with the timer on. Why pre-knead by hand? I noticed my 300 kw Kitchen Aid mixer is not powerful enough and taking too long to knead the 4-5 cups flour dough to the desired consistency without the motor becoming too hot to the touch.
To Share, To Enjoy Life Together. Why not make the "Cooking Adventures" as part of family activities to share, explore, and appreciate the differences... Let's Rock together in the Home Kitchen Lab!
Sunday, September 05, 2010
Mochi Mooncakes with Taro Filling
Taro root filling:
300 g Pre-peeled Large Taro, cut into small chunks and cooked (microwaved), and mashed
2 Tbsp Milk
1/2 C sugar
Method:
Microwave the Taro root chunks on a plate with 1 Tbsp of water and covered with microwave plastic cover shield. Use "potato" setting to cook till tender. Stir from time to time to make sure that they are cooked evenly and not overcooked to become 'petrified'.
Remove from the microwave and let it steam for few minutes without uncovering.
Add all ingredients in the food processor. Process until it becomes paste like consistency.
The original filling recipe ... I can't remember which blog it is right now, and I will correct this information later, but was for Sweet Potatoes and 1/4 C milk. I did mix the milk and sugar and chunk taro roots at the beginning. But when the putting the taro roots through through the "riser" didn't turn out ideally, I was spoon transferring them to the food processor. That's when I noticed the consistency of the mixture is already quite soft with just about 2 Tbsp of milk. I had about 2 Tbsp of milk left and likely some melted sugar in it. (Luckily the taro root is quite flavorful and has sweet tasting. If not, add 1/4 C more of sugar.)
Refrigerate for a couple of hours, covered.
Scoop out with 1 Tbsp size cookie scoop onto plate. *Keep it cold for ease of handling
** Depending on the size of the mooncake molds, cut the size of the filling to 1/2 Tbsp or press out the mooncake skin thin. ** My personal preference is thick outershell than the filling.
MOCHI MOONCAKE INGREDIENTS:
230 g SHIRATAMAKO "powder" form.
1 Tb Vanilla Sugar powder + 1/4 C minus 1 Tb Sugar
1 Tb MATCHA (Green Tea Powder)
2/3 C water
Japanese Potato Starch - KATAKURIKO 1/2 C
Dough Prep:
In a microwaveable bowl, add 230 g SHIRATAMAKO powder. In a small saucepan, mix sugar and Matcha together and mix well. Add 2 Tb of water to mix.
Then, add some more to mix, so that MATCHA is incorporated; then, add the rest of the water and mix well. Then, heat the mixture over medium heat till sugar melts, but NOT boiling.
Add the liquid mixture into SHIRATAMAKO powder. Stir well.
If the texture looks dry. Add some more water until pasty consistency is formed. Ear lobe soft dough. Not Liquidy. **The texture is totally different than when using SHIRATAMAKO GRANULES. (Check my previous blog posting's image on DAIFUKU-MOCHI).
Microwave it 1-1/2 min. Take it out, mix. You should see some rubbery formation at the edge of the glass bowl. *Note: Nuking time depends on the power of your microwave.
Return to microwave for another 1-1/2 min. But stop at 45 sec to bring out to stir. Is it rubbery and translucent? The ultimate result you want is "translucent" stage MOCHI. Stir with sturdy spoon to mix the dough to help incorporate mixture. Return to microwave again, if needed, to nuke it till it is at 'transluscent' stage, but not petrified. Be careful - it is dead hot - Take it out and Stir crazy. So, you need to know your microwave's power.
Transfer to the plate sprinkled with KATAKURIKO. Cool to Medium Hot.
Measure with sight and snap off approx two tablespoon of mochi.
Powder your fingers with KATAKURIKO and start pressing it out into round shape.
Place one taro filling. Start enclosing it in BAO making method.
Then, roll it in KATAKURIKO completely. Set aside until you have created at least 4 filled rounds.
Then, Select the mooncake mold. Insert the rounded mochi with filling into the mold.
Place the mold down on work surface covered with KATAKURIKO.
Press down on plunger without letting any mochi leak out from the molding's end.
"Pressing down the plunger" also imprints the 'design'/'pattern' of the mold onto the MOCHI.
Lift the mold off the work surface.
Push the plunger down to push the finished mooncake out.
Surprise!! MOCHI MOONCAKE!
When I was making the DAIFUKU MOCHI with the SHIRATAMAKO Granules, I had to work quickly to enlcose the filling. But when I was working to make the MOCHI MOONCAKE, I remembered how cotton soft the outer MOCHI to the touch when DAIFUKU is formed. This would not work well when you need the finished product to hold the shape after unmolding from the mooncake mold. I noticed, as I was exploring and timing how quickly it starts to mishape after unmolding, the MOCHI dough started to cool, and as I worked with the cooled MOCHI, the finished MOCHI MOONCAKE kept the pattern and the shape better. So, my advice is to let the MOCHI cool to Medium hot. Prepare at least 4 filled rounds.
Then, start forming in the mooncake mold.
*Make sure the filld rounds are covered completely in KATAKURIKO to prevent from sticking onto the molds.
Keep in covered container. Then individually wrap in plastic wrap or in gift box.
My first round is a success. So, I have two more weeks to turn out moon cake varieties in time for the Chinese Mid-Autumn Festival for my family.
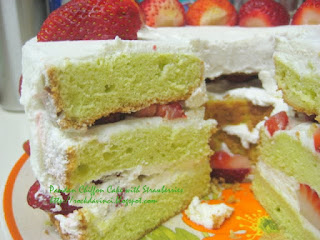
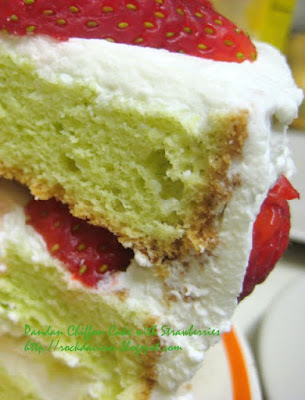
Pandan Chiffon Cake with Strawberries
This is the Pandan Chiffon Cake version made with home prepared fresh coconut cream and freshly squeezed pandan juice. I find this adventure as fun as Canneles de Bordeaux. Simple ingredients, yet the mixing technique or the baking temp can break the cake.
The recipe is the same as the last posting (from Seadragon). The photo shows the texture of the cake with larger pores than the 1st cake--very fine, pound cake like texture. I forgot to give it a quick snap tap before I put the pan in the oven. The moisture is just as great, however. Taste - great taste! Just the thought that you labored over squeezing the fresh coconuts cream and pandan juice really make the cake taste even better. If I have eggs from home raised chicken will add another plus to the taste bud, especially we are experiencing the Salmonella recalls on eggs.
The memorable part of producing fresh coconut cream and pandan juice this time will stay with me for a long time. Anytime I think about making my own fresh coconut milk/cream, I think about this metal bar coconut shredder tool of Viet-Nam. Well, that was back in the 70's. I don't have the shredder tool nor the time. It is already 8 pm on Thursday evening. I just got back from SF Supermarket in Sacramento after work. I luckily found Pandan leaves - "La Dau" is the descripton on the package. I also picked up Large Taro Root, and Wow! I found Drangon Fruits --- Wow! $3.99 a pound. But I can't possibly pass this chance. I bought two of them - $eleven Bucks!! I hope it will taste good when I try my hand on the Dragon fruit Sherbet bom bom I saw. So, where was I.... yes, the coconuts. I got one 'old' coconut and one 'young' coconut. I enclosed it in a plastic grocery bag and hammered down hard on the 'old' coconut's eyes. Yep! thick white coconut meat. Pour the juice into a bowl, filter it once through a strainer. Then, I used the pairing knife and remove the tough membrane-peel off the white meat. Cut into 1 to 2 inch chunks. Keep chunks in the juice to keep moist. Wash Pandan leaves thoroughly, cut the bottom steam - about 3 to 4 inches - ** this is my first time working with Pandan, and by 'touch' I find the stem to be quite tough. So I am guessing, like Broccoli or Asparagus to cut back some to the tender point? Cut the leaves into 1 to 2 inches. Add 1/2 C water + Cut Pandan leaves into food processor. Process it till it is .... wait, what's going on? I don't see any juice. It seems that the leaves have drank all the water. I barely see any juice or sqeezeable juice. So, what is going on here? I have the slightest clue because I have never seen this Pandan before nor how it is processed.
Let me think about this.
Back to the tool of choice to shred the coconut to produce coconut cream/milk... Of all the tools I have -
Option 1: I could use the blender and puree it with some of its own juice, then squeeze.
Option 2: Use the food processor.
But after some thought, I decided on the "The Juiceman Jr." I might be able to produce the coconut cream and finely shreded coconuts that I can process further to get coconut milk. Bingo! I got the freshest and creamiest thick coconut cream. While it may be risky to use the Juiceman - as the coconut meat is quite hard, I was not sure if the Juiceman's fine shredder teeth could handle it.
1 'old' coconut + 1/4 C coconut juice produced 175 ml coconut cream and 2 C finely shredded coconut.
Back to the Pandan leaves. I was not about to give up on $5 worth of 15 Pandan leaves. The Juiceman is the answer. I processed the Pandan leaves with the Juiceman and I got 75 mil of Pandan juice. Whew! but wow! that's all? (I wonder how much do Pandan leaves cost in Malaysia or Singapore.)
Instead of oil, I used 2 oz of soft butter. Chill. The next day, I whip up a pint of heavy whip cream... it is not enough to cover the cake. I should have prepared the pastry cream, additionally. But I have to make a do with it. We enjoyed every bite of the fresh taste of this Chiffon cake.
Subscribe to:
Comments (Atom)


