Every country around the world has some sort of pancakes served with meal of the day. This one is Chinese pancake that are served usually with lunch or supper. It's main ingredient is the chopped fresh green onions. I was not a great fan of green onions when I was young. They tasted like soap in my mouth. I ate them only when they are pre-stir fried. As I grew older, that raw soapy taste has disappeared, and I enjoy eating green onions on top of UDON or as stir fried green onion dish by itself.
There are two way to mix to make this dough. One way is to use boiling water. Then, there is using the room temperature water. For this one, I am testing with the boiling water. All purpose of using the boiling water is to make a pancake that is crispy outside and soft center. When I made this for the first time back in Viet-Nam, I didn't really recall so many steps to make this pancake. It turned out delicious just the same. But for the curiosity sake, lets see the result of all methods. I think it's in the technique of folding and rolling that creates the layers like in the puff pastry. We'll see.
Ingredients:
Method 1 - using boiling water plus shortening in the dough
2 C flour
Boiling water - after the bubbling have subsided - start with 1 C
1/4 C solid vegetable oil or rendered pork fat (lard) or butter
Salt
a bunch of green onions - chopped well - will produce about 1-1/2 C to 2 C
Sesame seed oil - about 1/4 C
Cooking oil - 1/4 C to 1/2 C
Mix flour with 1/4 C solid vegetable oil until crumbly.
Add at least 10 Tablespoon of boiled water to start off to mix the flour.
(You can use the mixer with dough hook to knead the dough as well.)
It should form a shaggy dough. Add some more water or flour, if needed.
The mixture should come together after 3 minutes of kneading. Remove from the mixer, if used. or from the bowl to a work surface and knead into a ball. The dough will look rough at this point. Cover and rest for 10 min.
(Repeat three times) Unwrap and with hands, turn/knead the dough a few times. You will notice the dough becomes supple and smooth right away at each turn. Form into ball and rest again for 10 minutes. You can get away with just two resting period and if the dough is supple and smooth after the second turn.
Divide the dough into 4 portions - depending on the diameter you desire. Roll out the first one into round disc, about 1/4+ inch thick. Cover it with saran wrap while you complete the other.
Roll the dough into cigar shape, then, roll the ends on top of each other.
Twist one end on top of the other end.
Wrap in saran wrap to rest for 10 min. before rolling into the final pancake form.
Remove from the plastic wrap. Push down with the palm of your hand first, then, with the rolling pin, roll out into a disc - about 1/4 inch thick. Set aside and roll out the rest. For more layers, repeat the folding, rest, and roll out again.
Heat the skillet.
Add 2 Tbsp oil.
Place the first pancake in. Cover with lid. (Steam helps to cook and form separate layers ... like in puff pastry in the oven.)
Fry at Medium low heat. - 6 min. or till beautiful brown.
Turn it over. Fry without cover 4 min. or till beautiful brown.
Cut with pizza slicer or knife.
As expected, the pancake turned out crispy crust with flavorful green onions enclosed in soft body. It turned out with an expected texture of the Chinese fried dumpling skin.
Serve with meal.
Dipping sauce, if desired. Mix the following together.
1/4 C soy sauce, low salt
1 to 1-1/2 Tbsp rice vinegar
1 tsp sugar to taste and add more, if needed.
As you gain experience, all this resting the dough before each turn and so forth will become natural and effortless to make this flavorful pancake. You will recognized if the dough is ready with two turns and rests or with one turn. Enjoy!
On with some more testing - multi-folding with sesame oil between each layer; without the shortening mixed in the flour; make with room temperature water. ... I think the secret is in the folding.
There are two way to mix to make this dough. One way is to use boiling water. Then, there is using the room temperature water. For this one, I am testing with the boiling water. All purpose of using the boiling water is to make a pancake that is crispy outside and soft center. When I made this for the first time back in Viet-Nam, I didn't really recall so many steps to make this pancake. It turned out delicious just the same. But for the curiosity sake, lets see the result of all methods. I think it's in the technique of folding and rolling that creates the layers like in the puff pastry. We'll see.
Ingredients:
Method 1 - using boiling water plus shortening in the dough
2 C flour
Boiling water - after the bubbling have subsided - start with 1 C
1/4 C solid vegetable oil or rendered pork fat (lard) or butter
Salt
a bunch of green onions - chopped well - will produce about 1-1/2 C to 2 C
Sesame seed oil - about 1/4 C
Cooking oil - 1/4 C to 1/2 C
Mix flour with 1/4 C solid vegetable oil until crumbly.
Add at least 10 Tablespoon of boiled water to start off to mix the flour.
(You can use the mixer with dough hook to knead the dough as well.)
It should form a shaggy dough. Add some more water or flour, if needed.
The mixture should come together after 3 minutes of kneading. Remove from the mixer, if used. or from the bowl to a work surface and knead into a ball. The dough will look rough at this point. Cover and rest for 10 min.
(Repeat three times) Unwrap and with hands, turn/knead the dough a few times. You will notice the dough becomes supple and smooth right away at each turn. Form into ball and rest again for 10 minutes. You can get away with just two resting period and if the dough is supple and smooth after the second turn.
Divide the dough into 4 portions - depending on the diameter you desire. Roll out the first one into round disc, about 1/4+ inch thick. Cover it with saran wrap while you complete the other.
Take the first dough and roll into 10 inch diam. disc. Smear the dough with 1 tsp of sesame oil.
Sprinkle 1/8 tsp of salt and smear into the oil on top to spread around the disc.
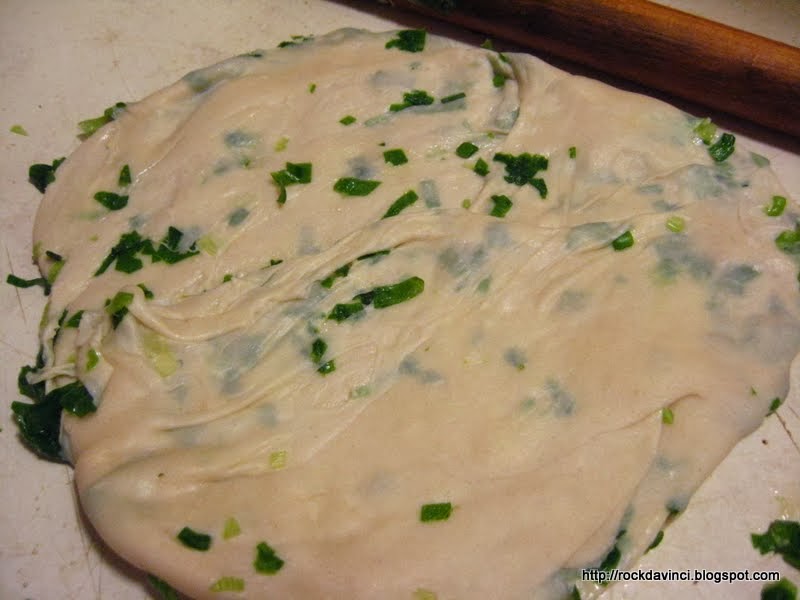
Spread chopped onions.
Roll the dough into cigar shape, then, roll the ends on top of each other.
Twist one end on top of the other end.
Wrap in saran wrap to rest for 10 min. before rolling into the final pancake form.
Remove from the plastic wrap. Push down with the palm of your hand first, then, with the rolling pin, roll out into a disc - about 1/4 inch thick. Set aside and roll out the rest. For more layers, repeat the folding, rest, and roll out again.
Heat the skillet.
Add 2 Tbsp oil.
Place the first pancake in. Cover with lid. (Steam helps to cook and form separate layers ... like in puff pastry in the oven.)
Fry at Medium low heat. - 6 min. or till beautiful brown.
Turn it over. Fry without cover 4 min. or till beautiful brown.
Cut with pizza slicer or knife.
As expected, the pancake turned out crispy crust with flavorful green onions enclosed in soft body. It turned out with an expected texture of the Chinese fried dumpling skin.
Serve with meal.
Dipping sauce, if desired. Mix the following together.
1/4 C soy sauce, low salt
1 to 1-1/2 Tbsp rice vinegar
1 tsp sugar to taste and add more, if needed.
As you gain experience, all this resting the dough before each turn and so forth will become natural and effortless to make this flavorful pancake. You will recognized if the dough is ready with two turns and rests or with one turn. Enjoy!
On with some more testing - multi-folding with sesame oil between each layer; without the shortening mixed in the flour; make with room temperature water. ... I think the secret is in the folding.


