To Share, To Enjoy Life Together. Why not make the "Cooking Adventures" as part of family activities to share, explore, and appreciate the differences... Let's Rock together in the Home Kitchen Lab!
Monday, August 10, 2009
Monday, June 22, 2009
Japanese Mochi Cake
Yield: 13x9" pan size


Ingredients and Methods:
1/2 Cup Soft Butter - Creamed with Sugar until fluffy and pale yellow
20 Packets - Truvia or 1 Cup Regular Granulated Sugar
3 to 5 eggs - 3 eggs are plenty, but if you prefer - 5 eggs will give a better fluffier result; see last two pictures' notes at the end of this post.
1 box 16 oz MOCHIKO - Sweet Rice Flour (Blue Star Brand by KODA FARMS - normally in a white box. Purchase at Japanese (Mitsuwa) or Asian Market (99 Ranch) for $1.39 to $1.67)
5 tsp Baking Powder
2-1/2 Cup Milk (at least room temp, but NOT cold) or use 1-1/2 Cup Coconut milk + 1 Cup Milk

Add one egg at a time to the Butter mixture. Blend well until it is no longer slushy before adding the second egg, etc. Once all eggs are added, the mixture is liquidy.

 Mix Mochiko together with baking powder well. Then add liquid. Mix with large spatula and mash mochiko well with milk.

Add butter mixture into the Mochiko mixture.
 Use large spatula and smash dry ingredient lumps against the bowl and mix until smooth. There should be no large lumps.
Pour into the baking dish.

(with Chopped up Sour Apple Balls. Chocolate tasted best.)

Bake at 350'F for 45 minutes - Golden Brown and or inserted knife comes out 'dry like'. (Optional) Bake with a bowl of (6 Cups) Hot water sitting at the bottom of the Gas oven for steam during the baking.

(Optional)
Add chopped up Hershey Chocolate with Almonds and sprinkle on top before baking.
Or add any other sprinkles on the top.
Let the favorites to float on top and bake.
Update: 1/16/2010
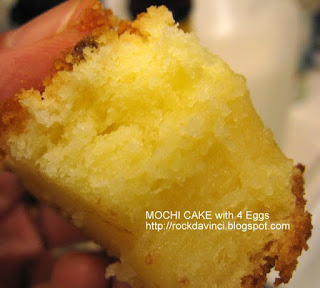
With 4 eggs, the Mochi cake definitely puffs up more with cake like texture.


Ingredients and Methods:
1/2 Cup Soft Butter - Creamed with Sugar until fluffy and pale yellow
20 Packets - Truvia or 1 Cup Regular Granulated Sugar
3 to 5 eggs -
1 box 16 oz MOCHIKO - Sweet Rice Flour (Blue Star Brand by KODA FARMS - normally in a white box. Purchase at Japanese (Mitsuwa) or Asian Market (99 Ranch) for $1.39 to $1.67)
5 tsp Baking Powder
2-1/2 Cup Milk (at least room temp, but NOT cold) or use 1-1/2 Cup Coconut milk + 1 Cup Milk

Add one egg at a time to the Butter mixture. Blend well until it is no longer slushy before adding the second egg, etc. Once all eggs are added, the mixture is liquidy.


 Mix Mochiko together with baking powder well. Then add liquid. Mix with large spatula and mash mochiko well with milk.
Add butter mixture into the Mochiko mixture.
 Use large spatula and smash dry ingredient lumps against the bowl and mix until smooth. There should be no large lumps.
Pour into the baking dish.

(with Chopped up Sour Apple Balls. Chocolate tasted best.)

Bake at 350'F for 45 minutes - Golden Brown and or inserted knife comes out 'dry like'. (Optional) Bake with a bowl of (6 Cups) Hot water sitting at the bottom of the Gas oven for steam during the baking.

(Optional)
Add chopped up Hershey Chocolate with Almonds and sprinkle on top before baking.
Or add any other sprinkles on the top.
Let the favorites to float on top and bake.
Update: 1/16/2010
With 4 eggs, the Mochi cake definitely puffs up more with cake like texture.
Friday, February 08, 2008
AMISH Bread Starter - Sourdough Bread #4 - a Success

Flat Sourdough Flat French Bread and Loaf Bread
After several weeks and numbers of tries in modifying the original AMISH Bread Starter I obtained in October 2007, I trained it to proof with just water and flour or water and pastry flour. Sugar was removed for 20 days, then 1 TBLsp of sugar was added to the baking starter, and 1/2 cup sugar is returned to the starter - as the starter looked a bit weaker - not bubbly as usual. However, you would know that the starter is still alive when the zip lock bag continues to swell up like a balloon and bubbles are forming every few hours before your daily routine of kneading the bag.
The first three attempts in turning them into Sourdough bread produced interesting results.
The dough was not kneaded but just mixed with wooden spoon - just enough to make the flour disappear.
The bread texture turned out looking rough and airy, but still very heavy. Dough tasted chewy, but just not "light" enough.
On the 4th batch tonight, it turned out successfully compared to the other three.
Equipment:
A Large plastic bowl with cover
A large Wooden spatula or Spoon or anything you can use to mix up the heavy dough without breaking
Measuring cups
Ingredients:
1. 2 Cups of AMISH Bread Starter that has been modified and have been maintained with just water and flour.
2. 1-1/2 Cups of Organic Low Fat Milk -- Lactose Free - Warm to touch
3. 1 TBLsp of Sugar
4. 3-1/2 Cups Unbleached Organic Flour
*Organic ingredients are optional
5. 1 egg white + 1 TBLsp water
8 pm Thursday evening.
Mix first two cups flour in milk and Starter with wooden spoon.
The dough will form, but it is stuck to the sides of the bowl.
Add one more cup of flour and continue mixing with wooden spoon.
Then, add 1/4 cup more and 1/4 cup more just enough to get the dough leave the side of the bowl....but not quite. But with your spoon, it leaves the side of the bowl when gathered. If touched, the dough will stick to your fingers.
Do your best and form it into a Ball size.
Cover the bowl and let it rise to double or more in size.
6 am Friday morning.
Use the wooden spatula and divide a section to a non-stick baking pan.
Stretch the dough into shape of French Flat Bread.
Cover with aluminum foil or whatever you have - leaving enough room at the top - like dome shape, but air-tight to rise.
If desired, transfer the rest of the dough into a loaf pan (greased and floured).
Using wooden spatula, shape it into a desired form in the pan.
Cover air-tight to rise and also leaving enough room at the top to allow dough to rise without sticking.
*Or place a piece of parchment paper between the dough and Aluminum foil to cover. Parchment paper can be left on the bread to bake and taken off easily after 10 minutes into the baking.
6 pm Friday evening.
Pre-heat oven to 325F - Conventional Large Gas Stove is used for this baking example.
Place the rack at 2nd from the top rack and place Loaf Bread - **without removing the aluminum foil - if stuck on the dough or leave the parchment paper, if stuck on the dough.
Please the rack at 2nd from the bottom and place the Flat French Bread.
Prepare egg white wash:
Beat 1 egg white + 1 TBLsp of water
After 10 minutes, without taking the breads out of the oven - still on the oven wire rack, carefully and gently remove the parchment paper or aluminum foil on to of the bread that might have gotten stuck to the dough.
**should have oiled the top of the dough during proofing - could have avoided dough from sticking to the material covering the pan or have placed the parchment paper.
Brush the bread with egg white wash.
Bake for 20 more minutes - Check on the Flat French Bread first
The bread should "sound" hollow when tapped and crust is Golden brown.
Switch the position of pans, if necessary.
Bake the loaf bread for another 20 to 30 minutes longer - until Golden brown and "sound" hollow when tapped.
Here are some visual aids:
Amish Bread Starter - Fed every 5 days.

Starter - Bubbly - Sign of Life?

First 3 sourdough breads' texture - Bubbly, but Dense, and heavy - did not rise enough?

Batch 4 - Flat Sourdough French Bread


Texture is chewy and light

Batch 4 - Loaf bread turned out much lighter than before.

Subscribe to:
Comments (Atom)


