Thursday, February 19, 2015

Making Chinese New Year MOCHI Cake

Happy Chinese / Lunar New Year!!
Every country has a different way of celebrating their New Year especially when it comes to food.   We learned while we lived in South Viet-Nam that friends and neighbors would purchase New Year cake as gifts during their "BAI NIEN" - meaning, we visit friends, family, neighbors to 'wish them a good year'.  Chinese New Year cake is made of glutinous rice flour - same as 'MOCHI' flour, brown sugar (they call it "red" sugar), red dates, or red beans, pork fats.   I never got used to the tiny bits of pork fats in them.  I remember poking them out with my fingers.  Anyways, thanks to modernization and availability of the glutinous rice powder at local Asian market, I can control what goes in it.  I wished the glutinous rice powder is Organic, Non-GMO, unbleached.  Maybe they will catch on in the next few years.
 

Equipment:
1.  A large Steamer that can hold water at least for 2 hours of steaming at high heat or check the post often without risking the loss of steam power and resulting in 'raw' cake << bad luck! @#~!
2.  Large Flour Sack Cloth
3.  Several removable bottom cake molds
     Spring load cake molds are easy for this purpose too.
4.  Cut Parchment paper to cover bottom and sides
5.  Brush Olive oil on parchment paper.  I am not making last year's mistake.  So, be sure to oil parchment paper even though you see the EVOO accumulating at the bottom.  These puddle will distribute itself all around once the cake mixture is added and during steaming.  This EVOO will assure easy removal of very sticky rice cake from the cake mold and allow you to remove it off the cake afterwards.
6.  Saran wraps
7.  a Couple of Baking sheets
8.  Large mixing bowls
9.  Measuring cup
10.  Kettle - Keep hot boiling water handy at all times.  You may need to refill your Steamer pot and you want the additional water to be boiling water
11.  Large Spatula

Basic Ingredients are easy, and I followed one of the cooking book that my mother gave me many years ago.
6 Cups of Glutinous Rice Powder
2 Cups Hot Water
2 Cups Dark Brown Sugar for better taste
Dissolve Sugar in Hot water first.  Then, add glutinous rice powder.  Mix well till smooth.  Add any optional goodies.

Optional addition:
Rehydrated Chinese Red Dates << dried JUJUBE fruits  or why not try regular dates?
Cooked Red Beans
Mashed sweetened Taro (my favorites)
Cassia Flower Jam
Walnuts

Bring water of steamer to a full rolling boil.    Fill each cake mold with batter.  Place them strategically in the steamer pan.  If your steamer is made of aluminum - TIP:  Cover the lid with a large sheet of Sack Flour cloth (can be found at Walmart at pots and pan mitten section, usually) to keep evaporation moisture from dripping into cake.   Steam for 2 hours.  DO NOT Open the lid, preferably.
Depending on the sizes of the cake, at 1 hour 20 minutes, quickly open the lid and insert a tester into the cake to check for doneness and immediately close the lid.   The dough should be translucent.
Turn off heat.  Wait for 10 minutes without opening the lid.
Spread two sheets of Saran Wrap on a baking sheet.
Invert the cake over the wrap.  Remove the parchment paper.
Leave to cool.      or SERVE when warm.
Note:  The following process will take several hours.
Skin should form around the cake.  No longer quite sticking to the fingers.
Flip it over and dry.   Slice and serve.
Wrap and Store in Refrigerator.  
Slice and pan fry them and serve or each French Toast style - meaning, beat an egg, and dip the cake slice in it and pan fry it.
Red Dates with Cassia Flower Jam
Red Beans with Cassia Flower Jam
Wish everyone a Great Prosperous Happy New Year, to Health, and many Blessings!

Tuesday, February 10, 2015

Polly's Almond Pudding with Fruits Cocktails

Milk Almond Pudding is so refreshing and easy to make.
You will enjoy it anytime.
Even though I am lactose intolerant, I found this Organic milk by Stremicks Heritage Foods the best milk without giving me any side affects.  I have tried Organic Valley milk, but unfortunately, it does not do well with my system.
So, use whichever brand milk of your choice.


Ingredients:
AGAR AGAR gelatin package or AGAR AGAR sticks, usually sold in Asian market - 1 inch square by 12 inches long, sold in set of 2 in clear plastic.
Follow the package to prepare the AGAR AGAR - instead of full 6 Cups of boiling water, add 3 C of water
(or buy powder AGAR AGAR package and dissolve 2 g to 120 g of liquid)

Add Organic Sugar - 3/4 C
1 tsp of pure Almond extract
3 C whole Organic Stremicks milk

Bring water in a pot to a boil.Stir in AGAR AGAR Powder.  Stir and cook over medium low heat to make sure all AGAR AGAR are dissolved completely.  Add sugar.  Stir until dissolved.
Add milk.
Transfer the mixture into a wide pan that you can slice easily the set pudding later.
Refrigerate until set.
When ready to serve.
Slice the set pudding into 1/1 inch squares or rectangles.

Add 2 cans of your fruits cocktails or cut up organic fresh fruits of your choice.
Serve


Polly's Quick Stir Fried Organic Red Chard

Just as quick as I can dish up a stir fried fresh Kale, I tried it with Organic Red Swiss Chard.  Whether Organic or not, it is up to you, but make sure to wash and rinse vegetables carefully.   You will notice the color of rinsing water change from mirky color sometimes to fresh bright greenish tinted water, etc.  It won't hurt to sprinkle 1/4 teaspoon of salt while washing to clean the vegetables.   As they say, however the shape of the vegetables or fruits maybe, it is supposed to be good for that body part of yours.   So, I am guessing this Swiss Chard is good for my lungs.
 What do you see?

Ingredients:
2 cloves of large garlic, smashed, then, pilled
1 bunch of Organic Swiss Red Chard - Washed and chopped crosswise
2 TBsp EVOO
Pinch of salt
Large WOK to cook in
Two spatula to stir fry like a pro


Heat up the wok, then, add the oil.
When the EVOO starts to shimmer, Add the garlic, then, chopped Swiss Red Chard.
With both spatula/wooden flat spatula, stir fry to coat all chard is coated with vege oil.
Add Salt.
Keep stirring to cook until tender - about 7 to 8 minutes.  or Depending on your gas stove's BTU, maybe it's only 5 minutes for you.


 Serve with cooked Extra Long Basmati rice mixed with Quinoa.   Yum!

Polly's Lionhead Harissa Stew

This is a modified Chinese Lionhead stew with Harissa paste.   It actually turned out quite tasty.
Prepare the pork meat balls first - Mix the following ingredients.
Wash and Cut NAPPA Cabbage about 6 Cups full
Pre-Hydrate SHIITAKE Mushrooms - Qty 6 in a Hot boiling water in a bowl - set aside
Drain Firm or extra firm Organic TOFU.  Cut them into 1 inch cubes, approx. - set aside
Get rice vermicelli ready.   Cut into desired length with Kitchen scissors.  You can use Yam Noodle also (as shown in picture.)  Set aside

In a Large soup pot, with some EVOO 1 - 2 tsp,  fry them till dark brown.  Turn the heat low and transfer to a plate, set aside.
1 lb ground meat balls
1 can or fresh chestnuts, chopped
3 green onions, chopped
1 large egg
2 TB fresh gingers, chopped
1/4 Salt and Fresh Ground Black Pepper
For Soup:
2 TB Organic soy sauce.
8 C Chicken Stock or half half chicken stock and water.


When meatballs are nice and brown, Add stock.  Add liquid from SHIITAKE mushrooms and mushrooms.  If you would like, you can add large cut DAIKON as well.  (DAIKON - Japanese white long radish)
 Taste the soup.  Add salt and Blk pepper or white pepper.  Add 2 TB Organic soy sauce.
Add vermicelli. 2 minutes.
 Add Nappa Cabbage.   Stir.  
2 minutes
 Add TOFU last.
 ADD homemade HARISSA paste
 http://rockdavinci.blogspot.com/2012/04/pollys-harissa.html
 Cook to reduce liquid.
Serve!

Repurposing COCSTO's Roasted Chicken

Here is how I repurpose Costco's Roasted Chicken.   It's cheap, It's cooked, but I don't like its taste - too salty, and it's kind of stinky.
Whole fresh chicken is very good, but sometimes, I just don't have the time to go through the whole regiment of cleaning the sink, chicken, utensils, and you have a better choice chicken, etc.   It's actually no more or less time than what I am doing it here, but this is how I repurpose the Costco's roasted chicken.
So, first, get a large pot that would hold the chicken plus water.   Fill the pot with fresh clean water.   Set aside on the stove.
Take the roasted chicken out of the COSTCO chicken package and remove the truss thread/rubber band; chop off the tail, if you would like.   Then, place the chicken in a large clean bowl.  Run the Filtered tap water to rinse the chicken.
Add the chicken into the pot.  Bring the water to a boil.
In the meantime to bring the water to boil, fill the large clean bowl with fresh Filtered water.  Set aside.
Then, let the boiling water to boil for a couple of minutes, and then, dump the water that came to boil with the chicken - dump  just the water.
Fill the pot with the fresh Filtered water.  Bring it to boil.
Then, immediately place a lid and bring the heat to simmer (no bubbling of water).
Cook for 10 minutes.
Without opening the lid, Turn Off the heat.
When the pot is warm to the touch.
Open the lid, remove the chicken to a clean cutting board.
Remove the skins.  Remove the meat.  Cut into portion size that you will using it for.  Vacuum seal the meat for storage, for example.
Use as needed.


Quick Spinach Ravioli and Mushroom Risotto Dinner

When I am really pinched in time and tired, I can't think much what to cook.  I would grab the first readily edible item found in the refrigerator and stuff them into my mouth, then, "worry"... aaahh Yak!
I have mushrooms, arborio rice, Organic spinach ravioli I bought at COSTO.  Cool.
And voila!   I noticed when my health is back to 'normal' level, I can squeeze some more energy out even at the end of the day to do a bit more for myself.  I wish everyone a healthy year for 2015!
Ingredients:
Organic Tomato sauce with Basils in jar.
Organic Spinach Ravioli

For Risotto:
You need to know the Risotto preparation method to cook the following ingredients.
1 Cup Arborio rice, rinsed
1/2 C to 1 C white wine - dry vermouth
1 - 2 C Water, add as needed.
Onions, chopped
1/4 C Butter
1/4 C EVOO
2 C Mushrooms, washed, dried, and sliced
Salt and fresh ground black peppers to taste

Stir fry sliced mushrooms in 1-1/2 TB butter and 1-1/2 EVOO.  Set Aside
Stir fry chopped onions till transluscent, but not browned.
Prepare Arborio rice to make Risotto following the regular Risotto method.
Add Mushrooms into the prepared rice.

Heat Organic Spinach Ravioli in a pot with the tomato sauce.  Taste and add any spices to your taste.
Serve Risotto topped with Parmesan Reggiano cheese, if you wish.


Sunday, January 18, 2015

Homemade Pizza topped with Mushrooms, Basils, and Honey

This pizza is one of the product I prepared yesterday.   To store the proofed dough overnight in refrigerator, for tonight's dinner, I wrapped it tightly in a saranwrap and then in a plastic bag, then in a plastic container of the similar diameter as the dough.
The recipe is for two portions of single size pizza.  
Ingredients are reduction of full recipes by 3 from Nancy Silverton's Mozza cooking book.  Modification is substitution of wheat germ with hemp hearts and Bread Flour wth AP Flour.
Ingredients:  
7.3 oz warm water
0.33 tsp yeast
8.66 oz flour + more for dusting
0.166 oz rye flour, dark or medium 
0.5 tsp organic Hemp Hearts 
0.5 tsp honey
0.33 Tbsp kosher salt 
EVOO

Preferment:
Mix 3 oz of warm water with pinch or 1/8 tsp yeast, 2.3 oz of flour. 
Mix well with spoon and cover with plastic and place in microwave oven with a bowl hot water, if your microwave has internal rack. At 800 Watt power microwave for 17 seconds. Stop and let it rise.

To prepare Dough:
Using paddle head, Mix the rest of the flour, yeast, rye flour, hemp hearts in the mixer.  Premix honey and the rest of the warm water in a small measuring cup.  Add to flour mixture.  Mix for 30 seconds.  Add preferment. 
Mix at low for 2 minutes.  
Add salt.
Mix for 4 minutes, and see if the dough is starting to form - not shaggy.
Change to dough hook, knead until the dough become tacky and dough leaves the side of the bowl.
Spray a bowl lightly with vegalene.
Place the dough in to rise.  Cover.
To store overnight, place the dough over a sprayed saranwrap. Wrap the dough tightly and place in a zip lock bag.  Then place in a plastic container of the same size.   Place in refrigerator.

To Bake Pizza:
Organic Tomato Sauce mix with minced garlic and chopped basil
12 oz Mozzarella cheese block cut into small slices or pieces or shredded
Pre-sautéed mushrooms
Fresh Basil leaves
Pizza paddle 
Some semolina flour...2 Tbsp
Remove the dough from refrigerator and let sit for 30 to an hour depending on your kitchen temperature.

(Read thru once first the following steps). 
Remove all oven racks or move them to the top.  (They are not used.)
Preheat home gas oven to 460'F with baking stone directly at the bottom of the oven.  
Turn the dough out on a well floured work surface.
Dust the pizza paddle with some semolina flour and set aside.
Divide the dough into (approx) 7 oz each
Using flour coated fingers press the dough into disc form, but leave 1 inch outer rim alone.
Then with a floured knuckles (of your hands) place the dough over and flip flop the dough over opposite each to extend the dough slightly.  As this is a 'personal' size approx. 10" size pizza 2 to 3 toss over is sufficient.  Transfer the dough at last toss onto pizza paddle. 
Top with sauce, mozzarella, mushrooms, Basils, except the 1 inch rim of the crust. 
Open the oven door and with a controlled single push slide the dough over to the baking stone.
Set the timer to 8 minutes.
Into 5 minutes, open the oven and brush the outer edge/crust of the pizza with olive oil.  Bake till cheese is slightly brown. 
Remove the pizza with paddle.
Drizzle with wild honey.
Slice with pizza cutter.  Serve


Saturday, January 17, 2015

Polly's Rum Cream filled Ponchiks

It seems the Eureka always happens when you least expect it.  And especially when you got the perfect tasting filling without a recipe.  This is my sixth day since my surgery.  Beside feeling weak all week long today I felt the need to move around a bit more to keep my circulation going.  Then, I end up with three bread category products.   Bread, doughnuts, pizza dough. Thursday, I managed to bake Morocan chicken pies enough to last me three days plus cabbage pancakes and paella rice Polly style.  I can't move around as usual but I decided to make small portion size of each. 
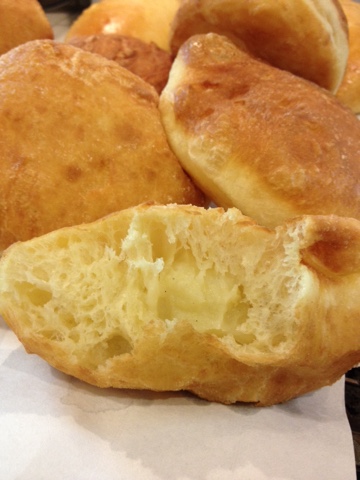
What I am really happy is the pastry cream fillings I made for the Ponchiks.  It turned out 99% and even tastier than the ones I used to buy from European Deli. 
The ponchik dough recipe is the same one I posted in my previous blog http://rockdavinci.blogspot.com/2010/05/ponchik-your-ponchik-then-there-is-my.html
or if you would like to try my modified recipe - and for a small batch, it is posted at the bottom of this page.

 As for the Cream Filling it's difficult to describe. 
The filling is a combinations of 2 Cups of meringue frosting for cake that didn't work out ... that I kept frozen and thawed out in a small pot over a low heat.  
1 cup of milk - half for starch slur 
1/4 to 1/3 C Potato Starch mixed in 1/2 C of milk. 
2 to 3 TBsp of Gold Rum
Big drop of Madagascar Vanilla paste
1 beaten egg
Heat meringue over low heat in a heavy bottom steel pan. Use whisk to stir.
Mix half of potato starch with 1/2 C of milk.   Stir well with spoon. Add beaten egg and stir well.  Scoop some warmed up meringue mixture out of pot and add to egg mixture.  Stir well.  (Egg should not curdle up at all.)
Add egg milk slur into the pot and rest of the milk.  
Increase the heat to medium.  Keep whisking.  About 5 minutes.   Add rum and vanilla paste; It should start to thicken.   Keep stirring until it thickens enough to lift up and sticks to the whisk.  Set aside.  
Fry the raised dough.
Pipe the filling into hot Ponchiks.
And ... Eat!!
The texture of this Ponchik is so soft, it disappears in the mouth magically.
All right, here is the recipes.   The original recipe is found at http://mypersiankitchen.com/persian-pirashki/
The following recipe and methods have been modified to fit my kitchen tool and for the product result.
Polly's "Small Batch" PONCHIK filled with Rum Cream  
Makes 8
Instant Dry Yeast 1/4 tsp
Flour 1-1/2 C + 1 Cup more for worksurface
Sugar 1 TBsp
Salt - Pinch
Warm Water 1/4 C
Oil 1 TBsp
Yogurt 1/4 C <<< ***Polly's Substitute with 1/4 - 1/3 Cup SOUR CREAM
Egg 1

Deep Frying Oil - I used EVOO
Deep fryer pot
Wire rack over the baking sheet
Paper oil catcher/paper towel

Dough Preparation:
With Paddle attachment, Combine dry ingredients in the electric mixer bowl at low speed or by hand.
Then, add, water, oil, and Sour Cream.   Beat with paddle attachment until shaggy dough forms, then, add egg. 
At medium speed, beat until the dough start to be sticky.   About 5 minutes.
Then, switch to Dough Hook.  Scrape the side and bottom of the bowl.
Increase the speed to medium high - about 4 on your Kitchen Aid mixer, and knead until the dough is tacky and comes away from the side of the bowl.   About 20-25 minutes.
Add 2 Tbsp more of flour, if needed, but no more.
Tranfer to a greased bowl with lid to proof until double in size.   I just use a plastic container, sprayed lightly with vegalene, cover, and proof till double in size.

Forming the dough into Ponchik:
Spread 1 Cup of flour over the work surface.
Unlike other Ponchik blog I posted, this batch's Dough is very sticky and soft in this recipe.
With dough over the well floured surface, coat the top of the dough with the flour also.
Roll out the dough gently with a well floured rolling pin.    About 1/2" high.   Do NOT push down on the dough.
With a good size Ring cutter.  I used 3-1/2 inch ring.  Flour its rim, and poke a dough out, and transfer to a Silpat on a baking sheet.

To fry:
Heat EVOO, Medium high (adjust as you go during frying)
Gently slide the dough into the heated oil.
Carefully roll it over when one side is golden brown.
Remove the fried Ponchik over the wire rack over the baking sheet.
When cooled to the touch, transfer them to 'tempura' paper/paper towel to catch remaining excess grease.

Pipe the cream in.
Sprinkle with Powder Sugar, if you wish, and serve.


Thursday, January 15, 2015

Inside-Out Carrot Cake Cookies

Everyone loves creamy cheese frosting on the cake.   To make it easily transportable, there are recipes for cupcakes and this Inside-Out Carrot Cake Cookies.
Basically, the cake becomes the cookies and creamy frosting is between the two carrot cakes cookies.

I made this a few years ago.  The recipe was shared by one of my son's co-worker. I thought it's time to revisit and enjoy them with family.

Ingredients:
1-1/8 C Flour
1/2 tsp baking soda
1 stick (1/2 C) unsalted butter, softened
1/3 C sugar
1/2 tsp vanilla
1/2 C walnuts, chopped (switch with other nuts are all right)
1 tsp Ceylon Cinnamon
1/2 tsp salt
1/3 C light brown sugar
1 large egg
1 C (2 medium) peeled and coarsely grated carrots (I just used mini food processor)
1/2 C raisins

Directions
1.  Put oven racks in upper and lower thirds of oven and preheat to 350'F
2.  2 backing sheets with silpat or parchment paper
3.  Whisk/Shift together flour, cinnamon, baking soda and salt in a bowl. 3 times.
4.  In a large bow, beat together butter, sugar, egg, and vanilla until pale and fluffy, about 2 minutes.
5.  Mix in carrots, nuts, and raisins with a wooden spoon/spatula, then add flour mixture and mix until just combined.
6.  Drop 1 TBspoon batter, 2 inches apart.
Bake for 10 to 12 minutes or until cookies are lightly browned and springy to the touch.
Remember to switch position of sheets halfway through baking.
7.   Cool cookies on sheets on racks 1 minute, then transfer cookies to racks to cool completely.
8.  While cookies are baking, prepare frosting.   With an electric mixter, blend the cream cheeses, butter, and confectioner's sugar in a small bowl until smooth.
9.  Sandwich flat sides of cookies together with a generous tablespoon of cream cheese filling in between.   I used pastry bag.