Not sure if I fixed it, but it's been running smoothly and quietly ever since.
A Refrigerator is an essential. Very difficult to do without in current life style. It keeps us safe by keeping the food fresh untill we cook them ... and keep germs and bacteria and fungus under control.
I have a side-by-side door GE refrigerator that is 19 years old!! I noticed a few years back, the refrigerator's ice water dispenser would freeze. I had to leave the door open. Cover the freezer side with double YOGA mats and aluminum foils to keep food frozen. After a couple of hours, the ice water dispenses again. To fix this problem, I cut a piece of YOGA mat off and taped it inside against the water reservoir on the door. That worked for year, then, repeat.

Then, I noticed the light bulb on the top has gone out. I didn't think about it and took out the light bulb and left the socket open without replacing the light bulb. A couple of years later, the refrigerator's motherboard died. I did not even know there is a computer motherboard on this refrigerator. So the Tech was called to replace it. That was about $350 parts and labor. This GE refrigerator designer placed the ice-maker's water line in the same line as the motherboard. Eventually when the ice-maker's waterline's putty or whatever it is started to deteriorate, it was dripping water or the condensation was dripping down to the motherboard. I replaced the motherboard so I can have a refrigerator to use.


Then a couple years passed. This time, there is no cold air to the refrigerator. I came home one late evening from the office, and found the cooler side was about 67 degree in a danger zone. I was in full panic. I close and open the door a few times, and noticed the sound of the motor kick in once or twice, then, stops. Luckily I have a backup refrigerator in the garage. I had some time to do the research. I found out that there is an air exchange box located at the top end of this model. It is controlled by the switch located at the door. The switch also controls the light. It switches the light on when you open the door and shutdown the air exchange fan. When you close the door, it turns off the light and turns on the air exchange fan and blow the cold air to reset the refrigerator's temp.

I read briefly something about light bulb and light switch are responsible in triggering this air flow. I decided to tape up the the light switch to OFF position while I decide to buy a new refrigerator or not. I managed to get the refrigerator going by putting in a new light bulb also, but only to meet its dying wish, every two weeks or so. After some more research on the YouTube this time. Thank goodness that I am a good digital student, I decided to buy some parts and try the fix myself, "again." After all, it is less expensive than spending a few thousand dollar during this COVID-19 stay home. I also found a YouTuber's solution to fixing the ice-maker's water dispenser tube dilemma. I find many complaining about the new replacement part - OEM or not, manufactured with a shorter water tube than the ones the old GE model refrigerator came with. This water Tube is critical in delivering the water into the ice tray.
This will be my second try to replace the ice-maker's water dispensing line. After getting all the parts - light switch, light socket, thermostat, ice-maker water dispenser line from https://www.partselect.com. it time to get to work.  My first 2 to 3 hours was just doing the cleaning of the coils and fan. Extensive dust were collected behind and under the coil. I cleaned it once back in December, and it was dusty again. This time, I used the DustOff Spray to push out as much dust off at the same time have the vacuum hose right next to it.


Removing the light switch and light socket was very simple - and I even found a physical diagram of actual locations and parts of the refrigerator hiding inside the light switch box.
So, here is my picture journal.
Making extension to the water dispenser tube to the ice-maker tray with a cut off of a small size Turkey baste tube was a great idea. The original aluminum tube was a gonner. I cannot find the similar parts anywhere - unless you buy a whole new ice-maker, I suppose, but my ice-maker works fine.
Making extension to the water dispenser tube to the ice-maker tray with a cut off of a small size Turkey baste tube was a great idea. The original aluminum tube was a gonner. I cannot find the similar parts anywhere - unless you buy a whole new ice-maker, I suppose, but my ice-maker works fine.
Measure and cut the turkey baste tube length accurately. The tech that repaired my motherboard, took the original out, and I did not know there were few other internal parts right in the interior plate covering the hole where the ice maker's water tube goes in. The original tube when I first found it was already dropped off and just laying inside the ice tray. I had no idea what part connected to what. This time, I totally forgot about the parts in the interior and after cutting the turkey baste tube to approximate length, I tried to push it through from the backside. Only to find that there are some kind of insulator, coil and plate inside. They were just sitting inside the ice maker's water tray blocking the new tube to go through.
Check YouTube how to remove the old water tube (Shut the water valve first, of course).
My panic is that the water safe cover plate's hole is bit small to allow the turkey baste tube through. So I had to make it larger to fit. I checked every possible YouTube video on how to replace the water line, even under the subject of replacing an ice-maker unit, but this part of the replacement was never demonstrated. So, I had no idea the sequence of the parts to place over the tube.
Remove the metal bracket.
Pull down gently on the navy blue couplet connected to the white water tube to release the water line.My panic is that the water safe cover plate's hole is bit small to allow the turkey baste tube through. So I had to make it larger to fit. I checked every possible YouTube video on how to replace the water line, even under the subject of replacing an ice-maker unit, but this part of the replacement was never demonstrated. So, I had no idea the sequence of the parts to place over the tube.


I tried to follow the YouTube demo on how to remove GE Ice-Maker, but the demo on how to replace the ice-maker's water line in the back was never found. I found a coil of fiber wrapped wire in the back and a metal plate with green wire that is connected to it. I am supposing at the time, it is the ground wire. So, I placed the coil already in the shape of a loop that looked like it used to wrap around the water tube back around it, then I placed the metal plate over. Finally I placed the white plastic face plate to keep the water from splashing to it - is my guess. I also found a large washers with putty sandwiched in between, but I had no idea of its placement. I supposed it went over the water tube and cover the hole on the wall to the exterior but the turkey baste tube is a bit too large for it, so I just skipped it.


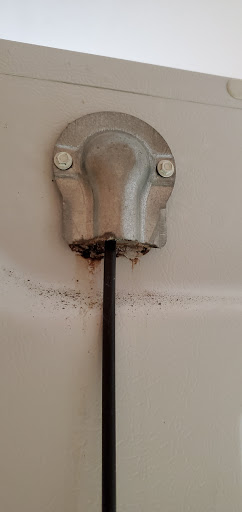
In the back, I stuffed some putty underneath metal cover to the ice maker water line.

Next, replacing the cooler's light switch that controls the activation of air exchange fan between the freezer and cooler.
Remove the temperature control handle by pulling them straight out. But also helpful if you have it in 0 position, so you know where it was pointing to. Unscrew the two screws using 1/4 inch socket extension attached to the socket ranch.
The casing comes off very easily.


Finally, I tried to replace the thermostat that is in the top back end near the air exchange box. But I was very tired. After removing the guard, and looking at it. I gave up for the time being. I need to research which crimp socket - MLX HOUSING CAP NAT or Plug or connector terminal I need. The thermostat replacement didn't come with it attached.


So far without replacing the thermostat, the refrigerator has been maintaining 30-32 degrees, so that's a good sign. With weather hitting 100'F the last couple of days, I really appreciate the cold water and ice from the refrigerator.
For repairing this old model refrigerator, I had to buy 1/4 in. socket extension kit. (Some of the screws are recessed deep in the housing.)


