Saturday, March 18, 2017

Polly's HOKKAIDO MATCHA LOAF BREAD


HOKKAIDO MILK LOAF - Polly’s with Matcha   3/15/2017
Basic recipe by Yvonne C. “65’CTang Zong Bread” book I purchased.

2 LOAF PANs - Size 12?? -
   I used one Pullman loaf pan with Cover 9 x 4 x 4 inch or 28.8 x 10.1 x 10.1 cm.
  And a full size disposable aluminum loaf pan with Cover 11.5 x 5.5 x 3.5 inch.

Ingredients:
Group A:
540 g - Bread Flour or Natural White - Wheat Montana Unbleached Non GMO All Purpose Flour
68 g  - Organic cane sugar
6 g ( orig: 8 g- Kosher Salt
11 g  Dry Yeast

Group B: 
86 g whole eggs (about 2 small eggs)
59 g Butter - room temp
54 g  Milk
9 g natural Milk flavoring?? I  did not use... I suppose the commercial baker use this to enhance the aroma??  (Yak!)

To make 65'C Roux or Tang Zong:
184 g Tang Zong (Roux) -
     Polly's modified measurement:  200 g water + 40 g Flour with Matcha.
        Premix 150 g flour with 12 g Natural Matcha - Not for the smoothie type with food color - use the real stuff, then measure out 40 g flour with Matcha.

Group C:
49 g Sour Cream (unsalted fermented milk butter - is what it says in the book)
1 egg wash - I used whole egg, but removed some most of the egg white.  Add 1 tsp of milk

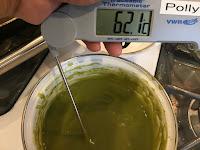
To make Roux -TANG ZONG 65'C
In a small pot, add 40 g pre-shifted Match flour.  Add about 1/4 C of 200 g water and whisk.  This method avoid lumps compared to when you pour all the liquid into the dry.  As the mixture smooth out, add some more water, and eventually all.
Cook over a low heat with Thermometer handy.
Stir continuously with a whisk or heatproof spatula.
Take the temp every few seconds.
It will thicken from the edge quickly.   Keep stirring the edge in or it will form lumps!
 As soon as the temperature get close to 65'C, the mixture would thicken... rather quickly, so keep stirring and remove the pot off the stove top immediately.  Keep covered  (with plastic film - hopefully non leaching pta or other yaky chemical) to store to avoid skin to form.  I just let it set aside to cool while I got all the Group A ingredients measured into the mixer.
Weigh out 184 g of Roux
 
There should be a bit more than 184 g completed roux.

Mixing Dough:
Add all Group A ingredients into a mixer bowl.  Hand Whisk them together first.

Add Group B.  Hand mix with spatula
Add Group C.  Hand mix with spatula.

Why hand mix?  - If you love your mixer, hand mix at the beginning to avoid fine flour particles to settle into your mixer's enclosed motor unit.  Believe me, they will get in there overtime.
With Dough hook, at speed one - Stir mode, mix the ingredients 30 to 45 sec.
(Kneading time with Kitchen Aid Professional 5 Plus model:  30 min. - 10 min interval check.)

Change to speed #2.  Knead for 10 min.  Stop and check.  The dough is quite well formed.  Leaving the bowl’s side with no flour.
Knead for another 10 min., Check.
 Knead another 10  min.  
Because of the Egg and butter in the dough, the dough would not form the 'normal' elasticity. 
But take time to knead until a good elasticity is formed to bake into a nice pulled crumb.
Place in slightly oiled plastic bag for 1st rise.
I used Turkey roasting pan with cover filled with hot water (about 120'F or feel quite warm when your hand is dipped in without burning) to simulate the bread proofing box.
1st Rising:
About 40 min in 28’C, 75% moisture.   A Large Turkey roast pan filled with hot water.  Placed large metal bowl with dough in oiled plastic bag placed in the water with roast pan cover.  After 40 min, the dough doubled in size on time.
Portioning:
Divide dough into 4 - 265 g each  My portion is about 261 g each.
Bench Rest: 15 min. Up to this point, everything went accordingly
 After 15 minutes.
 Form  - no problem forming


Last Rise in baking bread mold:  8 min - in room temp 38’C with moisture 85%.
  The last rise is taking longer tan 8 min for the doughs to fill the bread mold as illustrated in the book’s.  Extending the rise time to 15 min. covered in the Pullman bread pan in one and Buca’s pasta's to go pan with cover in the other.  Both lined with organic parchment paper.  Placed on open turkey roast pan filled with hot water.  Inverted bowls inside at the bottom to hold the bread pans.
I can easily heat up the water when it becomes too cool.  But Do Not leave it on no longer than 30 sec and do not leave kitchen.

At 13 min - the dough in Pullman bread pan has expanded to almost touching each other.
The doughs in aluminum bread mold with cover from Buca pasta delivery are still slow in rise, but it is rising.
*Checked at end of 15 min in bread molds over the hot water in roasting pan.
The dough has not increased in double in size as shown in the book illustration.   The required temp is 38’c with moisture 85% that I do not have.
At this time of rising in the mold, the oven is turn on to 350’F  *Hoping the heat from oven would help in rising in the pan
1.  15 min  not rising much
2.  15 min  rising well and very very close to touching each other.  Applied egg wash.
3.  15 min  or 10 min?  this is difficult.  I heat up the water again in the roasting pan with bread pans over it.   
            Perfect rise at 12 min.  I thought - Doughs are touching each other.   Ready for baking.  But after the baking, I realized that I should have let them rise the full 15 min.

Bake:  Preheat oven to 350’F  - 150'C on top and 180’C on bottom - Bake 35 min.
  I do not have the specialized bread oven.  Just my large gas oven.  So, know your oven's BTU.
Oven is filled with a pan of hot water under the mid bottom rack in a brownie pan.
Baking rack at the mid section for baking when ready.
Since I do not have a commercial oven that would emit heat 150’C on Top and 180’C on bottom.  I have a pan of water with hot water in the oven to simulate Hotness of the environment. Hmm... really?
When ready to bake, I removed the pan of water.
Result of baking in Pullman or covered bread mold for 35 min: 
( I love taking pictures of food.)
 It is so fluffy... and smell wonderful!
the large aluminum mold’s bread showed a bit of under bake at the top and bottom.  Either waited a full 3rd 15 min for the final rise before baking could prevented it or baked for 8 more minutes?
The bread in Pullman mold also showed some ‘not full risen’ sign at the top and bottom.
However, overall, this is a great recipe to keep trying.
 Slice them up and Eat!!
Wow.  Only a small slice and you can feel the full packed taste and satisfaction.
Awesome sandwich bread!!
3/19/17 - Forget the 'bit dense' dough at the top or the bottom.  After I toasted them, oh my goodness! they are light and delicious!

Tuesday, February 14, 2017

YEAR 2017 MOCHI MAKING JOURNAL

Ever wanted to pound your own MOCHI to make that fluffy tasty round DAIFUKU MOCHI?
This will be my second time to try my hand on MOCHI-ZUKI (pound MOCHI at home). 
Here is my Photo Journal.
After soaking GLUTINOUS THAI RICE for several hours, sweet rice is steamed at high till cooked.
Then, they are added to my commercial size cake mixer bowl to be 'kneaded' into MOCHI.
Try it! using your smaller cake mixer - it works!
 I want to add YOMOGI - Mugworts plants into my MOCHI.  It adds color and make my MOCHI healthy treats.  (Rehydrating YOMOGI in warm water.)
Red Bean Paste Prep work:  Make your own Red Bean paste, if you have the time.  Otherwise, canned red bean pastes are heated in a pot till hot to allow moisture to dry up.  When the red bean pastes are thick.  Remove from heat and let it cool completely before using.
Hmmm... this is softer than I wanted.  I think the sweet rice was not cooked long enough.
Better job next year!
 Spread 'POTATO' starch - Japanese KATAKURIKO all over the baking sheet.
Transfer the pounded MOCHI and cover with KATAKURIKO.


Polly's Morning Matcha Pecan Biscuits on the Go

Great Happy Rooster Year 2017!!
We made thru many years of great food blogging thanks to Google Blogger app.  I hope Google will continue to support the app.  I sure miss the direct upload from PICASA, however.  Google+ is a 'chicken'.
But year 2017 is no chicken.   We are all up and ready to go every morning tackling great weather of rainy seasons that we were missing in California at least for 30 years.  There were some great rain 14 years ago, but nothing like we are experiencing the last few months.
In the morning, when I bake, I promised myself to add a bit more nutritious ingredients to make every bite counts.
So, I came up with Polly's Matcha Pecan Biscuits.

Ingredients:            Preheat oven to 425'F        
Make 8 to 12 depending on the size of the biscuit butter you use and how thick the biscuits you want - I will leave it up to you.

1-1/2 C shifted Bob's Red Mill Unbleached Pastry Flour
1/2 C shifted Bob's Red Mill Unbleached Cake Flour
1 Tbsp Non-GMO Baking Powder without Aluminum
1 Scant Tbsp Matcha - Green Tea in Powder - but not one of those "smoothie" green tea 'flavored' mix with food color and all the artificial stuff.
Pinch Kosher Salt
3/4 of 4 oz Stick Butter cut into chunks
3 Tbsp Daisy's Sour Cream
 3 Tbsp Organic cane sugar
1/3 C Chopped Pecan
1 Tbsp Ground Flax Seed
Cold Organic milk -  1/2 C or by Visual - enough to 'Moisten' the flour mixture - not dry, not wet.

Shift All flour together and remeasure 2 Cups into a mixing bowl.
Add baking powder, Matcha, and salt and shift or using a whisk to mix well.
Slice 3/4 of a stick of butter into a Tablespoon slice.  Then, flip them over and slice into thirds.  Repeat it crosswise to end with small cubes.
Toss into flour.  Using fingers, toss butter chunks and flour together. Smash butter between fingers.  Note:  this is a "Free" form smashing.  Just Keep All Butter in Large flat / chunky form - NOT in mill form or pea size or whatever else you learnt, but smash it 'flat' between fingers.  You should see smashed/some still in squashed chunks in the bowl.
Add Ground Flax seed.
Add sour cream and Toss around to mix in with hand.
Add some cold milk.  Mix to pick up the dry flour at the bottom of the bowl and form a shaggy dough.  Add a bit more milk if the dry flour at the bottom of the bowl would not stick to the ball of dough.
Add chopped pecan.  Mix.  Add more milk to dry parts of the mixture to allow absorption.  Mix gently with hand to 'incorporate'.
Handling the dough gently, bring dough together into a shaggy BALL.
Transfer to slightly floured work surface (flour from the other half cup of flour)
Fold the dough over each other and give a couple of kneading down about 10 times - end result is a fat disc ready to be rolled out.
Using a rolling stick, roll out the dough gently to the thickness of your liking for your biscuit to be - Remembering that it would rise at least 1/2 inch.
Using a biscuit cutter, cut out the dough and place on a small baking sheet.
Based on the thickness and size of the biscuit ring/cutter you use, there should be enough biscuits to serve 3 people 2 biscuits each or for 4 people.
I just use the small toaster oven's baking sheet.
Bake till golden.
Serve with family's favorite eggs and grilled bacon, etc.
 Ah.,... this is bit too much milk than usual.   Do not make the dough too wet like this.
 Need to add some more flour to rescue.


Friday, December 23, 2016

Tasty Soft and Fluffy Sour Cream Biscuits for Breakfast

We enjoyed a tasty breakfast yesterday with this biscuits.
Try it and let me know how it goes with your batch.

Ingredients:            Preheat oven to 425'F         Make 7 to 8
1-1/2 C shifted Bob's Red Mill Unbleached Pastry Flour
1/2 C shifted Bob's Red Mill Unbleached Cake Flour
1 Tbsp Non-GMO Baking Powder without Aluminum
Pinch Kosher Salt
3/4 of 4 oz Stick Butter cut into chunks
3 Tbsp Daisy's Sour Cream
1 Tbsp Organic cane sugar
Cold Organic milk - 2 to 3 Tbsp (add more as needed Tablespoon at a time)

Shift All flour together and remeasure 2 Cups into a mixing bowl.
Add baking powder and salt and shift or using a whisk to mix well.
Slice 3/4 of a stick of butter into a Tablespoon slice.  Then, flip them over and slice into thirds.  Repeat it crosswise to end with small cubes.
Toss into flour.  Using fingers, toss butter chunks and flour together. Smash butter between fingers.  Note:  this is a "Free" form smashing.  Just Keep All Butter in Large flat or chunky form.
Add sour cream and Toss around to mix in with hand.
Add 2 Tbsp of milk.  Mix to pick up the dry flour at the bottom of the bowl and form a shaggy dough.  Add a bit more milk if the dry flour at the bottom of the bowl would not stick to the ball of dough.  (Add more milk if needed.  The dough should not be 'dry' but very well moistened, but not 'wet'.)
Handling the dough gently, bring dough together into a shaggy BALL.
Transfer to slightly floured work surface.
Fold the dough over each other and give a couple of kneading down - end result is a fat disc ready to be rolled out.
Using a rolling stick, roll out the dough gently to the thickness of your liking for your biscuit to be - Remembering that it would rise at least 1/2 inch.
Using a biscuit cutter, cut out the dough and place on a small baking sheet.
Based on the thickness and size of the biscuit ring/cutter you use, there should be enough biscuits to serve 3 people 2 biscuits each or for 4 people.
I just used the small toaster oven's baking sheet.
Bake till golden.
Serve with family's favorite eggs and grilled bacon, etc.
 Some speckles appeared on the biscuits could indicate that maybe too much baking powder.  Since backing with adding sour cream is my first time, I did not want to take the chance of a dense biscuits.  Two teaspoons of baking powder maybe enough.  And normally, when you are baking with acidic ingredients, you would add baking soda, but I just dislike the taste of baking soda sometimes I can detect.
 The crumb is tender and light.
 My grandchildren enjoyed them very much. 
Eggnog Biscuits - If you have not tried baking biscuits with Eggnog during the holiday season - you should.  Of course, there are so many "junks" they put in a pint of eggnog you purchase from the store, but if you have a left over, it's an optional adventure in trying it.  Even better would be to use leftover of homemade eggnog.

Friday, November 25, 2016

Ponchik Recipe Search

 Are you still looking for your PONCHIK recipes?   I am!  I am interested in testing as many as I could.  With family gatherings during this Holiday, let's try some as family fun! 
Some are quick formula and some are made from a yeast dough.  Each formula would result in different texture, but I am sure will be a tasty treats that everyone would love.  Here is my collections of sites with testable PONCHIK recipes that I would like to try myself.  
 
http://westmorelandtimes.com/news/15779/06/ponchiki-with-cherries/

http://www.realsimple.com/holidays-entertaining/holidays/more-holidays/festive-hanukkah-recipes/raspberry-ponchik-0

http://www.latechef.com/recipes.php?Simple-Dessert=Armenian-Recipe/Ponchik/7442

http://www.food.com/recipe/nazook-armenian-pastry-417485

http://heghineh.com/cream-filled-donuts/
 And there are lot more on the YouTube and that is a good thing compared to 5 years ago.


Croissants Baking with Pastry and Cake Flour Mix

This is the photo journal of Croissants making using Pastry and Cake flour mix. The ingredients are exactly the same as the ones posted in my "Your Best Croissant Recipe and Technique" http://rockdavinci.blogspot.com/2013/04/your-best-croissant-recipe-and-technique.html, except the flour is replaced with pastry and cake flour.
The result? Smell great, baked great, taste great, but the crumb is more bread like with layers rather than honeycomb like layers.
There is no good reason to test again with different formula when the previously tested formula had a very good result, but just wondered if the different combination would produced similar flour being used in France, but the flour I used is not exactly comparable to French's. 


The crumb is a bit less "layered" compared to AP Flour's. It's very buttery.  I prefer the 1 pound butter block rather than the full 625 grams.  Perhaps if I had kneaded the dough longer to developed the dough, it would have helped with developing the layers...
Tools:  Pastry brush, Small dedicated paint brush, French rolling pin, or long rolling pin, Pizza cutter, a ruler, Saran Wrap and a  Plastic container with tight lid, Digital scale, and other normal baking tools.

CROISSANT Ingredients:
Preferment:
Nonfat Milk 6 oz
(Warm water - 1/2 C)
Active Dry Yeast 15 ml
AP Flour 6-1/4 oz or 175 g

Dough:
Active Dry Yeast   25 ml   - 1 Tbsp + 1 tsp
Whole Milk   425 ml   >> 1 Cup warm whole milk 1/4 C warm water
Pastry Flour   500 g  & Cake Flour 300 g - of the 6 Cups, save 1/2 Cup for the work surface
Sugar   70 g
Salt    2 tsp
Unsalted Butter, melted   15 ml - 1 TB

Roll-In Butter:
Unsalted Butter - Cold but pliable - 625 g
AP Flour - 1/3 C

Egg Wash:
Large Egg Yolks   4
Heavy Cream   60 ml
Salt    pinch

METHODS:
1.   Make preferment - Add 1/2 C warm water after examining the consistency of the dough after mixing with 6 oz of non-fat milk (or regular milk).  The dough should be pudgy soft but not wet or tough.   Beat it up in mixer.  Then transfer to a bowl.  Cover, let rise.

2.   Half way waiting for the preferment, start to mix dough with Paddle attachment to make shaggy dough.  Stop - cover & to wait for preferment. 
When preferment is ready, add the rest of the liquid to the shaggy dough in the mixer.  
Important tip:  The dough should feel soft - Add tablespoon more of warm water at a time to make sure the dough is quite moist.   Add Preferment.    Mix for 5 minutes.  The dough is tacky.

3.   Cover and let it sit for 30 min and transfer to refrigerator for 30 minutes.

4.   Cut butter block into chunks with fingers and mash coat it with flour.  Beat it to flatten with the rolling pin into square block - approx - 1/2 inch thick.   Flouring to keep from sticking to the rolling pin or place the butter block on a wax paper and Cover the butter block with wax paper before beating and rolling into square.  Shape the side with a pastry scraper.  Roll it up in the wax paper and Set aside in Refrigerator.

5.   Take our the dough.   The dough should be soft without much resistance.   Roll out  the dough into round mound.  Use a scissor and make a criss-cross cut on the top and pull each cut side open and flatten the center a bit.  It looks like a flattened and squared star-fish.  
or roll out into a large rectangle shape - large enough to enclose the butter block.

6.   Place the butter block in the center of the flattened and squared star-like dough.   Then fold each arms in to the center to enclose the butter block.   If your dough is a rectangle shape, place the butter block in center and fold the butter with the right and left side of the dough.  Then using your hand's end of the palm to press down the top and bottom open ends to seal the butter.    
Or use other methods described at the URL mentioned at the top of this blog.  But my testing show that the butter block made by premixing the butter with some flour turned out the best with the home baking oven; unless you have one of those beautiful commercial hot oven for home.    Butter would not woos out before the croissants are baked.

7.   Roll the dough with the butter block enclosed into rectangle.  Roll the rolling pin without rolling off the dough.  Stop about 1/2 inch or so away from the end of each sealed ends.

Fold the dough in to thirds.  Brush off the extra flour off the dough with pastry brush as you fold the right and left dough over to the center.  
Wrap tight and refrigerate for 30 minutes.

8.  Repeat the folding process 3 times.   Refrigerate for 30 minutes each time. 
Wrap well tightly and let the dough rest in refrigerator overnight.   Or can be kept frozen till needed.  

8a.    Take out the dough out of the refrigerator 1 hour before the next step if frozen.   If you want to fill the croissants with raisins, almond paste, chocolate, etc. gather them now.     
Set them aside. 
8b.    Flour the work surface lightly and unwrap the dough and beat the dough with rolling pin - a good wack several times, but carefully not to tear the dough..  

9.  Cover the baking sheet with Silpat, if you have one, or with parchment paper.

10.   Roll into large rectangle.   Using a ruler, measure the dough out and slice the dough with a Pizza slicer into triangle shape.  Keep the extra ends and off shape ends.  Cut them into equal pieces to use as a 'tummy'.

11.  Place the extra piece of dough on the wider end of the cut triangle croissant dough.  Moisten fingers.    Hold two pointy ends of the wider end and Pull out to elongate, then, roll the dough over the extra dough pieces and goody fillings you have.

Hold the top of the triangle with left fingers and with the Right hand Palm end over the wider end of the croissant dough - roll the dough in upward motion as you pull the dough with left fingers to elongate the dough at the same time -  Stretch the dough slowly and elongate as much as it would allow - hopefully double in length.   
Tip: **This will tell you if you added enough water or not at the beginning.  So be sure to make a note of the amount of liquid to the particular bag of flour you used that day.  And if you are going to use the same bag of flour, you will know to add or subtract liquid the next time.....

Suggestions:  Curve the ends of the unfilled croissant  and place on baking sheet.    Keep the filled croissants with goodies straight.   
13.  Brush with egg wash without sealing the cut edges.   (Cover and refrigerate the extras.)

14.  Let rise in warm kitchen till double to triple in size.
Preheat oven to 400'F - about 15 minutes before the croissants reach its double+ size.

15.  Brush again with egg wash - very gently - before baking.
Bake for 12 minutes or until beautiful dark brown.