Friday, October 09, 2015

KALE Powered Scones


It's a very simple ingredients.  Let's bake stuff filled with lots of good nutrients rather than plain sugar and flour, etc.  Let's make it to you feel like you are adding nutricious value to every byte.
So, this is my second testing with the morning scones with Organic Kale powder, Organic Hemp Seeds, Organic Raisins, Poppy seeds.


The basic recipe is as follows:

The ingredients are very simple.  You will need a food scale.
Weigh 6 oz flour, Then, shift 4 times with 2 tsp of BAKING POWDER and 1/4 tsp KOSHER 
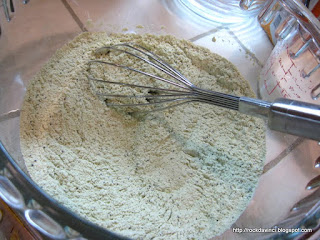
SALT & weighed 2 oz of SUGAR, 1 Tbsp Organic Kale powder
Weigh 6 oz of Heavy Cream Plus extra 2 Tbsp more or 3 Tbsp set aside if you are adding any moisture absorbing goodies like I do
1/2 C or more of Goodies - (Chocolate chips plus ), Organic hemp seeds plus poppy seeds plus Organic raisins.  The amount depends on your own preference
Egg Wash:  1 Large Organic Egg Yolk with 1 to 2 Tbsp of Heavy Cream.
Read through once before starting:
Prepare baking sheet lined with parchment paper.   Set aside.
In a medium size mixing bowl, add flour mixture, then, add 3/4 of 6 oz heavy cream to the center.  Do not add all the heavy cream in all at one time.   Use your eyes and touch to determine if there is enough heavy cream.   It all depends on how dry your flour is in your pantry.
(This flour mixture is greenish because it has 1 Tbsp to 2 Tbsp of Kale powder mixed in it.  Actually 1 Tbsp is very powerful enough for the great flavor.)

(This one is without the Kale powder)
"Fold" in with spatula a bit to let the cream moisten the flour…. and wait for about 10 seconds.
Check the bottom of the bowl.  There will be more dry flour left, so add the heavy cream to the bottom and add the Goodies,  then use spatula to cut it in. Do not stir crazy.  You are only moistening the dry flour together.
            The dough should be soft like cookie dough.
Transfer to floured work surface to keep the dough from sticking to the work surface.
Knead firmly ONLY 9 times, then on 10th time, form into a Disc by the palm of your hand  - about 8 inches round.  
-- Do not push down crazy, just be gentle when you push down to form into disc.
Transfer the dough onto baking sheet lined with parchment paper.
Let it rest for 10 min.
Preheat oven to 425'F.  Rack on center of the oven.
Beat 1 egg yolk with 1 Tbsp of Heavy Cream to make Egg Wash - See if there is enough egg wash after beating it with fork to cover  top of the scone Twice.  If not, add a bit more heavy cream and or extra egg yolk (depending on the size of your original egg yolk).
-- Egg wash gives that crispy shine on  the top.


Apply Egg wash to the top of the dough.
Use Pizza cutter to cut through the disk into triangle shape.
-- If you are using a sharp serrated knife, Hold the knife Vertically to Slice through.  This is bit difficult since the dough is kind of sticky.  So, the best thing to use is the Pizza cutter.  But if you don't have one, just DO NOT PRESS down to Cut the dough because it will 'seal' the sides of the scone dough to keep from rising properly. 
Let the first coat of egg wash to dry a bit - 5 min.
            Then, apply egg wash again.

Bake approximately for 15 min, depending on the BTU of your oven/convection oven.
Set your alarm at 12 min to check once. Bake 3 min longer
 It's ready when the top is browned and dough is dry.

Tuesday, October 06, 2015

Dig into Your Kabocha

Another tasty sweet natural home grown KABOCHA.   Just rinse it, cut open, de-seed, put in a roaster pan with lid with some water.  It comes out tender and sweet.   I love KABOCHA.  Do you?
If you have purchased from a grocery store before, I myself had a bad experience with it.  I don't know how old it was, but my taste buds were stunned by its musty bambooshoot odor and taste.  It was unpleasant.  It was a "blah" taste.  Now the KABOCHA has been cropped in my brothers garden I do not refuse the offer to take home one or two.  
Try it.  You will love it - roasting it is the best method.  Put it in your Chiffon cake or pie instead of that mushy watery pumpkin.  You will have fans. 
Deliciously sweet.

Saturday, October 03, 2015

DORAYAKI Testing #3

Finally this recipe found at www.Japanesecooking101.com turned out a successful Japanese pastry called DORAYAKI.
It's fluffy, and I like the idea of fresh DORAYAKI that I can control the sweetness of.  The commercially made pastry is all right, but I think they are overly sweetened to prolong the shelf life.  I wasn't too much of its fan before, but after this batch, I am eager to make them whenever, such as for bake sales.

Wednesday, September 30, 2015

Scary Expired Canned Food

Have  you checked your pantry recently? To my surprise, even after several checking through past months to make sure that there is no expired canned food sitting, I found this can of pineapple with its lid blown opened.  What's in it is a mystery that I did not care to venture further and a peek was enough to see that it needs to be tossed immediately.   How about your pantry?


Monday, September 14, 2015

YOMOGI MOCHI MOCHI DORAYAKI - Japanese Pastry with Red Beans

This pastry looks like a pancake, but it's more like mini Japanese KASUTERA cake in round shape filled with sweet Red Beans.  DORAYAKI is a pastry filled with sweet red beans sandwiched between two round thin cake.   This type of pastry as I recall is a specialty that we buy from stores.  Japanese kitchen back 50 some years ago did not come with modern kitchen equipment as we know today or even available.   The most high tech gadget was the electric rice cooker.  It's almost like everything we ate and sold were made by family of that trade and by tradition.  The store bought DORAYAKI is actually waaaay too sweet for me.  So when I saw the recipe in the magazine and on Internet, I gave it a try.

The first recipe included MOCHI powder. The recipe was tested by the magazine's test kitchen staff in search for  crispy outside, chewy soft inside pastry.   How did it turn out with mine?  Naaaa, even though I opened and used the expensive SHIRATAMAKO (sweet rice granules), the recipe method did not fare out as I had hoped for.  I added YOMOGI powder after first round to add more flavor.  Basically, the cake remain quite flat even with a teaspoonful of baking powder.  Back to drawing board to retest.

Cinnamon Rolls with Poppy Seeds

I used Greek plain yogurt mixed with milk instead of sour cream for this one.  The result is just as good.  
20 oz of flour divided up to: 10 oz, 6 oz, 4 oz
Whisk in mixer's bowl 4 large egg yolks and 1 whole lage egg, 3/4 cup sour cream ( my preference ) or buttermilk or 1/2 C yogurt plus milk to make 3/4 C,  4 oz organic sugar cane.  Then add 10 oz of flour that is mixed with 9 oz of instant dry Yeast and 1-1/4 tsp Kosher Salt.   Use spatula to mix well.  Connect to mixer and add 6 oz of flour.  Hand mix in then use dough hook to knead.   If you love your mixer, I strongly suggest hand mix dry flour in first then use the mixer.  This will prevent dry ingredients to eventually clog the motor housing and cause to loose power, etc.  Knead for 5 min at your mixer's allowed speed for kneading.  At slow speed, slowly add extra flour 1 Tbsp at a time (out of remaining 4 oz).   Knead at regular speed  for another 5 min, adding flour 1TBsp at a time until the dough leaves the sides of the bowl.   Transfer to work surface and knead 10 times and form into a smooth ball.  Turn it over in a greased bowl.  Cover to proof till double in size.  You can make the dough a night before, too, 
If you started forming dough at night, roll the dough out, spread 2 to 3 Tbsp of softened butter across the rolled dough.  Spread brown sugar 1 to 2 C and 2 Tbsp Ceylon Cinnamon across.  Sprinkle poppy seeds as much you like. 
Start rolling the dough.  Roll up just tight enough - not too tight or not too loose that fillings would drop out when the cut piece is placed in baking pan upright.  
Line a cake pan with rim with parchment paper.
Use serrated knife and slice.  *18 slices for 9x13 or 12 for large tall size - use brownie pan.  Place the sliced ends in center and start filling the baking panfrom  center out.  Cover the pan with plastic slightly sprayed with vegalene and a air tight lid and refrigerate over night, if desired.   Take it out 1 to 2 hours ahead to complete the rising.  Preheat oven to 350'F.   Cover with Foil and bake for 15 minutes.   Prepare frosting - 1/2 C powder sugar + 1/2 tsp milk.   Adjust consistency by adding more powder sugar or milk.   Remove the foil and bake 10 more minutes.....depending on the size of the slices.   Use baker's thermometer to  check dough's temp for doness.  I am not looking for browning on the top.  If you do, your rolls texture will be 'dry'.  If the dough at center reads at least 185'F, depending on your oven's BTU, it's done.   Remove from oven and drizzle with frosting, if you wish.  Enjoy!

Tuesday, September 08, 2015

MATCHA TANG ZONG HOKKAIDO Soft Bread

This is one of my favorite recipe I enjoy.   Sometimes when I am really tired I want to just grab a bread at the store and just bite into it.  But considering how my body has been reacting to some of the processed food, I restrain myself often.   I wished the manufacturer would wear a new thinking hat and start new processing method with less preservatives and modify their sales coverage to think "local".
This is basically the HOKKAIDO MILKY LOAF that I learned from one of the bloggers.  I tested it by adding Tang Zong - 65' Roux and added Matcha,

Interesting part of this bread is that when it baked, the natural green color oxidized just like when drinking tea and is brownish light tan in color.  But after several days in refrigerator, the color looked more greener.  Can't quite figure that out.  Maybe because of my camera's filter setting.  
One slice of this bread would fill you up.   It's light, but it's equivalent to three slices of regular store bought breads.