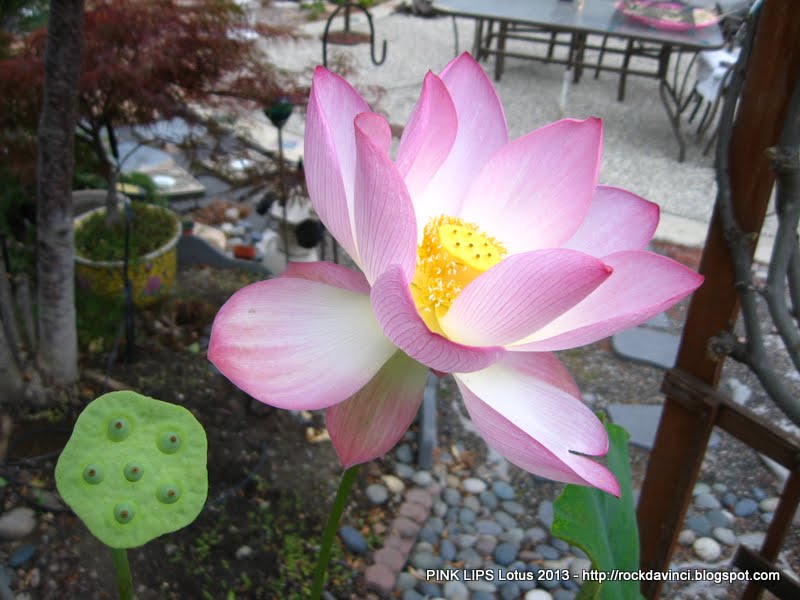
This is the 3rd years of Pink Lips, and it has given me many joyful hours. The 2nd Blossom produced 16 seeds that germinated. Strangely this year, the germination took many days, contrary to the first year, it only took few hours to sprout and start to grow within 2 days. These groups took more than 2 weeks+. Regardless I am so very thankful for their rebirth. I hope I can keep them alive through the winter, as the other two - CHAWANBASU and PINK LADY have decided to return to earth after last year.
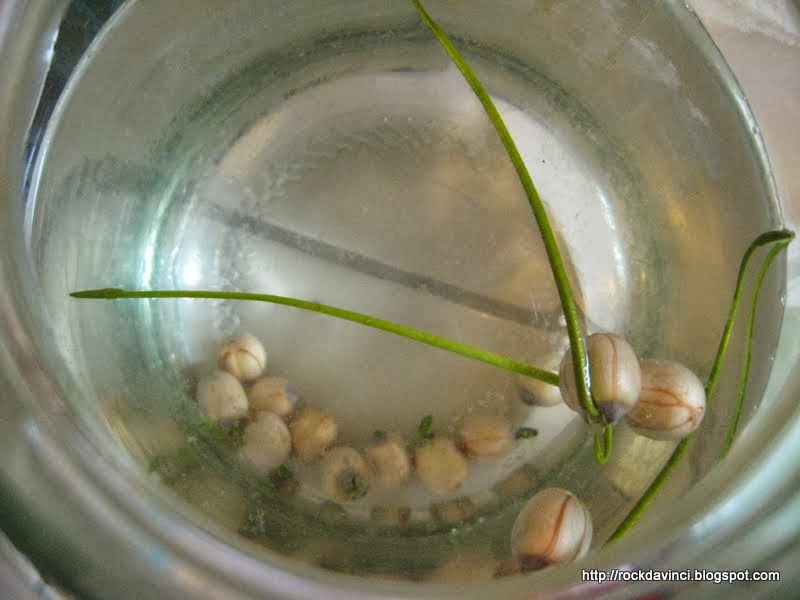
Breached Sprouting!!!
Finally after two weeks later... (using clean egg shells to keep them from floating.)
Time to transplant to their permanent home.
I almost forgot to share this. My mother had a bounty of fresh figs this year. Last year, I peeled them and dried them Hoping to make Cucidatti. This year, I made the Fig Newtons. There are some great looking Fig Newtons by other bloggers where I got the tips from.
Here is my result:
I wished I posted this back in August when I made them. Now I forgot if I used the recipe link Weelicious to Mehan'sKitchen.blogspot.com or thefauxmartha.com
My hand notes got several recipes and scribbling, but I think it's the Mehan'sKitchen.blogspot.com recipe I used. The big difference is that I used fresh figs rather than 12 oz dried fig.
Ingredients for Dough:
6 Tbsp Soft Butter
1/3 C Sugar (instead of 1/2 C as in the original recipe)
1 large egg
1 tsp vanilla
1-1/2 C flour
Method:
Sift flour, then, measure 1-1/2 Cup. Set aside.
Cream 6 Tbsp soft butter with 1/3 C sugar for 2 minutes.
Add 1 large egg, and 1 tsp vanilla and beat a couple more minutes or less to incoroporate egg into butter mixture.
Add flour. Roll into 12 inch logs.
Chill in refrigerator rolled in plastic wrap until the Fig paste is ready.
When the fig paste is ready: (Recipe below)
Over a parchment paper, Roll out into 12 x 8 inch. Or after rolling it out, place on a parchment paper.
Each piece of dough is 4 inches wide. Fill 2" inside with an inch
border on each side.<<< I think I eyeballed this section of the
instruction to make mine.
Add fig paste into pastry bag. Squeeze the paste out without any tips. This works out better as the paste is very sticky and thick.
Squeeze the prepared fig paste in center.
One side at a time, lift each side the parchment paper over and fold the dough over the fig paste to envelope it. Form the dough into shape with the help of parchment paper.
Transfer over to baking sheet and remove the parchment paper.
Bake at 350'F for 20 min - a hint of browning at the bottom edge.
This one is actually already a bit browner than desired at the edge. Make sure your is not like this.
Gently, slice with sharp serrated knife when it is bit cooled but warm, not cold.
Enjoy!
FRESH FIG PASTE:
Gather about 40 fresh figs. Make sure that they are not over ripened. To Jar/can them, they have to be in a tip top shape and at ripening stage.
Peel figs and open the figs to make sure that they are good.
Place them in a small pot.
Add 1 cup of sugar Add a 1/8 tsp of Fresh Fruits Ascorbic Acid
Stir to mix.
Bring heat to simmer.
Cook/simmer until it starts to thicken - about 2 hours at least. Set timer to check at 1 hour and then at 30 minutes interval.
When it starts to show sign of thickening, use a heat proof spatula, for example, and start stirring to help evaporate more liquid. Set your alarm and check every 15 minutes, and stir. Pay attention not to burn at the bottom. Do not go too far away from the kitchen.
Next, Stir constantly to help the evaporation until it becomes paste.
Remove from heat and let cool.
Scrape the side of the pot with heat proof spatula.
When it starts to become a thick paste, you can see the bottom of the pot while stirring.
Do the same for rest of new fresh figs picked. Prepare mason jars - sterilize and heat seal.
After 2 to 2-1/2 hours of simmering and stirring.
I came across this recipe quite accidentally on Tuesday evening. The recipe sounded very interesting. And I was just thinking of something to bake. It was a perfect timing, if I pull it through for Wednesday's Rosh Hashanah, I thought.
Based on the ingredients listed, it sounded like a very heavy dense cake with 2-1/2 C of flour, vege oil, 1 C of honey, and coffee liquid. To make sure that it does not fail. I decided to use my Chiffon Cake mixing technique. The cake turned out light and tasty.
The recipe is found at http://www.epicurious.com/articlesguides/holidays/highholydays/honey-cake/recipes/food/views/Honey-Cake-367189
Ingredients are:
For cake:
- 2 1/2 cups all-purpose flour
- 2 teaspoons baking powder
- 1/2 teaspoon baking soda
- 1/2 teaspoon salt
- 2 teaspoons cinnamon - Use Ceylon Cinnamon - "Not Saigon Cinnamon"
- 1/4 teaspoon ground ginger
- 1/4 teaspoon ground clove
- Divide 1 cup sugar ---> 1/4 C for egg mixture and 3/4 C for Egg White Meringue
- 1 1/4 cups vegetable oil
- 1 cup pure honey
- 3/4 cup lukewarm coffee (brewed, or instant dissolved in water)
- 1 1/2 teaspoons packed grated orange zest
- 3 large eggs - separated
For chocolate glaze:
- 1/4 cup plus 2 tablespoons well-stirred canned unsweetened coconut milk (not light)
- 2 teaspoons light corn syrup
- 4 ounces bittersweet (60% cacao) chocolate, finely chopped
MY CHIFFON TECHNIQUE:
Mix first 7 ingredients and shift them 4 times. Remeasure 2-1/2 C into a mixing bowl. Do NOT Pack down the flour into the measuring cup. Just scoop and flat off at the top. Some extra flour... about 1/4+ cup remains and use it to coat the Bundt cake pan. Grease the full size Bundt cake pan all around including the center tube - and add 1/4 C of extra flour mixture you saved. Tap the cake pan firmly to remove excess by letting flour fall into the shifted flour mixture.
Separate eggs.
Hand whisk eggs yolks with sugar.
Mix vegetable oil, pure honey, coffee, and orange zest together. Add to egg mixture.
TO PREVENT FLOUR LUMPS IN THE BATTER:
Then, "Slowly" start adding some liquidy egg mixture into a large size bowl with about 1/2 C of shifted flour to make slurry like mixture. This is to keep the flour to form into lumps if you add liquid mixture all at one time. Lumps can be minimized when you add think slurry like mixture.
Now this time, Add the rest of the shifted flour "slowly" into the thickened egg mixture all the while stirring to assure that all flour and liquid is
combined without forming flour lumps. Set aside with a cover to keep
it from drying.
Start Preheating oven to 350'F.
Whip
egg whites. When it starts to form good white foam (about 2 minutes)
start adding sugar in a steady stream while the mixer is going. Whip to
firm meringue. (Total of about 8 min - but it will depend on the power
of your mixer and whip attachment design.)
Fold
meringue into batter mixture 1/3 at a time. Mix until the batter is
smooth and shiny without Meringue cloud. Add to bundt cake pan.
Give firm Taps
of the Bundt cake pan on a foam pad or anything firm to remove air
bubbles. I tapped mine on the foam floor mat for over 30 times to
remove all visible air bubbles coming up to the surface. (Notice the air bubbles in the batter after adding batter into the cake pan. These bubbles need to be removed to prevent large holes in the cake here and there you see in a baked cake.)
Bake for 45 to 55 minutes. Insert cake tester at 45 min. The cake is done when the cake tester comes out dry.
Remove
from the oven and place on a rack to cool. You will notice the slight
deflation of the cake by 1 cm the first 3 minutes of cooling. But
that's all it deflated with mine.
Let it cool in the pan for 20 min. Remove from the pan and set it aside.
Note: Shrinkage during cooling - But Not Collapsing, is expected.
In the meantime, prepare the Ganache.
Open a can of Coconut Cream. Measure chocolate pistoles (my chocolates are in disc form) and rough chop them.
Warm the coconut cream and add heavy syrup. Pour over the chocolate and let it melt for 30 seconds. Hand mix to incorporate the rest to liquid form. Heat in microwave, if necessary, but only for a short seconds. Or you will end up needing to remake another batch.
Spoon Ganache over the cake.
Enjoy!
Note: Depending on the type of coffee you use, I think my honey cake is a bit heavy on the coffee flavor side. While everyone at the office liked it very much, I was expecting "honey" flavor of the special local honey I added. Nevertheless, when I sliced into the cake, it was light, fluffy, and full of interesting flavor. But the one slice I saved for two days turned out more tastier than the first day. I was able to taste the cloves, ginger, cinnamon, and zest in it. So, it's worth making this cake two days ahead in the future.


 Breached Sprouting!!!
 Finally after two weeks later... (using clean egg shells to keep them from floating.)


 Time to transplant to their permanent home.