Monday, April 18, 2011

Vanilla Beans

I ran out of 7 jars of Vanilla Paste that I have been using for my baking and especially for my Canneles de Bordeaux. While I have been hunting for the best possible price to replenish the vanilla paste, I decided to try the vanilla beans. While waiting for the arrival, I caught one of my recorded video on cooking channel.... Chef Sandra Lee, I believe was demonstrating how to make Open Apple Pie. One of the ingredients is the vanilla. She pointed out the vanilla beans that she is using has been soaked in the rum for two weeks. It gives a good flavor. So, I thought I would try. This is not a blog on how to make vanilla paste or whatever all the experienced foodies know how to. But to share the result of my rum soaked vanilla beans.
Posted by Picasa

Hamburgers on Homebaked Buns

I am so happy with the result of this hamburger and hotdog buns. I think it was from one of the dear blogger -- gracekitchencorner.blogspot.com. I have been wanting to make my own hamburger or hotdog buns to find out how good it really suppose to taste. The storebought hamburger and hotdog buns are handy, but they always have this 'after taste' that I could not exactly put my fingers on. I just tolerated it all these years. This is a keeper recipe in my kitchen.
Posted by Picasa

Sunday, April 17, 2011

Homebaked CIABATTA

Loved how this ciabatta turned out. Just like 1 Cup Baguette, I would like to bake just that amount that I need for the meal.
Posted by Picasa

Challah Loaf

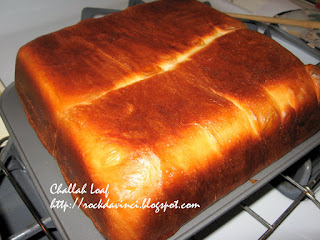
I just love this Challah bread recipe I learned during the 2010 holidays. The dough is so soft and tasty, I can use it as a base for many other types of bread. Since I don't have a 'pullman' loaf pan that I really would like my bread loaf to turned it into sandwich style, I improvised two 8x8 brownie pan. I let the dough rise eclosed in 8x8 non-stick teflon coated brownie pan and baked it. It worked out perfectly as 'pullman' pan idea.   The formula for the bread is found here:
https://rockdavinci.blogspot.com/search?q=challah+bread
And here is copy of what I wrote there:
My Challah has some modification to the recipe I got from the Baking Bites' site. I added Tangzong - Flour ROUX to give extended moisture and softness as a test.
Tangzong - Flour ROUX is not my recipe either. I learned it from some of the Malaysian and Singaporean food bloggers. They reference Yvonne Chen, the bread doctor. For example, you can visit Pei-Lin's blog site. http://dodol-mochi.blogspot.com/2009/10/tangzhong-or-water-roux-method.html.
For Tangzong:  Mix 25 g of flour with 125 ml of water in a saucepan.  Have a thermometer ready.  Mix well and cook over medium heat.  While stirring continuously , measure the temperature often to make sure that it does not exceed 65'C (centigrade).  Remove from heat to cool before use.
Since my kitchen is either too hot in the summer or too cold in the winter, to make sure all my mixtures for the dough is at desirable proofing temp, I added my Tanzong roux while at 90'F (Farenheit) into the flour mixture.

Bread dough Ingredients:
Dissolve 1 tsp sugar + 1/2 C warm 110'F water + 1 Tbsp active dry yeast for 10 min. until bubbles form on top.
Manual Mixing (since I kind of gave up using my Kitchen Aid dough mixing function):
Total of flour used in my variation:  'approx.' 3-3/4 C + roughly 1/2 C for kneading
When it's about 8 minutes into the yeast fermentation, start adding 1/2 C oil, 1 Tbsp honey, 1/4 C sugar and 2 C flour and 1/2 C warm 110'F water in a large mixing bowl.
Mix all well together, and add yeast mixture.  Add Tangzong.  And mix all well together.
In the beginning, I was using a spoon to incorporate everything.  You can use spatula or hand, but I know the mixture is very wet, and I was not yet ready to get my hands all occupied, so, you will see the spoon in the photo.  Once the dough mixture is well mixed.  I let it set for 5 minutes.
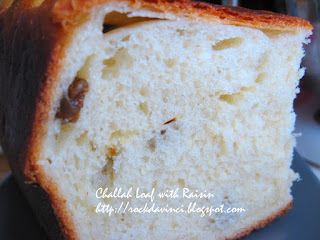
Bring two eggs to room temperature under warm water and chop 2/3 C of raisins and cranberries in the mean time.
Add 1 C flour, raisins and cranberries in.  Pass two eggs through the mini-strainer to separate Albumen, chalazae, etc. and it's mashed evenly when done in the bowl.
Mix all well again with the spoon or with your hand.
The mixture is really wet.  Transfer the mixture out to floured work surface.
Start pulling and pushing down the mixture.  Adding handful more of flour up to 1 more Cup.
Repeat pulling and pushing down the mixture, scraping and rolling until the gluten is formed.
After an hour of manually 'kneading' the dough this way, the dough's gluten is well developed for me to round it to form a ball.  Ready for the proofing.
Cover with plastic and a cover and place in a warm place to proof until double in size.
*I heated the oven to 350'F and turned it off.  Waited 15 min and measured the interior temp.  85--87'F.  I placed the bowl inside with lamp on.  It took three hours for the dough to rise.
As I removed the plastic cover, the dough deflated on its own.   I did not pound down any further because I want to keep as much air bubble as possible.
Transfer the dough to lightly floured work surface.  Divided it into three equal parts.
Prepare a baking sheet covered with parchment paper.  Set aside.
The dough is soft and pliable.  Gently pull and elongate the dough.  I rolled the dough into a log shape, then, rolled on the surface gently to form into a long rope.  Repeat with the other two.
Braid the ropes and tuck the ends under.
Transfer to the baking sheet pan line with parchment paper.
Beat 1 egg whites with 1 tsp water - egg wash the formed dough.
Spray the plastic wrap with vegalene and lightly cover the dough for the 2nd rise.
I covered my dough with the inverted rectangular plastic container.  Then, placed the sheet pan
back in the oven with light turned on.  Proof until double in size.
Remove from the oven.  Preheat the oven to 375'F.
I  egg washed it again.  Bake until deep golden brown.  Interior temperature read 200'F.
Cool completely.  **The crust of the bread will become tender as it cools.
You can view video of how I managed to knead the wet dough by visiting YouTube - How to Knead Wet Challah Dough - Step 1 of 4

Posted by Picasa

1 Cup Baguette

Sometimes, all you need is just one baguette to go with your Onion Soup or what not. So, here it is, a baguette made from just 1 Cup of flour. Just perfect.
Posted by Picasa

Roasted Chicken with Gazpacho Sauce

What to do with the extra Gazpacho Soup, I thought. While roasting the chicken, I decided to use it as part of the ingredient to make the sauce. It turned out quite tasty. The vegetable mixtures turned into a smooth sauce complimenting the wonderful taste of roasted chicken (brined for 12 hours in lemon mixture). The chicken is tender and tasty. The creamy Gazpacho sauce gave it the "welcome spring" taste.
Posted by Picasa

Poached Chicken in Cream Sauce

This is my first Poached Chicken in Cream Sauce. I am very surprised that the chicken is so tasty.
Posted by Picasa

Thursday, March 17, 2011

Coq au vin

Time flies.  I forgot all about this delicious dish I tried in February.  This is my first attempt with Coq au vin.  I used the chicken, instead of the rooster.

Thursday, March 10, 2011

Produce and Pesticides: What You Need to Know


Disturbingly, many farmers are using pesticides to prolong the lives of their crops. These chemicals enable foods to travel long distances and...
Click on the picture above to get to the full story at Dr. Oz's website.
My goal this year is to plant more veges in my garden.  Let's see how it goes.

Tuesday, March 01, 2011

Shoestring French Fries and Hamburger Dinner


After following the simple recipe in the Bouchon cookbook on how to prepare french fries, I made shoestring French fries.  I have so many different cuts of potatoes left from me practicing cutting the potato tourne, etc, etc, I thought it's a great idea.  The length and width are bit irregular and would not meet the standard, but they turned out great for our dinner.  We love the texture of crispiness of the shoestring French fries.

Sauteed Onion Glazed Chicken Breast with jus lie


I think by the end of March, I will be going through the Chickens as I have with pounds and pounds of flour for my baking adventure.  The more I learn about this "European" cooking method, I like the idea of adding varieties to the dishes prepared for my family - and economically. 
I was testing the Saute method to prepare the chicken breast slices.   They were lightly powdered with seasoned flour, and sauteed in butter.  I didn't have any recipe to follow.  I decided to saute the onion slices afterward in the same sauteuse.  Onions were sauteed till they are caramelized, then, smeared all over the chicken.   I prepared the jus lie with the drippings left in the pan.  Chardonnay + salt + fresh ground black peppers + sugar to taste.  Thickened slightly with Potato Starch (Japanese HOKKAIDO Potato Starch).

Chardonnay Roasted Chicken

Hmmm..... well.  After the fact that I made this, I found out the new info on "Dry-Heat" method of what is "roasting" is.   After I made this I decided to dub this Chardonnay Roasted Chicken.... Well, learning is a progress of failure and success.  I am still happy with the result.  But,  I will try to correct the 'roasting' method the next time.  I am getting good at preparing this 'potato tourne', however.


And this chicken are boneless.  I carved the meat off the bone.  Seasoned with Cilantro Lemon Salt Pepper rub with fresh thyme.  Clasped the no-skin side together and tied it with strings.
Prepared mirepoix and spread them on the bottom and set the chicken on the top. 
Bones are frozen because I already have enough clear chicken stock from the last chicken.
Roasted covered at 375'F for 1hr 30 min.  Added 1/2 Cup of Chardonnay after 55 min of roasting.  As this chicken is roasted in my favorite roaster with cover, I broiled the chicken for 5 min to brown the top.  The broiling would be unnecessary if I had used the right technique.