FYI - visit my newest test on MITARE or MITARASHI DANGO / MITARASHI YAKI DANGO (means all the same) at http://rockdavinci.blogspot.com/2010/06/pollys-mitarashi-yaki-dango.html I just tested again two nights ago 6/11/2010 and got the best result from using SHIRATAMAKO (glutinous rice flour) than this "JIO SHIN KO"(rice flour).
 I was very busy this weekend. I retried the MITARE YAKI DANGO recipe again. This is one of our childhood favorites, and it brings up a lots of fun childhood memory growing up in Japan. *Note: JIO SHIN KO is the Japanese term for this particular Rice Flour. It might not have ROMA JI (Japanese in English Writing/Sound equivalent translation) on the package, but the rice flour is found at Japanese Grocery Store. Asian / Oriental Market carries Rice Flour, but I do not know they will turn out . . . hopefully the same. *8/26/09, 9 pm: It did not turn out the same with "Rice Flour" manufactured in Thailand. Sadly after boiling and or steaming the rice balls for 3 hours, I had to toss out 45 rice balls.

Preparation time: 3 hours. Prep time can cut down significantly if you have two other family members helping in rolling the rice flour dough into round balls.
Yied: 28 to 45 round rice balls on the bamboo skewers
Equipment: Medium mixing Bowl, Measuring cups with meteric measurement, Scale to weigh in Grams, small Sauce pan, Mixing spoon, Measuring spoons. Large pot to boil water & rice ball; strainer and a large bowl filled with cold water to chill cooked rice balls. Short Bamboo skewers - 12 to 20 skewers--depending on the size of the rice balls. Small tabletop indoor BBQ Grill or stove top grill.

Ingredients:
JIO SHIN KO - Rice Flour - 250 g (about 1-3/4 Cup)
Water - 200 CC (*1 cc = 1 ml)
Sauce:
1/2 C Soy Sauce (*I prefer to use Low Sodium Soy Sauce mixed w/some Water)
2 Tbsp Sugar
1 Tbsp Cornstarch
Process:
JIO SHIN KO - Rice Flour - 250 g (about 1-3/4 Cup)
Water - 200 CC (*1 cc = 1 ml)
Sauce:
1/2 C Soy Sauce (*I prefer to use Low Sodium Soy Sauce mixed w/some Water)
2 Tbsp Sugar
1 Tbsp Cornstarch
Process:
Mix half of the water into Rice Flour and knead in a mixing bowl.
Add additional water as you go along. Knead until it is well incorporated.
The dough feels very firm.
 You can feel the moisture on the smooth surface of the dough when held in hand.
It won't hurt to add 2 more Tablespoons of water. But do not add more than needed.
The soft rice ball would not keep its shape after boiling, and we want it to keep its round shape.
Divide the dough into 4 equal size.
Roll one of the dough into a long rope.
*Depending on the size of the rice ball you want, your rope maybe anywhere from 1/2 inch to 6/8 inch to 1 inch in diameter.
*Depending on the size of the rice ball you want, your rope maybe anywhere from 1/2 inch to 6/8 inch to 1 inch in diameter.
My rope was about 6/8 inch in diam.
Cut them equally, 1 inch long.

*Diam and length equal the size of the Rice Ball. So, gauge it to your liking and make sure there are enough for everyone to enjoy.
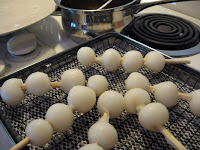
Recruit family members. Wash their hands clean and start pressing and circling the dough into a Round Ball. You should feel the moisture on the surface of the dough at the same time that it is taking the round shape. The dough will crumble if the dough is too dry or too much pressure is applied.

In the meantime, BOIL a pot of water. *Bubbling hot
Start putting some Rice Balls into the boiling water.
*The Rice balls would sink to the bottom. Use the spoon to unstick off of the bottom of the pot. Give it a swirl.


The boiling water would quiet down at this time. Then, after a few minutes, it starts to boil again. Now Boil the Rice Balls for 2 Minutes.
During this 2 minutes, the Rice Balls will start to rise to the top and stays afloat. Normally a sign of doneness. Scoop up the Rice Balls and transfer to the bowl of cool water with strainer.

Cool the Rice Balls in the cool water bowl. About 30 secs.

Scoop them out to a large flat plate. Try not to let the rice balls touch each other.

Scoop them out to a large flat plate. Try not to let the rice balls touch each other.

Skewer 4 to a stick or 3 to a stick.
Prepare the Sauce. Mix Soy sauce and sugar and Cornstarch in a small sauce pan/pot. Bring to a boil. Stirring constantly. Becareful not to burn yourself from the Lava like activity going on in the pan. Cook for 1 minutes. The sauce should be glue like. Remove from heat.
 Prepare stove top BBQ Grill or Japanese HIBACHI, whatever works to dry bake the Rice Balls on the Skewers a bit to give it a bit of charred markings.
 Prepare stove top BBQ Grill or Japanese HIBACHI, whatever works to dry bake the Rice Balls on the Skewers a bit to give it a bit of charred markings.
Roll the Rice Balls on the skewers in the sauce.
*Scoop some sauce in a large soup spoon, and roll the Rice Balls to cover each ball entirely.
*Scoop some sauce in a large soup spoon, and roll the Rice Balls to cover each ball entirely.
Set aside and eat warm or cooled.
*Tip: Do Enjoy it as soon as possible. Do not put homemade Dango made with JIOSHINKO in refrigerator. They will turn rock hard.
Serve fresh and enjoy!!
Serve fresh and enjoy!!
Note: for newer testing result with SHIRATAMAKO glutinous rice flour instead of JIOSHINKO, visit my other blog on YAKI DANGO. The YAKI DANGO made from SHIRATAMAKO is taste much better and has longer retention of the natural softness.