Monday, July 30, 2007

Canneles de Polly Test Success

**Use "Canneles de Bordeaux" recipe from Foodnetwork.
http://www.foodnetwork.com/food/recipes/recipe/0,,FOOD_9936_27405,00.html?rsrc=search

Foreword:
After baking 27 batches of Cannelles de Bordeaux in the year 2006, I had maybe 5 satisfactory results.    All other 22 times were exciting and delicious adventures.
The most difficult part of making Cannelles or Canneles is the Baking.   But there are few others that matters...
I always try to imagine how the nuns in Bordeaux, France would have been preparing and baking Canneles in the old days mixing ingredients, preparing canneles molds--with butter and beeswax mixture, rum...why rum...no refrigeration, so...to keep the eggs from spoiling?  or during its minimum 12-hours setting in refrigerator -- 'supposedly' curing....hmmm, very interesting.    I will leave the scientific part of what Rum is doing with Eggs and Sugar and Flour to FoodNetwork's Alton Brown, but here is my result for Year 2007, Batch 5 -- The Perfect Home Baked Canneles.


Materials to Gather:
  1. Timer Clock
  2. Gas Oven - the test completed in Large GE Gas Range Oven.
  3. 2 Large Tray with sides - to keep "butter and beeswax" from spilling out to the bottom of oven to prevent fire. or 1 Large Tray with Sides, 1 Medium Tray with Side.
  4. Cooling Rack set on top of Cookie Sheet to catch extra dripping "butter & beeswax"
  5. Extra Tray with Sides for Unmolding process Canneles before transferring to Cooling Rack
  6. Sturdy Tong that you can lift Copper Canneles Mold. Strong enough to allow you to flip the Copper Canneles Mold over.
  7. Empty mason jar to store Extra "butter & beeswax" for next use.
  8. Pastry brush just for Canneles baking stored in plastic ziplock bag in refrigerator.
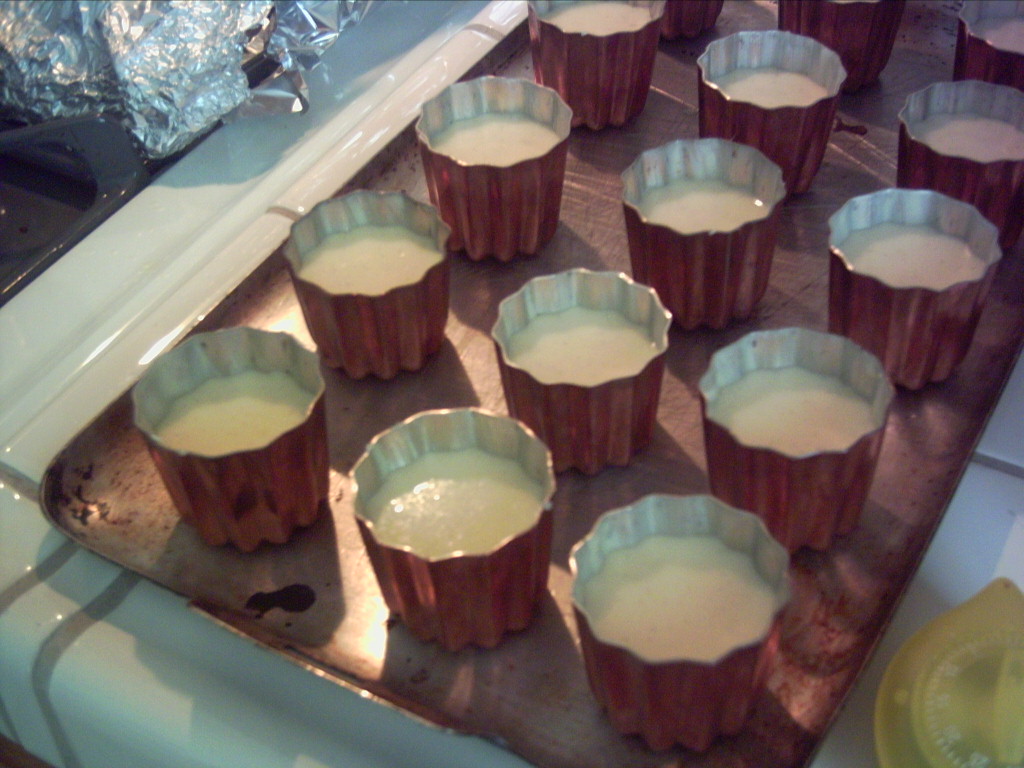
  9. 18 Copper tin lined Canneles Molds or 15 minimum.
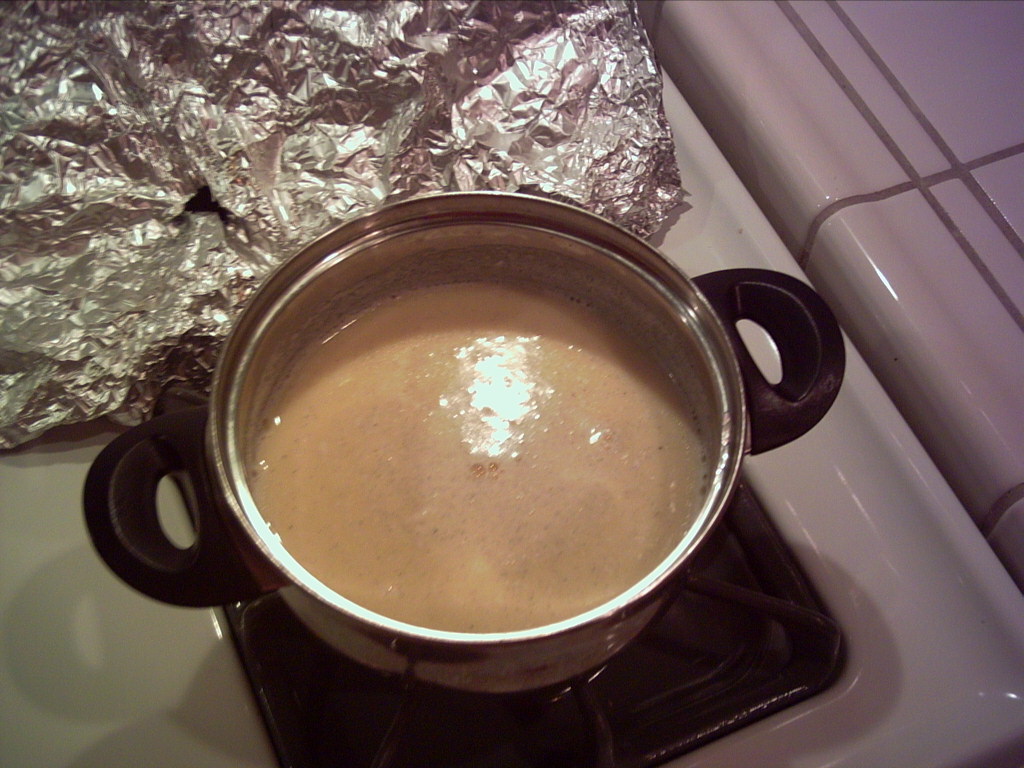
  10. Edible, clean Natural Beeswax -- not from Candle.   No color added and No chemical used during making into Beeswax block.    Buy it from Sacramento Bees store at http://www.sacramentobeekeeping.com/
  11. FAN to keep kitchen and home cool during summer as you will be baking at 445'F
  12. Flour and; Cake Flour
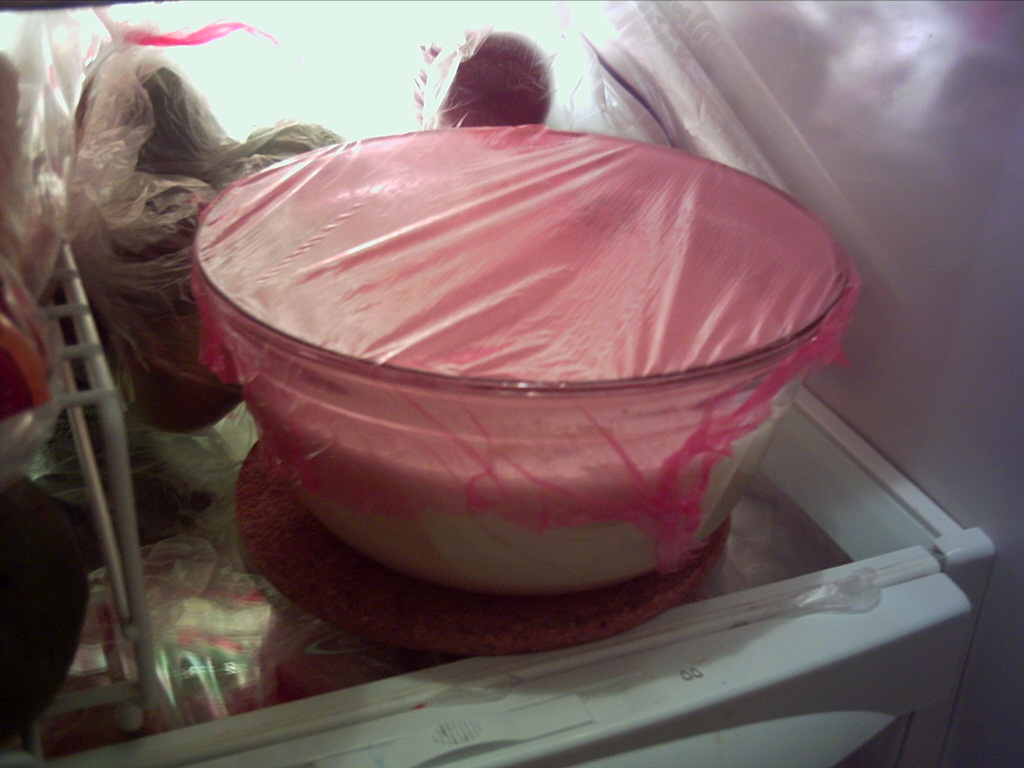
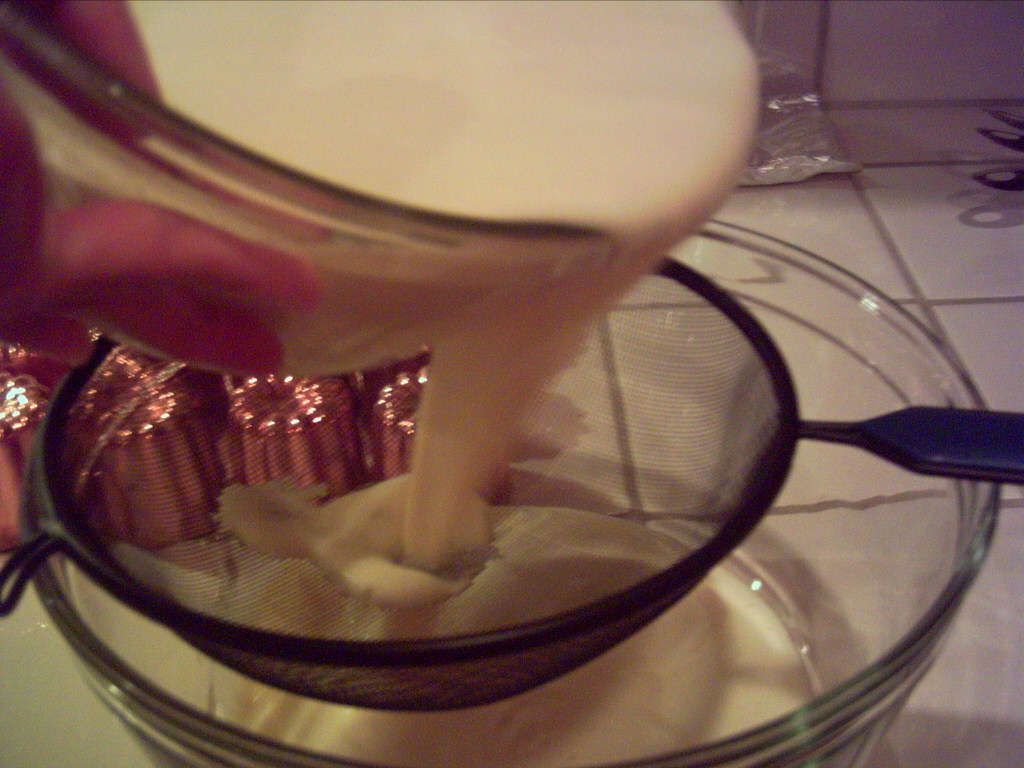
  13. A Strainer; Container with Cover or plastic wrap to cover the container -- glass or plastic
  14. Myers Dark Rum
  15. Vanilla Paste or purchase Vanilla Beans at Import/Export at a good price

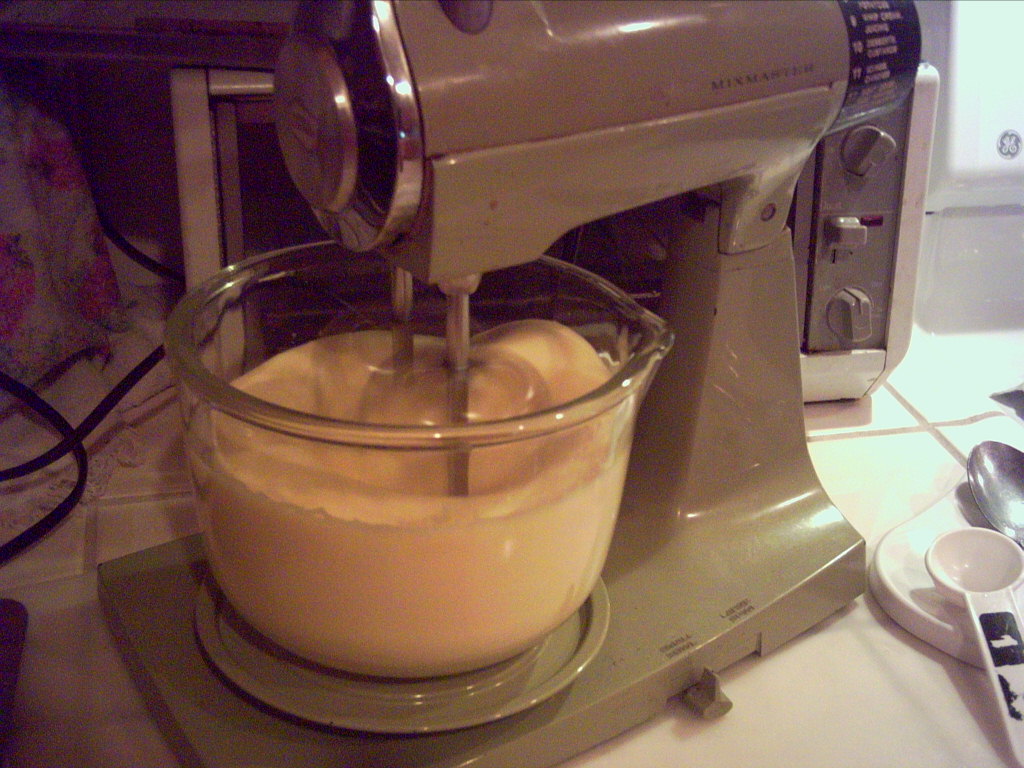
The following ingredients are the "Control" items and based on Double Batch Recipe I prepared. Modify as needed, but do not change the sugar amount--more is Okay, but not less.


Recipe Modification --**for Double Batch Recipe:

  1. Sugar - Increase Sugar to 1-1/2 Cup.
  2. Eggs - Safeway's Organic "Large" Egg - 3 eggs. (If Double Batch Recipe - use 5 eggs Plus 1 egg yolk. ) **If Truly using Extra Large Eggs as FoodNetwork recipe calls for, and; they do weigh in to be Extra Large, then, 2 eggs + 1 yolk.
  3. Flour - 1-1/2 Cup but--its half Regular Flour, half Cake Flour
  4. Follow the FoodNetwork's recipe instruction in how to mix the
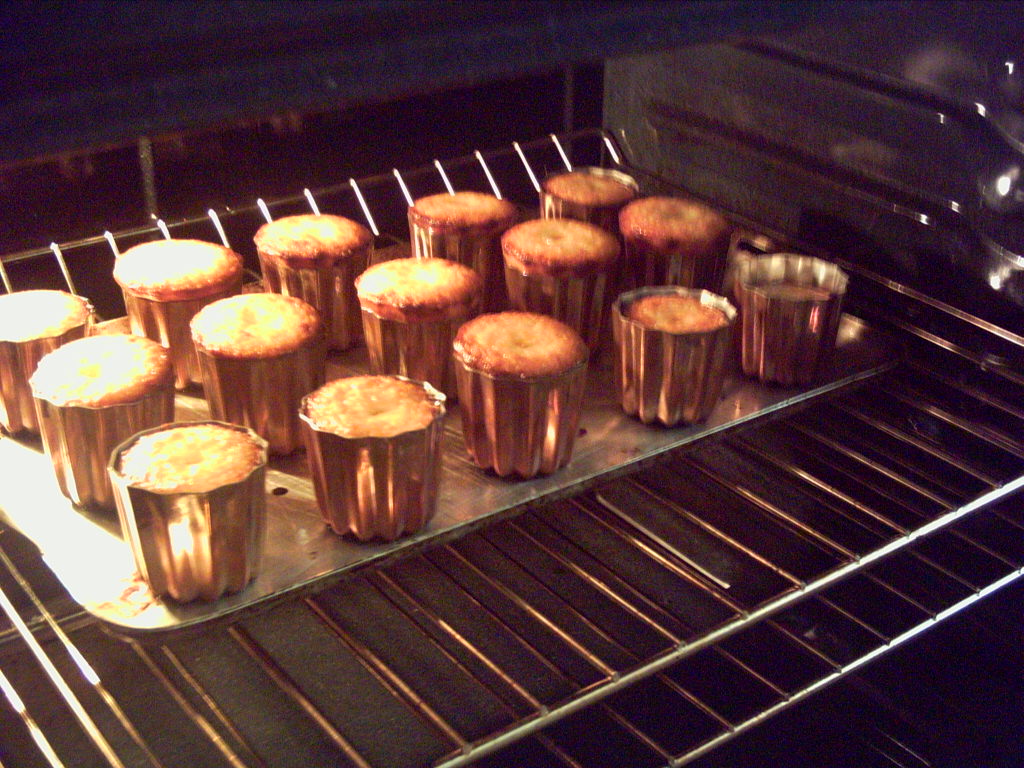
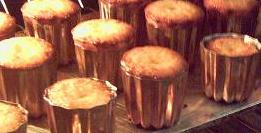
 ingredients.
  5. Space each Canneles 1-1/2 Inches apart from each other.
  6. Preheat oven to 445'F
  7. **Melt beeswax and butter over low heat. I use a dedicated small Pyrex "glass" saucepan with Silverstone coating.
  8. Place one oven rack at the Highest slot at the top.
  9. Place second one in 3rd slot from the top.
  10. Start your timer and start baking for 1 hour 20 min to 30 min.
  • At 1 hour into the baking, Swap Bottom tray to the Top and Top tray to the Bottom rack.
  • Before the end of 1 hour 20 minutes, using sturdy metal tong take one canneles out.
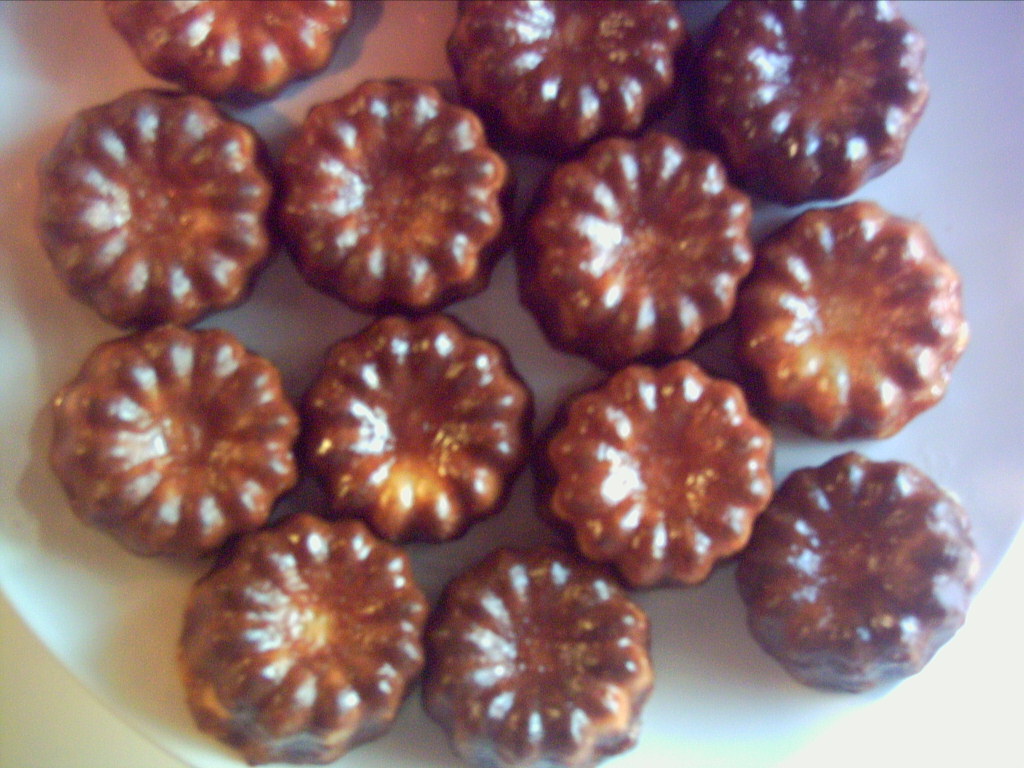
  • The Canneles should be Dark Chocolate Brown Color--Not Golden Brown.
  • Carefully Flip it Over to Receiving Tray (tray with sides). You will see extra 'butter and beeswax' pour out from the bottom of the mold.
  • Visually check its overall color. Dark Chocolate Brown--all around? but not burnt.
  • ***It should not be Jiggly like Jello - it means the Caramelization has not occurred yet.
  • Place it back into the mold and bake it longer.
  • If it feels sturdy, dark chocolate brown, Bake 10 more minutes if you would like or take one tray out---work one tray at a time.
Turn Canneles upside down, let extra 'butter and beeswax' to pour out.


Remove the mold and set it to one side of the tray.
Let Canneles cool in Receiving tray for a minute or two---Then,
Transfer it to the cooling rack.


Keep distance from each other 1-1/2 Inches apart or more to allow Caramelization to crystallize.


As Canneles cools on the rack, the Canneles' outer shell will start to form--Crunchy.


Crunchy outside, but Creamy inside.


Enjoy!


Saturday, March 03, 2007

MARRONS GLACÉS I

MARRONS GLACÉS
Photo Journal of Adventure in Making MARRONS GLACÉS
Crystallized/Glazed Chestnut

1. Purchase Chestnuts in Premium Condition. Wash and Boil until Done.
2. Keep Boiled Chestnuts in Warm water Until All Peelings are Finished.   Remove as much veins as possible without breaking chestnuts apart.
3.  Cooked chestnuts is soft and semi-translucent.  When crushed between fingers, leaves somewhat powderly texture.
 4. Pots to prepare Sugar Syrup with Rum or liqueur.   A Shallow Baking Pan for Syrup Bath.   Another Shallow Baking Pan with Cooling Rack to Dry Marrons Glacés on.

5. Carefully transfer peel chestnuts into baking pan and pour prepared Syrup to cover the chestnuts.   Soak Chestnuts overnight.

6. Day 2 -- Carefully transfer each well soaked Chestnut onto Cooling Rack to start Drying Process.
7. Day 3 -- Carefully transfer each Dried Chestnut back to bathe in Syrup for several hours.
8. Day 3 -- Transfer each Chestnut to Cooling Rack to Dry

9.  Once the Marrons Glacés are Dried, they are ready to eat or packaged individually and stored in air tight container.
10. Save crumbled bits and pieces of Chestnuts and Syrup in a tight covered jar.  Serve it over Ice Cream or any Favorite Dessert Dishes and explore its possible use. Enjoy!

Summary:  On my next adventure in this Marrons Glacés II making, the preparation methods resulted in better looking Marrons Glacés.  Of course, the practices make it perfect, too.  The finishing texture is much desirable than this preparation method when the cooked and peeled chestnuts were heated through in the prepared syrup as prescribed.
So, hope you will check the other Marrons Glacés journal and find out for yourself.

Wondering how the commercial Marrons Glacés looks like? Here is the Link: http://www.clementfaugier.fr/fr/v4/v4_accueil.aspx

Links to Recipe:
Here is an interesting recipe you might want to try: http://www.harmonysweets.com/harmonysweets/croissant-chocolate-marrons-glace.jsp


For recipe with better result, please check out my other blog on Marrons Glaces Part Deux at http://rockdavinci.blogspot.com/2010/01/maron-glace-part-deaux.html

Thursday, October 12, 2006

Where to buy Canneles Baking Molds

I came across quite a few web forum asking where to buy the Canneles baking molds.     The molds are sold at limited number of places in US, I think. However, depending on how you spell the word "Canneles", the result group in web search engine differs.     By the way, there are Copper tin-lined mold, aluminum, non-stick aluminum, Copper and inox steel lined, gastroflex mold, and elastomold.     When you do an entry phrase in any of the web SEARCH ENGINE, you need to type: Canneles de Bordeaux molds or Caneles molds or Canneles copper tin mold.     The mold is sold individually and priced anywhere from $6 to $25, depending on who you are buying from.
Some of the sites are: **Some sites may have changed. Some might have discontinued.
Tip: Go to their Main Home Page and Do Search.

Interested in testing with Aluminum Cannele Molds?     Great affordable price at $4.99 ea.      How good is the mold?     I am not sure, yet.  I am waiting for my shipment (Purchased 12/29/2009 just now) from http://www.fantes.com/stacks.html


MYCHEFSFAVORITES thus far has the affordable copper tin-lined Canneles molds. 
http://www.mychefsfavorites.com/baking/cannele-and-charlotte/cannele--copper--tin-lined.html


http://culinary-direct.com/store/index.cfm?displayMode=catalog&action=search&viewmode=search&searchType=items&searchTerm=CANNELE

Other favorite sites are:
http://www.fantes.com/stacks.html
or
http://www.meilleurduchef.com/cgi/mdc/l/fr/boutique/produits/moule_cannele/index.html
The reason being that they do have promotional sales.
I am waiting for next group of Canneles molds to arrive to test my batch 9 and 10. Someone asked me whether I can use Low Fat Milk, etc.     Only a test will tell. However, I think in French cooking, the real butter and "whole" of something is the key to their wonderful rich taste.

So far, I have seen Canneles mold (moule in French) being sold individually.      I was very lucky to have acquired a set of 15 from France over e-Bay. It was a lucky buy.
I am interested in buying Copper Cannele Molds lined with inox steel, but I have not found anyone selling it.

Photo Journal of Canneles de Polly

Canneles de Bordeaux adventure continues - After 14th batch baking test of Canneles recipes and baking time, I finally found the right combination of sugar and temperature that produced wonderfully crunchy outer shell and custardy center.   There is a recipe that produces bread like texture of center of the Canneles, but after 14th batch of test baking two different recipes, I like the custardy center the best.


Here is the Photo Journal of Canneles Preparation Process - batch 15 - 20th:


Scald 3 Cups of whole milk and 1 TBSP of Vanilla Paste (or 1 Vanilla Bean).      Stir frequently to keep the milk from burning at the bottom and keep "the skin" from forming at the top.     When it reaches 180F. Turn off the heat and Add 3 TBSP of unsalted Butter.     Let it cool to lukewarm.     Make sure the milk mixture is cool to the touch.
Beat 2 whole eggs and 1 egg yolks with 1-3/4 Cups of "Baker's Sugar."     It should become Lemony color.     All recipes called for "whisking" the egg, then add 3 TBSP of Dark RUM, but after 14th batch of testing, I find beating the eggs and Baker's Sugar brought a better result - the result is browning of outer shell -- "caramelizing".     Still need one more testing of just "whisk" together ingredients the same way the recipe called for.
 Get 2/3 Cup of Cake Flour ready.


Add egg mixture to the flour. Gently fold eggs into the flour.     It will look lumpy.


Make sure the milk mixture is cool to the touch.
Next, Add milk mixture to the flour mixture. Whisk to mix gently.


Strain the mixture.


Refrigerate for minimum of 12 hours. I've tested with 6 hours with my new recipe combination and it turned out satisfactory.     However, I noticed the difference in batter's aroma, it lacks the sweet mature aroma of rum and sugar when it is refrigerated less than 12 hours.
When ready to bake, bring it out to room temperature for minimum of 1 hour.

Coat each Canneles molds with unsalted melted butter or "beeswax and butter".
Tip**Leave the molds in the refrigerator for a few minute.   Although this image shows copper tin-coated canneles molds, I have acquired Non-Stick Aluminum canneles molds as well, and have successfully baked the Canneles in them.

 Preheat oven to 180C or 365F -- Electric Convection Oven brought the best results in testing last 5 batches.     Nice even brown and within a reasonable time.     Baking Canneles in Conventional GE Gas Oven/Stove worked out well, but the results have been a bit unpredictable.     But I am sure it is more than the temperature that played a role producing perfect Canneles, such as thickness of the baking pan that molds were sitting on, how many molds were on it, which height level the baking pan were set in... all these seemed to have tampered the result of the Canneles.


Use 1/3 Measuring Cup to scoop batter mixture into molds.
**Do not fill up the mold.
 Stir batter mixture often to make sure that flour mixtures are evenly distributed before scooping into molds.
Line up the molds on a baking pan with rim to catch butter spill during baking.
*I've used melted 100% pure beeswax and butter as the traditional recipe calls for.     I find the unsalted butter working just as well and giving the shell the "shine".     However, without beeswax mixed with butter coating Canneles Molds, Canneles tend to get stuck during demolding.    
Tip:  You can order 100% Pure Beeswax with no chemical additives at Sacramento Beekeeping Supplies, http://midtowngrid.com/sacbeekeeping/sacbeekeeping.shtml.     
* Never use Candle Wax from your ordinary candle.


This batch is baked in the conventional gas oven.    Make sure not to crowd the molds on the pan.    As you can see, the batter starts to puff up above the rim.

Baking period seems to be the most critical part of the Canneles baking.
Baking for 1 hr 30 min in gas oven still did not brown the Canneles -- the recipe from Foodnetwork's "Canneles de Bordeaux." Additional 15 to 20 min were required for pan of 15 canneles molds to become beautiful brown.

Towards the end of baking period, I took one out of mold to check the status of shell caramelization. Reverse the mold and tap it gently and Cannele should slide down. If it is still pale, I baked it longer; however, I noticed that the longer you bake, the tougher the center. Which is true with any custard or working with eggs. So, again, here the counter-top electric convection oven I bought brought the best timing in baking and in texture and taste.


These are the ones done in gas oven---after close to two hours of baking.


This batch is baked in my new counter-top electric convection oven.     Molds are non-stick aluminum coated with melted butter or" beeswax and butter" mixture.     After batch 14, I dared myself to come up with my own recipe mix.     This is Pumpkin Buttermilk Canneles de Polly.     I decided to honor my new convection oven with this recipe.
Tips:  Do not buy and use non-stick Cannele molds.  The fume from the teflon burning at 450'F is a killer. 

The result of Pumpkin Buttermilk Canneles de Polly is surprisingly delicious.     The recipe measurements were done after deduction of study of recipe of Canneles from www.MeilleurChef.com and Foodnetwork's "Canneles de Bordeaux" recipe and Gale Gand's recipe and of course, after 14th batch baking tests.


This is the recipe of Foodnetwork's Canneles de Bordeaux that I baked in Batch 18, except I modified the way I mix and amount of sugar. As I mentioned above, I beat the eggs and sugar together till lemony rather than just "whisk" eggs and add rum. & increased the sugar from 1 Cup to 1-3/4 Cup. I think 1-2/3 Cup will do just well -- I will test that on the next batch.


I hope this will add some flavor and encouragement to your adventure in Canneles baking. They are just YUMMMY!!

Wednesday, October 11, 2006

Canneles de Polly? Canneles Adventure


Canneles de Bordeaux  --- I have never gotten so interested in baking pastry until my friend showed me the Canneles copper mold she acquired.    It was at one of her end of summer BBQ dinner she invited me to.    As she is an experienced French Pastry Chef, I listened attentively to what she was telling me about this tiny crunchy chewy caramelized cake as I ate her wonderful tasting flat plum pie she made from scratch.    As I listened to her, my interest got heightened by each bite of delicious plum pie.    Canneles (CAN-A-LAYS)?    How in the world I missed it during  my trip to France?     Hmmm… I went right to work as I returned home that night. I did a web search on all the information there is about Canneles. That was the start of my adventures of Canneles baking.     Thus far, I have baked 26 batches of Canneles.       Twenty Success, Two Flops, and Four Questionables.
I hope my Canneles journal will give you encouragement and start your adventure in Canneles baking.      If you have any question that I can answer, please e-mail me.


The Canneles images on this blog are from my batch 7 and 8. Copper/Tin molds were special purchase from France, and they are circa 1950, and they still work.

Monday, May 01, 2006

Lemon Pepper Flavored Bread with Garlic

Make One 4 Lb Loaf Bread, using Home Baking Machine - WelBilt or any other brand.

Ingredients -- Pour the ingredients into Bread Machine Baking Basket in the Order Listed:
**Make sure the Bread Machine is located in a room above 69 degrees.
**Preheat 1 & 1/4 Cup MILK Plus 1/4 Cup UNFILTERED Tap Water to 120 degrees in Microwave. Let it Sit and ADD it as Ingredient Item 5.

1. 2 Teaspoon of Rapid Rise Dry YEAST
2. 2 Tablespoon Granulated SUGAR
3. 3&3/4 to 4 Cups of Angor Flour for Baking (COSTCO's 25lb bag)
4. 2 Teaspoon SALT
5. ADD 1& 1/2 Cup of Preheated MILK and Water.
6. 2 Tablespoon of Canola Cooking Oil
(6a. DO NOT PUT in YET: 2 Tablespoon of Lemon Pepper w/Garlic flavor Spice.)

Start Bread Machine:
7. Insert the Bread Baking Basket securely.
8. Start the setting - 4 Lb loaf, Light Color, Run now.

9. At the sound of "ADD" ingredients BEEP timer, ADD 2 Tablespoon of Lemon Pepper w/Garlic spice.

Approximate Time of Prep & Bread Completion: 3 hrs 30 min.

The bread tastes with a hint of tanginess from lemon and flavorful pepper and garlic. Great for anytime with butter... butter tastes better, but use it moderately.
Eat Well, Be Well.

MODIFIED Flavor:
Add a 1/2 Cup of Raisins during the "ADD" CYCLE.
Add some Cinnamon spice to the dry ingredients after adding Flour.

Check the height of the dough about 20 to 30 minutes after the "ADD CYCLE". If the dough has not doubled, your room temperature could be the culprit.

Monday, February 13, 2006

Rum Fruits Preserves

The dehydrated fruits and canned pineapple soaked in spirit of Barcardi Rum, Brandy, and Grand Manier provides interesting taste to your regular sponge cake, holiday fruits cake, or just to sample some after dinner.
*This is very sugary and highly spirited. Recipe calls for real liquor.

PREPARE Rum Pot Starter:
1 clean 1/2 gallon or 4lb 6oz glass jar with lid
(use Maraschino Cherry jar)
2 Cups Maraschino Cherry juice
1/4 Cup Grand Manier
1/2 Cup Barcardi Rum
1/8 Cup Brandy
1 Cup granulated sugar
WOODEN SPOON

Total of 3 Cups of various dried fruits cut into 1/2-inch size:
Dried Cherries
Dried Apricot - cut into 1/2 inch
Dried Mango - cut into 1/2-inch pieces
Raisins
Maraschino Cherry

1 Can -- 20 oz Pineapple Chunks drained well
Discard juice or use it for other recipe (for sweet and sour pork sauce for your dinner.)

You can buy large jar of marching cherry at your local COSTCO.
With1/4 jar of maraschino cherry left over, drop prepared 3 Cups of dried fruits and well drained pineapple into the glass jar. Cover the fruits with all liquid ingredients - Rum, Brandy, and Grand Manier. Top it off with 1 Cup of sugar. Place the lid on the jar, but not closed or tightened.

Place the jar in somewhat warm spot in the kitchen, and away from direct light. Sugar will slowly dissolve into the liquid in a week. If you see any sugar left on top on the 7th day, stir it once with the Wooden Spoon.

WEEKLY ADD ONS:
Prepare - 1 Cup of dried fruits or 1-20 oz drained pineapple on Alternate Week
1 Cup of Sugar
Add 1 Cup of dried fruits or drained pineapple.
Add 1 Cup of sugar on top.
Place the lid back (loose)

After two weeks, you can start enjoying the Rum Pot fruits with your favorite desserts or as is (in a small portion).
Always use Wooden Spoon to stir or scoop out.
Add Rum or Brandy when you feel it needs some kick or it started to taste sugary.

e.g.
Prepare your cake mix. Add 1 Cup of Rum Pot fruits. Bake it in non-stick Bundt cake pan.
My favorite fruitcake recipe is from the foodnetwork, but modified in my own way to add my Rum pot fruits in place, etc. and Spray the cake with juice in the rum jar using the sprayer everyday for a week+ before presentation. Serve it warm.

Thursday, January 27, 2005

POLLY'S CHILI RECIPE

POLLY’S CHILI
About 4 hours to soak. 4 hours to cook. 


Serves 4 for two suppers
INGREDIENTS:
1 small bag of Pinto Beans              2 Cans of 1 lb Cut Tomatoes or Crushed Tomatoes
2 bags of McCormick Chili Powder Mix or McCormick's "Tex Mex Chili" Powder Mix
1/3 C Chili Powder               1 C chopped onions
1 tsp Black Pepper               1 tsp Paprika                         1 Tbsp Salt
1 Large Pot about 8 Quarts size pot.
METHODS:
1.  1 small bag of Pinto beans.
2.  Wash beans and soak in water for 4 hours.
3.  Change water often.  Soak beans until doubled in size--rehydrated.
4.  Fill a 10 Quart size pot with water 3/4 of the way.  Bring to boil.
5. STRAIN BEANS 2 TIMES:  Add beans into boiling water.   Let the water come to boil    Strain the beans and add fresh water and bring to boil.   Strain again and add fresh water and bring to boil.  Turn the heat to simmer.
6. Boil the bean until soft and water level is at the same level as the bean + 1 inch above it. About 2+ hours.    If you use pressure cooker - it is faster.  Follow the pressure cooking guide on how to cook beans.
If the bean is still hard to the touch, put more water and boil long - 1 more hour or until soft.
WATCH out for the boil over. It will make a mess on your stove. If you have a gas stove, this is very important that you do not let it boil over. As soon as it boils/steam, keep the lid propped open (use a long cooking chop stick, if you have one, across the pot and prop one side of the lid on it.)
7. Open two cans of 1 lb size CRUSHED/Cut Tomatoes.
8. Add tomatoes into the pot.
9. Add Salt to taste -- 1 Tablespoon.
10. Turn heat to Med-low.
As the chili mixture is very thick at this point -- to avoid splatter -- keep the pot covered with lid -- propped open.
11. Get two packages of McCormick "Tex Mex" Chili powder mix or the regular McCormick's Chili Powder Mix. Add only 1 package of Tex Mex Chili powder if the preference is low heat chili.
12. Put 1/3 cups of chili powder into the pot with beans and tomatoes.
13. Stir well to get rid of the Chili powder clump, but without mashing the beans. -- Chop stick is the best to stir with.
14. Mix in Black Pepper, Paprika 1 teaspoon at a time.
15. Use a clean spoon and Taste.
16. Mix Tex Mex Chili Mix and stir well to get rid of the clump.
17. Taste. Add more salt, if needed.
18. Heat it up thoroughly -- low heat and stir occasionally.

SERVE:
** Serve with Honey and homemade Non-Yeast Sopapilla

Tuesday, January 18, 2005

Computer Support Help:

There is a help for your PC-- PCdaVinci.
Contact PCdaVinci for any computer system issues with Windows, OSX, and Linux.

Fees:
Home Client:
$35 flat fee for 1 - 2 hours troubleshooting support; ask for details.
Additional $10 for software install. $5 for hardware replacements;
Client responsible for software license; hardware replacement and purchasing.

Business:
$55 per hour.
Additional $10/hr for Software Installation and Configurations.
Client responsible for software license; hardware replacement and purchasing.

*Free e-mail support depending on the complexity of the problem.
Visit: www.pcdavinci.com Serving Sacramento to South Bay--San Jose area (California)

For your company's computer system and network support, send e-mail to helpdesk@pcdavinci.com
For your company's new logo creation, send e-mail to info@pcdavinci.com
For your company's webpage design service, send e-mail to info@pcdavinci.com

Wednesday, December 15, 2004

Business and Career Tips:

New to Career Market? Feel a Bit Powerless?
Come on! Get Empowered! & Be Empowered!

Internship as a starter:

Average young adults do not know where to look or where to launch their first career. Jobs are everywhere if one looks around, but the career that they want, the ones that they want to build to look back many years later require some planning and startup support system. Whether the individuals just got out of high school or college, if they did not have some sort of support system, from parents, relatives, community programs, government, private industries, etc, it is difficult to gain work experience that employers are looking for. With combinations of the two together, it could help many young adults launch their first career step into the corporate world or their own business.


Some young adults have ideas about what they want to do, but they lack experience to be hired. Some are still searching what they want to be. Corporate Internship is an excellent place to start for many individuals. For young adults with energy and enthusiasm to find the right career or even if they know what they want to be but don't know where to start, the "Internship" is an excellent way to launch that first step.

Tip(s):
1. Stay in school. For example - Foothill College (Foothill, CA) has an excellent Internship program with NASA/Ames. Interesting and challenging internship programs in diverse career fields are available (depending on their budget.) Computer science, physicist, clerical, accounting, aeronautics, sales management, computer support, administrative assistant, Unix system administrator, etc, etc.... Check with Foothill College's Internship Program administration. Many employees at Ames research center in Mountain View, California started out as Interns. Some of them worked as Intern for several years. At the end of their Internship program, since they already have good inside reference and gained new knowledge, skills, and education, subsequently, they are hired into full-time position. Remember - Get Empowered!

2. Almost all corporations in the Silicone Valley offer internship program. Why not visit their websites and find out about their Internship program? Whether the position you are interested is posted/available or not, Let's get your resume and cover letter ready! Contact their human resources, get their name and mail your resume to apply for the Internship. You never know. It could be the best thing you ever done for yourself to layout your career path. Remember - Be Empowered! At the end of your internship program, you might get hired into the open position. If not, you certainly have gained job experience to launch your next success in your career.

3. Have you ever calculated how many hours a day you spent watching TV or playing Video Games? or spending hours talking to your friends? Unless you turn them into a career such as TV critics, Video Game tester, sales or consultants, they might be robbing you of the time from launching your career. Balance and control are both desirable traits and they can become your strength. Let's balance and prioritize.

4. Have you wondered about interpersonal relationship skills? Are you born with it? learned at school? or taught by parents? through experience? But most of us are definitely not born with it. A poor interpersonal relationship skill can cause stress, misunderstanding, frictions between friends, co-workers, family members, etc. Your local college has wonderful business management class called "Interpersonal Relationship and Management class". Try it. You will soon find out what it takes and it means by "You are okay. I am okay."

5. Other very useful classes that will help out in career building are: Management 101, Ethics and Critical Thinking. Believe it or not, we are using management 101 skills in our daily activities with our family members, at the shopping mall, with vendors, with friends, etc. Did you try to solve an issue today? How did you handle it? Are you sure you didn't decide in haste? What are Fallacies? Can you identify a fallacy when you see or hear one? Why not learn to identify them and learn to use it effectively.

That's all for now.
From Bee with Style