While checking out one of my favorite blog site HappyHomeBaking.Blogspot.com, I came across her Matcha Milk Bread Recipe. I tried her recipe for Matcha Milk Bread with Red Bean Paste - AZUKI. It turned out great. This is from her link to another site where HOKKAIDO MILKY LOAF recipe was listed ( http://schneiderchen.de/ ). I tried to gather as much similar ingredients as I can, but unfortunately I do not have Powder Milk in my pantry. So, I substituted it with Coconut Powder (20g) and Matcha (Green Tea Powder, 10g). Truly as described at happyhomebaker that while the dough is being kneaded, it was very sticky. I decided to use my "Artisan" Kitchen Aid Mixer with dough hook. As the photos show below, the dough looks very sticky - sticks to the mixing bowl. I started to mix the dough around 8:40 pm and finally got the glutenous shiny dough around 9:35 pm. It was worth the wait. The doughs are rising right now. Cant' wait to see the result. They will likely be baked at the crack of dawn.
 Mix all dry ingredients as listed at http://schneiderchen.de/ HOKKAIDO Milky Loaf Recipe. But I only had 179 g of Bread Flour left in the pantry, so I had to improvise by substitution, 1 C High Gluten Flour Plus 1 C All Purpose Flour = 353 g to make up the total 540 g of Bread Flour the recipe called for.
I warmed up the milk and heavy cream in the microwave a bit. Warmed up the whole egg in a bowl of warm water also.
Mixed warm milk, heavy cream, and beat the egg together a bit with a small whisk.
As you can see the dough is very sticky - sticks to the dough hook and the side of the mixing bowl for the first 30 minutes.


Stop the mixer and scrape the bowl. As you can see, the dough is very sticky. The gluten has not finished developing to the consistency I want - shiny and smooth.
Finally, close to an hour. Stopping and scraping the bowl at least 5 times. Noticed the dough started to leave the side of the bowl and started to show the shine and smooth surface.
At this time, you should almost clearly see the bottom of the bowl.
Stop the mixer. And roll it out to a work surface. I did not use more than 1/2 tsp (half tsp) of Bread Flour on my "glass" cutting board (because my kitchen surface is "tile" surface")
The dough is smooth and did not stick to my hands at all.


Cut them into 4 equal sizes. 282g each. Roll and Tuck. After thought: Dividing into 3 portions maybe better. The recipe called for 13x33x12 cm load pan. If I had 7x4x4" Pullman Loaf pan, it would have helped also... the size matters. :-) Placed in the square cake pan for the 1st rise...
After looking at the photo of the HOKKAIDO Milk Bread at Angies' website, it looks like the breads were baked in a large Pullman loaf pan right next to each other. (Beautifully baked.)
I though I would use my 9x9 square cake pan to proof and bake after the 1st rise in it. (It's sprayed with Vegalene). Well, decided not to take the risk at my 1st try with this recipe.
 After the 1st rise, I transferred the dough into my large Roasting Pan.
 I quickly rolled each one out on my flat glass cutting board... as I have tiled counter. Then, rolled the dough out, roll and tuck and placed in the roasting pan.
As it was already 11 pm. I decided to just cover the pan with the lid and went to sleep.
Truthfully, I use this roasting pan for many other bread baking. Something about this "dark" coating and the lid that it produces wonderfully baked bread. I have been having a great baking result with my Mediterranean Olive Bread or the No-Knead Bread. After the perfect beautiful 2nd rise, I put the pan in the oven to bake at 345'F. Recipe called for 40 min. baking time.
At:5:30 am, the doughs were well doubled to their beautiful Loaf size. I preheated the oven to 345'F.

 A glass pan with HOT water was placed at the bottom of the oven to provide some steam.... this is called for in the original recipe, but it has been my habit to place a pan of hot steaming water in the oven when I bake bread. It's like doing the job of "steam injection"of the commercial oven. I egg wash on the doughs. Started the bake time at 5:55 am.
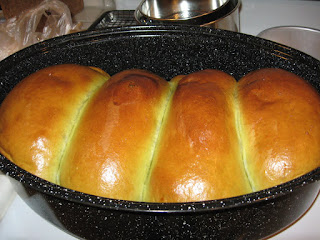 The bread was beautifully baked after 35 minutes.
Due to the timing - had to leave for work. I loaded the hot pan into my van & in the hasty loading of cutting board and serrated knife and packing Ziplock bags, I unpanned the beautiful bread... My car smelled wonderful... and the bread looked wonderful.


 This is a successful Matcha Milky Bread.


Due to the timing - had to leave for work. I loaded the hot pan into my van & in the hasty loading of cutting board and serrated knife and packing Ziplock bags, I unpanned the beautiful bread... My car smelled wonderful... and the bread looked wonderful.
But the bread started to deflate while I started to drive. ... but not in a bad way.... What I mean is that I am expecting this to be very soft tender bread as I have tasted it to be so when I purchase the Milky Loaf Bread from the Asian Market. ($3.99 for half a loaf!!)
The bread actually deflated to half it's size. I am not sure if the bread would have stayed tall and true even if I had waited for 15 minutes minimum before unpanning.


Regardless, the bread's texture is soft and well developed.
Love the chewy tasty flavors.

I read at one of the blog site about this "Steam Baking Master Pan" for French Bread, etc. The design make sense, and I would like to get hold of one and test it myself.
Well, for now, I am very happy with this Milky Loaf recipe.


